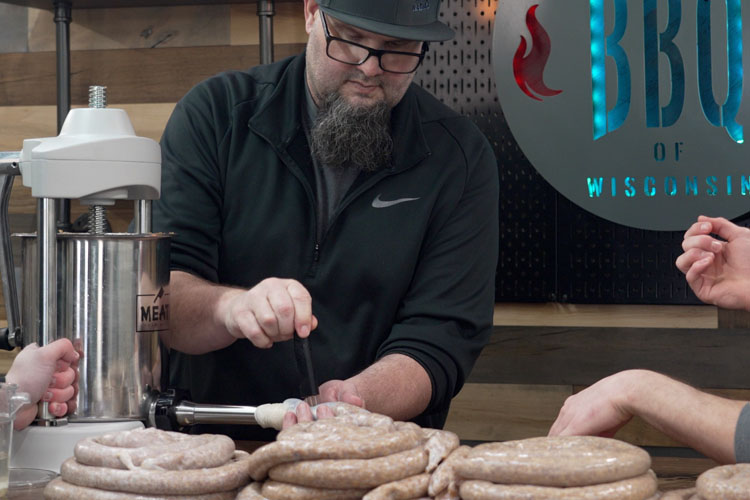
You might hear it called Polish kielbasa sausage, which technically refers to all types of Polish meat sausage and is a staple of the local cuisine.
A lot of people shy away from attempting to make sausage at home. But I promise it’s not as complicated as you think, whether you want to make Polish sausage, German-style bratwurst, or breakfast sausage links.
Follow these step-by-step instructions and my top tips for how to make Polish sausage at home, and you’ll soon be a pro.
Polish Sausage
Ingredients you’ll need
- Boneless pork butt
- Seasoning – you can use a PS Seasoning kit, which includes No. 379 Blue Ribbon Smoked Polish Seasoning, maple cure, and natural hog casings. Alternatively, my homemade seasoning recipe is in the recipe card below.
- Cure – maple cure or Cure #1 in our homemade seasoning.
- Natural hog casings – if you’re not using a kit, you can buy these separately at PS Seasoning or on Amazon.
Equipment you’ll need
What meat should I use for Polish sausage?
Kielbasa is predominantly a pork-based sausage, so I’m using 25 lbs of boneless pork butt.
A pork/beef combination is another popular option. If you want to go down this route, I recommend 15 lbs of pork butt combined with 10 lbs of chuck roast.
The ins and outs of sausage cure
There are 3 main reasons we add a cure to our homemade Polish sausage recipe:
- It gives the meat that quintessential smoked, deep pink color. Without the cure, your sausage will take on an unattractive grey hue.
- Enhances flavor.
- It kills harmful bacteria that cause foodborne illnesses.
Besides this, if you don’t use a cure, you must let your sausages ferment in the fridge for another 24 hours.
We use Cure #1 (sodium nitrite) in our homemade seasoning, and the PS Seasoning kit includes a maple cure.
Pro tip: Use a cure with either sodium erythorbate or encapsulated citric acid to massively speed up the process. You’ll thank me later.
My #1 sausage-making tip
If there’s only one sausage-making tip I can pass along to you, it is to keep your meat and equipment as cold as possible to avoid the dreaded “smear.”
You ideally want your meat to be below 35°F before grinding, so keep it in the fridge or freezer between each step. I keep my studio cool, but you can also place the grinder head in the freezer beforehand—whatever it takes!
If you want more sausage-making tips, I’ve filmed a video where I talk about the gear I recommend and go through my process.
[TAG1]
How to make Polish sausage
1. Prep the casings
The first step is to rinse the salt from your natural hog casings and soak them in warm water for an hour. Repeat this process for another hour and you’ve got extremely pliable casings.
Sometimes, I do this the night before, leaving them soaking in half a teaspoon of baking soda in the fridge.
Pro tip: Store leftovers in the fridge (not the freezer) in a container filled with salt water and they’ll keep for up to 4 months.
2. Prep the meat
Trim the pork butt into cubes that will fit in your grinder. Grab your seasoning, disperse it over the top, and mix it in with gloved hands.
3. Grind
I’m doing one pass on a coarse grind (⅜” or an 8-10mm plate) for this Polish sausage recipe.
A coarse grind equals a more crumbly texture and more visible chunks of sausage, like what you’d expect in pepperoni or salami.
Head here to learn more about grinding meat.
Hot tip: If using a combination of pork and beef, do a second grind with a 3/16” (4.5mm) plate.
4. Mix
I hand-mix my seasoning but then blend the cure with an electric mixer. I mix for around 5 minutes to get that nice protein extraction. What that means for you is no dry and crumbly smoked sausage.
You’ll know when the meat mixture is ready for the next step when the meat sticks to your hand and doesn’t fall off when you turn your hand upside down.
5. Stuff
Now, it’s time to thread your casings onto the horn and stuff your sausage. I recommend keeping the horn and casings moist to prevent rips.
Pack the ground pork tightly into the sausage stuffer to remove air pockets.
Slowly feed the ground meat into the casing, ensuring you don’t overstuff.
When you fill the casings, you only want to fill them 3/4 full. You want to leave room so it’s easier when twisting the links.

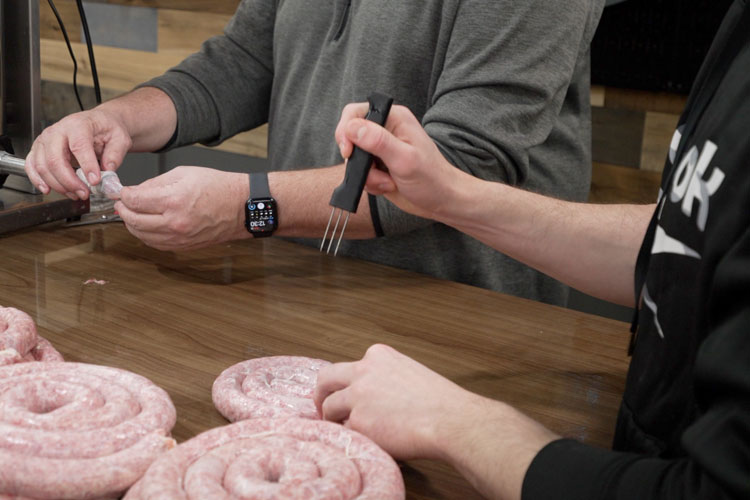
You can remove air pockets as you go with a sausage pricker.

If you find any afterward, you can easily remove them as well.
There are a lot of different ways to form the links. The way I found easiest is to measure out the first link, pinch, then move over and pinch the second link, then twist.
If the sausage doesn’t feel plump, or a little loose, twist it up some more to tighten it up.
Once you reach the end, tie a knot in the casing.
Snip between each link to create individual sausages.
6. Smoke
As mentioned, the PS Seasoning kit contains sodium erythorbate, so the sausages can go straight into the smoker.
I place mine on wire racks for easy rotation, which I recommend doing at every temperature increase.
The key to smoking Polish sausages is to keep the temperature low and smoke them slowly for 5 to 6 hours.
I start at 110-120°F to dry the casings out for an hour. Then I increase the temperature to 130-140°F and add my sawdust to get the smoke rolling for 2 to 3 hours.
Then, it’s time to increase the temperature to 170°F. Keep them smoking until they reach an internal temperature of 155°F.
Pro tip: Using a pellet grill instead? Run it at the lowest setting for an hour, then increase the temperature to 200°F until they reach the same internal temperature.
7. Cool down
Remove the smoked sausage from the smoker and immediately place them in an ice bath to stop cooking.
After 30 minutes, place them back on the wire racks at room temperature or in the turned-off smoker to “bloom” for an hour.
If you’re not in a rush, I recommend placing the wire racks in the fridge for another 24 hours to let them air dry and enhance the flavor.
They’ll keep in the fridge for a couple of weeks. But if you vacuum seal them, they’ll keep in the freezer for several months.
Put your skills to the test
Now you’ve successfully made homemade kielbasa sausage, test out your sausage-making skills with these recipes:
Print
How to Make Polish Sausage
Smoked sausage with the flavors of garlic, black pepper, and marjoram.
Course Main Course
Cuisine Polish
Prep Time 3 minutes minutes
Cook Time 6 hours hours
Total Time 6 hours hours 3 minutes minutes
Servings 70 sausages
Author Jeff Rice
Homemade seasoning (optional)
- 205 g salt
- 28.5 g Cure#1
- 22.8 g black pepper ground
- 40 g garlic
- 11.4 g dried marjoram
- 4 cups cold water
Rinse the salt from the natural hog casings and soak them in warm water for an hour. Repeat this process for another hour.
Trim the pork butt into cubes that will fit in your grinder.
Add seasoning and mix it in with gloved hands.
Do one pass on a coarse grind (⅜” or an 8-10mm plate).
Mix in the cure with an electric mixer for 5 minutes. It’s done when the meat sticks to your hand when turned upside down.
Pack the ground meat tightly into the stuffer to remove any air pockets.
Feed the casing onto the horn. Tie a knot at the end of the casing.
Slowly feed the meat into the casing, filling it up ¾ full.
To form the links. Measure out the first link, pinch, then move over and pinch the second link, then twist. Continue until all the links are made. Tie a knot in the end. Snip between each link.
Place sausages on wire racks and in your smoker, rotating them every time you increase the temp.
Start at 110-120°F to dry out the casings for an hour, then increase the temperature to 130-140°F and add the sawdust to get the smoke rolling for 2 to 3 hours.
Increase the temperature to 170°F until they reach an internal temperature of 155°F.
Remove the sausages from the smoker and immediately place them in an ice bath for 30 minutes.
Place them back on the wire racks at room temperature to “bloom” for an hour before placing them in the fridge for another 24 hours to air dry.
Store sausages in the fridge for a couple of weeks or vacuum-sealed in the freezer for several months.
Did you miss our previous article...
https://manstuffnews.com/backyard-grilling/how-to-safely-defrost-ribs
 Backyard GrillingWeekend WarriorsAdvice from DadBeard GroomingTV Shows for Guys4x4 Off-Road CarsMens FashionSports NewsAncient Archeology World NewsPrivacy PolicyTerms And Conditions
