I’m here to reassure you that making homemade summer sausage isn’t as complicated as it looks. It’s just a lesson in patience, as you have to put in the time. But trust me, the result of a big batch of flavorful smoked summer sausage makes the extra effort worthwhile.
Summer sausage, wine, crackers, and cheese are a match made in heaven. I also love to enjoy it on a sandwich. It’s got a lovely semi-dry sausage texture similar to salami.
Follow the instructions below, and watch the accompanying video which shows you step-by-step how to make summer sausage at home.
Homemade Summer Sausage
Ingredients you’ll need
- Sausage kit – I’m using half of the Garlic Summer Sausage Kit from PS Seasoning. The kit makes a 25 lb batch. It includes:
- No. 405 Garlic Summer Sausage seasoning – consists of garlic, spices, and paprika. Other common spices used for summer sausage are mustard seed, black pepper, coriander, allspice, and ginger. PS Seasoning has an extensive and affordable range of summer sausage seasonings if you want to change it up.
- Maple cure – salt, maple sugar, white sugar, and sodium nitrite.
- Sodium Erythorbate – the real cure accelerator.
- 2.5″ x 14″ mahogany fibrous casings – I recommend using either fibrous or collagen casings for summer sausage.
- Chuck roast
- Boneless pork butt
- Encapsulated citric acid – optional, but it speeds up the process and adds a tang.
- Non-fat dry milk – a great binder to retain moisture (water and natural juices) in your meat.
Equipment you’ll need
How did summer sausage get its name?
The fermented sausage predates refrigeration, so it was frequently consumed in summer when the high temps caused fresh meat to spoil.
What type of meat is in summer sausage?
Summer sausage typically includes a combination of beef and pork or just beef. However, some people also like throwing in wild game like venison. You can do a 75/25 or 80/20 ratio of beef to pork; whatever works for you.
I’m making a 12.5 lb batch of summer sausage with 7.5 lbs of chuck roast and 5 lbs of boneless pork butt.
Chuck roast is excellent for sausage as it already has a decent amount of fat and flavor. I also always make sure I include the pork butt’s fat cap in the sausage mix. Always use fresh, quality, chilled meat for best results.
How long does it take to make summer sausage?
Realizing that making sausage takes time and that patience is key is essential when making summer sausage. If you follow my directions, you’ll need a day to make it.
There’s prepping, then smoking the sausage for six and a half hours, drying them out for two hours, and resting them for 24 hours before serving.
Summer sausage curing
Let’s talk about curing for a second. The maple cure I use includes nitrites, which both preserve the meat’s red color and kill harmful bacteria. It’s a 2-for-1 deal.
If you want that old-fashioned fermented tang you’re used to tasting in store-bought summer sausage, add encapsulated citric acid or traditional starter culture (Bactoferm F-LC Culture).
The latter converts meat sugars into lactic acid, lowering its pH and enhancing shelf life. The kicker is you need to add a fermentation cycle.
To speed up the process, I’m using citric acid instead. When mixed with the cure, it acts as an accelerator. If you decide not to use it, place the stuffed sausage back in the fridge overnight to ferment before stuffing and smoking it in the morning.
The best sawdust for smoking summer sausage
Hickory is a popular wood for all types of smoking. I used it for this summer sausage recipe and highly recommend it. The hickory smoke flavor is evident in the final product.
How to make Summer Sausage
1. Prep the meat
Cut the chuck roast and pork butt into cubes small enough to fit down your grinder.
Place the cubed meat into a large container, add seasoning, and mix it in by hand.
Once the meat is well coated, place it in the grinder’s hopper.
2. Grind the meat
Pass the meat through a coarse grind twice because I think it helps emulsify the meat, aids protein extraction, and distributes the fat better.
I use a 4.5mm (3/16) plate on the third grind. Once it’s done, I put the ground meat back in the fridge.
3. Prep the casings
Place the casings in a bowl of warm water.
Separate them with your hands, then let them sit until you’re ready to start stuffing (25 to 30 minutes is perfect).
4. Mix the meat
Load the ground meat into your mixer, first pushing it to the bottom.
Add the non-fat dry milk and the cure/water mixture before mixing the meat for about seven and a half minutes.
Slowly sprinkle the encapsulated citric acid over the top at the end while it mixes for another 30 seconds. You don’t want to overmix it!
Remove the meat from the mixer, place it in the fridge while you preheat your smoker to 120°F, and set up your sausage stuffer.
5. Stuff the sausage
Pack your canister tight with the sausage mixture. Rub some fat on the silicone O-ring before turning it to ¾.
Place one of the soaked casings on the horn and get stuffing!
I like to put a little pressure on the horn as it feeds through to reduce the risk of air pockets.
I leave a little room at the end of my sausages (about 2 inches). This gives you a little bit more slack when tightening them up.
Then, secure the ring around the end with your pliers.
6. Smoker setup
Your smoker should be preheated to 120°F so it’ll be ready to go.
Place the hanging rods on the top rack. I tie a little knot in a string attached to the sausage, hook it on, and place the hooks on the hanging rods.
Next, thread the internal temperature probes down the center of a sausage on either side as deep as you can get them.
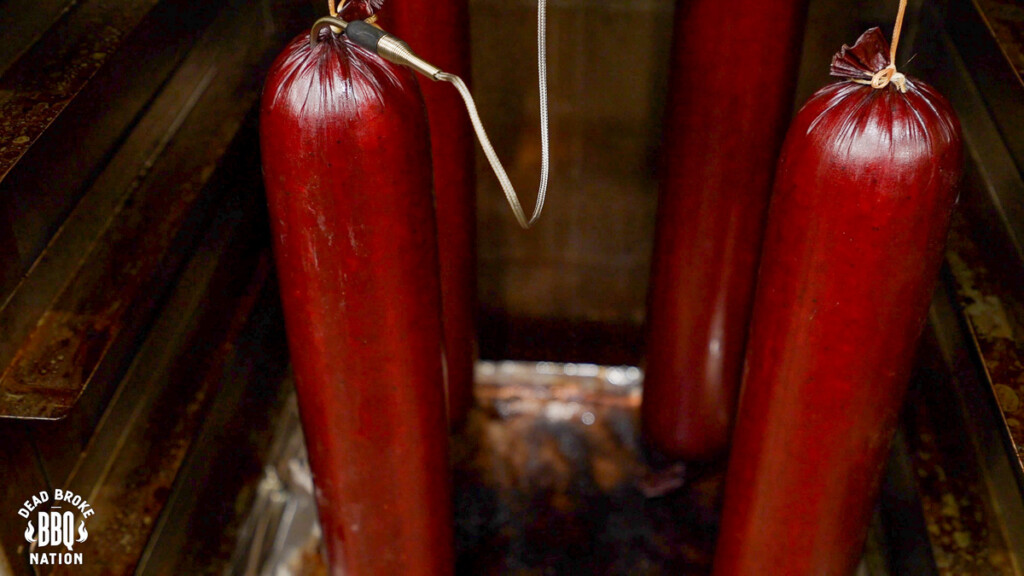
Set the timer for 30 minutes to let the sausages dry out before you start smoking.
7. Smoke the sausage
I’m using a ¾ pan of hickory sawdust mixed with about one cup of water. Mix by hand and make a well in the middle before placing the pan down the bottom of the smoker.
While you’re at it, add a little water to your smoker’s drip pan to prevent the summer sausages from drying out.
Turn your vertical smoker to 150°F, and set the timer for two hours.
After two hours, if you’re happy with the progress and amount of sawdust remaining, increase the temperature to 175°F and set another timer for two hours.
After this time, my summer sausages were sitting at an internal temperature of 126°F. I removed the sawdust pan, increased the temperature to 180°F, and waited until the sausages reached an internal temp of 150 to 155°F. My total smoking time was six and a half hours.
Hot tip: Gradually increasing the smoker’s temperature ensures your summer sausages don’t lose any fat or additives.
8. Cool them down
Remove the probes and place the summer sausages in a large container of ice water. I usually put a wire rack on top to keep them submerged, as we want them to stay under the water as much as possible.
Leave them in the ice bath for 15 to 20 minutes, then towel dry them off and hang them back in the turned-off smoker at room temperature. I like to call this the blooming process, but others call it resting.
We stopped the cooking process with the ice bath. Hanging them back in the pit allows some moisture to escape outside the casing and decreases the moisture level.
After about two hours, place them on a wire rack in the fridge for 24 hours.
9. Slice up and serve
After 24 hours, it’s time to slice into your summer sausage and serve it. You can easily remove the casing on individual slices.
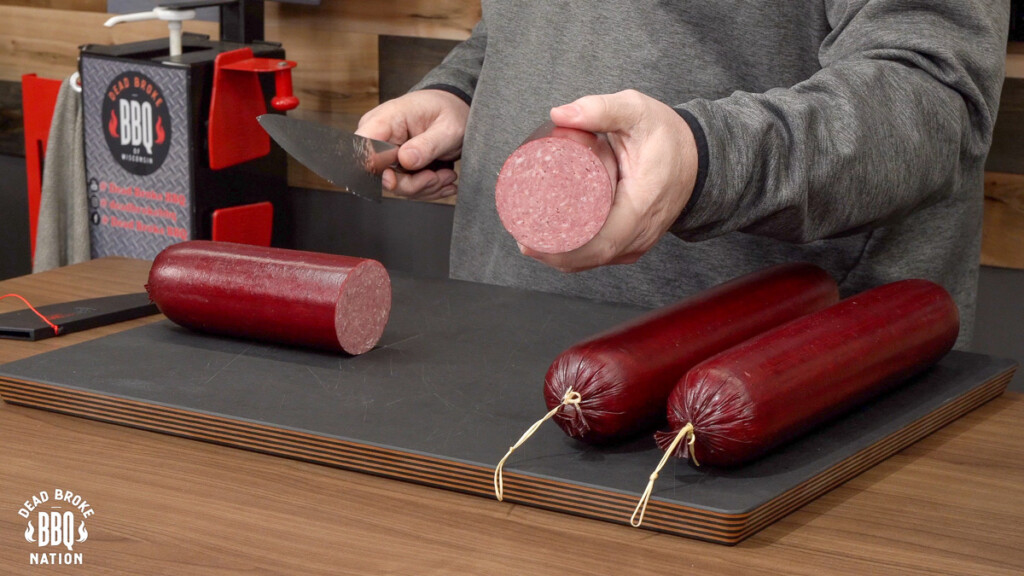
I like to use a vacuum sealer to store my excess summer sausage in the fridge or freezer.
When appropriately sealed, summer sausage will last three to four weeks in the refrigerator and several months in the freezer.
More sausage recipes
In the end, I couldn’t believe I had made this summer sausage – it tasted that good!
Follow this recipe, and I bet you’ll be just as impressed with your smoking skills. If you want to put those skills to the test further, check out these other sausage recipes:
Print
Homemade Summer Sausage
Similar to dry-cured salami, smokey, and salty with a bit of a tang.
Course Appetizer, Main Course
Cuisine American
Prep Time 2 hours hours
Cook Time 6 hours hours 30 minutes minutes
Resting Time 1 day day
Total Time 1 day day 8 hours hours 30 minutes minutes
Servings 4 big sausages
Author Jeff Rice
- 1 sausage kit seasoning, cure, and mahogany fibrous casings.
- 7.5 lbs chuck roast
- 5 lbs boneless pork butt
- 1.5 oz encapsulated citric acid
- 2½ cups non-fat dry milk
Cut up the chuck roast and pork butt into cubes small enough to fit down your grinder.
Place the cubed meat into a large container, add seasoning, and mix it in by hand.
Place meat into the grinder’s hopper and pass it through a coarse grind twice (using a 4.5mm plate on the last grind). Afterward, place ground meat in the fridge.
Place the casings in a bowl of warm water, separate them with your hands, then let them sit until you start stuffing.
Load the ground meat into your mixer, pushing it to the bottom. Add the non-fat dry milk and the cure/water mixture before mixing the meat for seven and a half minutes. Slowly sprinkle the encapsulated citric acid over the top at the end while it mixes for another 30 seconds. Do not overmix.
Remove the meat from the mixer and place it in the fridge while you preheat your smoker to 120°F.
Pack your sausage stuffer canister tight. Rub some fat on the silicone O-ring before turning it to ¾. Stuff the sausage into the casing placed on the horn. Leave about 2 " of room and secure the end with the ring and pliers.
Place the hanging rods on your smoker’s top rack. Tie a knot in a string attached to the sausage, hook it on, and place the hooks on the hanging rods.
Thread the internal temperature probes down the center of a sausage on either side. Set the timer for 30 minutes to let the sausages dry out before smoking.
Fill a pan ¾ full with hickory sawdust mixed with a cup of water. Mix by hand and make a well in the middle before placing the pan down the bottom of the smoker. Add a little water to your smoker’s drip pan.
Turn the smoker to 150°F, and set the timer for two hours. Increase the temperature to 175°F and set another timer for two hours. Remove the sawdust pan, increase the temperature to 180°F, and wait until the sausages reach an internal temp of 150-155°F (about another two hours).
Remove the probes and place the sausages in a large container filled with ice water. Place a wire rack on top to keep them submerged and leave them for 15 to 20 minutes.
Towel dry them off and hang them back in the turned-off smoker at room temperature for about another two hours.
Place them on a wire rack in the fridge for 24 hours before slicing, serving, and storing.
Did you miss our previous article...
https://manstuffnews.com/backyard-grilling/the-10-best-cuts-of-beef-for-smoking-when-youre-sick-of-brisket
