Are you looking for an easy and delicious way to prepare your Thanksgiving turkey on a Big Green Egg? If the fear of a dry, bland bird has kept you from volunteering to host, this recipe is your game changer. The secret to a centerpiece that guests will talk about until next November isn’t just the smoke; it is the brine.
The Power of the Brine
Don’t let the term “brine” intimidate you. While it sounds technical, it is essentially a saline solution that works a bit of holiday magic on your poultry. Through a process called osmosis, the saltwater solution travels into the meat, carrying with it the aromatics and sugars you have added.
This process does two critical things for your turkey:
- Moisture Retention: It creates a “hydration buffer.” This ensures that even if you overcook the bird slightly on the Egg, the meat remains succulent.
- Deep Seasoning: Unlike a dry rub that only sits on the skin, a brine seasons the meat all the way to the bone, breaking down tough muscle fibers for a more tender result.
The Lane’s BBQ Advantage
While you can certainly mix up a basic brine with salt and water, Thanksgiving is not the time for guesswork. Everything you need for a professional-grade bird is found in the Lane’s Ultimate Turkey Brine Kit… well, everything except the turkey, of course! This kit takes the heavy lifting out of the equation, providing a perfectly balanced blend of salt, sugar, and herbs designed to thrive in a smoky environment.
Now sit back, grab a glass of Beaujolais Nouveau, and let’s dive into the foolproof method for The Best Big Green Egg Smoked Turkey: A Complete Brining Guide.
Step 1: The Timeline and The Prep
To achieve the best results with a smoked turkey, you have to work backward. The most common mistake people make is rushing the process, which leads to rubbery skin or an unevenly cooked bird. For an 11-pound turkey, you need to begin this process three days before serving.
The Pre-Brine Checklist
- Fully Thawed: Ensure your turkey is completely thawed before you even think about the brine. A partially frozen bird will not absorb the salt solution, leaving the center bland and dry.
- The Liquid Ratio: For an 11-pound bird, you will need one gallon of water at the ready. This volume ensures the bird is fully submerged and that the brine concentration is perfectly balanced.
Buddha Note: Avoid the “Pre-Brined” Bird
Before you start, check the packaging of your turkey very carefully. You want a “natural” bird. Many grocery store turkeys are pre-injected with a salt solution (often labeled as “basted” or “containing up to 8% salt solution”). If you put a pre-injected bird into a brine, it will result in a salt-bomb that is nearly inedible. Look for turkeys that have no added ingredients or solutions listed on the label to ensure you have a blank canvas for the Lane’s Brine.
Why 3 Days?
- Day 1: Prepare the brine and submerge the bird.
- Day 2: The “Long Soak.” This is when the osmosis happens, pulling moisture into the protein.
- Day 3: The “Air Dry.” Removing the bird from the brine 24 hours before cooking allows the skin to dry out in the fridge, which is the only way to get that crispy, bite-through texture on the Big Green Egg.
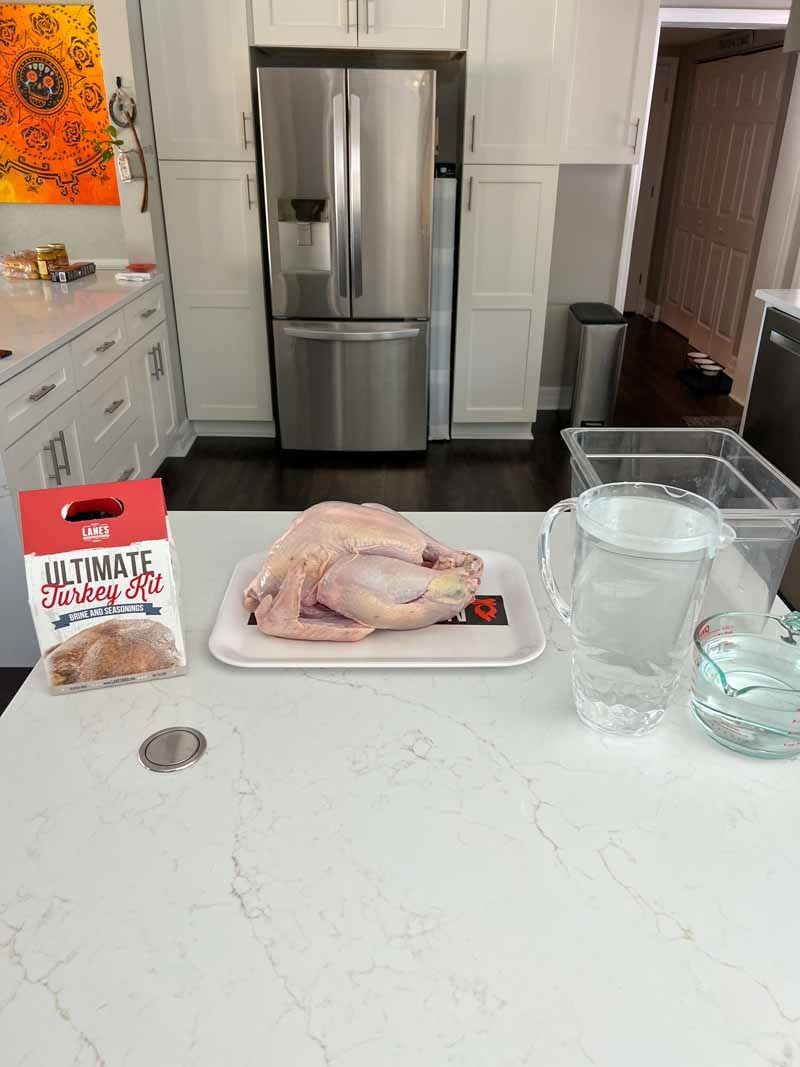
The Lane’s BBQ Ultimate Turkey Kit: What’s Inside?
While you can certainly source your components piece-by-piece, the Lane’s BBQ Ultimate Turkey Kit is designed to take the guesswork out of the biggest meal of the year. It provides a layered flavor profile that starts deep in the meat and finishes with a beautiful, mahogany crust.
The kit includes:
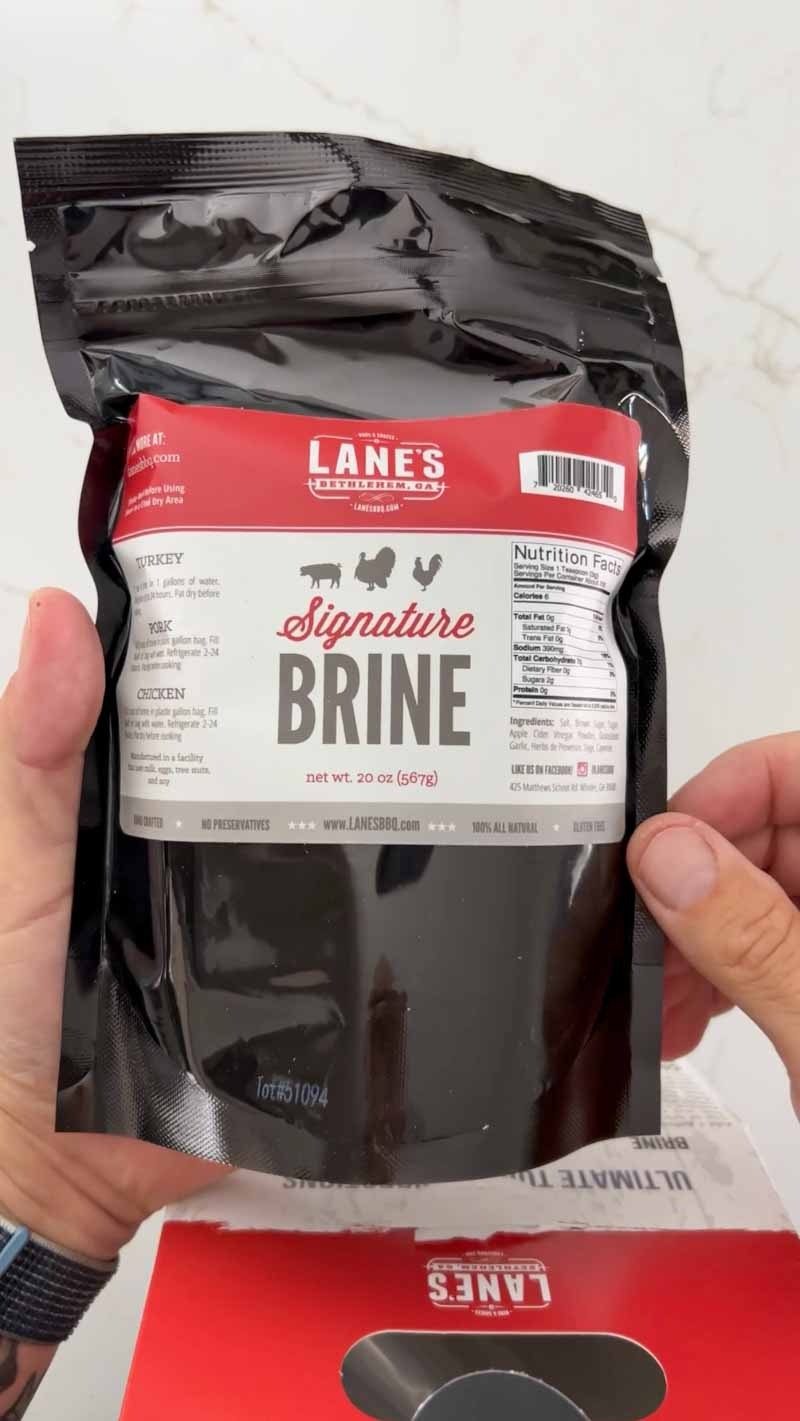
- Signature Brine: A balanced blend of salt and sugar infused with a specific herb profile that complements poultry.
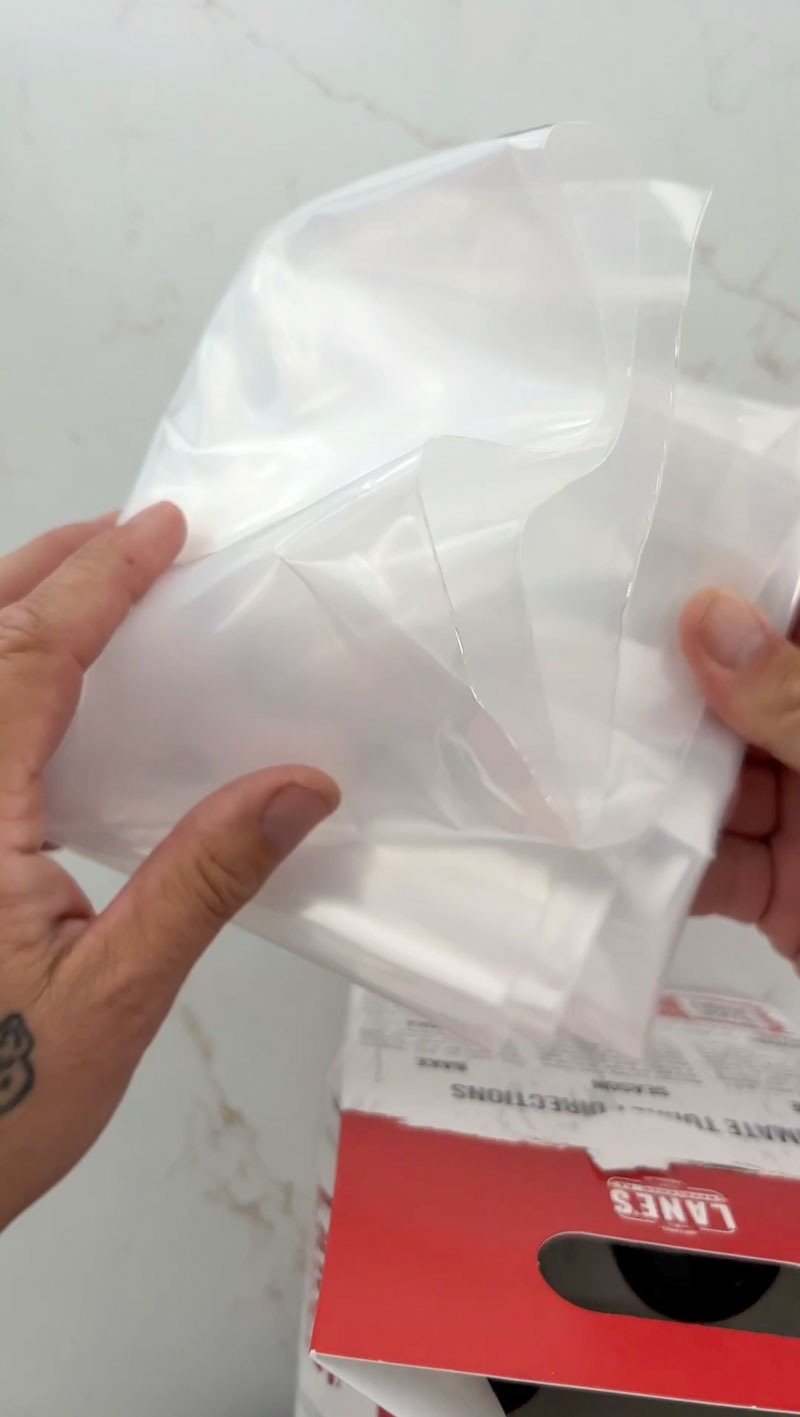
- Large Brining Bag: A heavy-duty, food-safe bag that is large enough for a big bird and strong enough not to leak in your fridge.
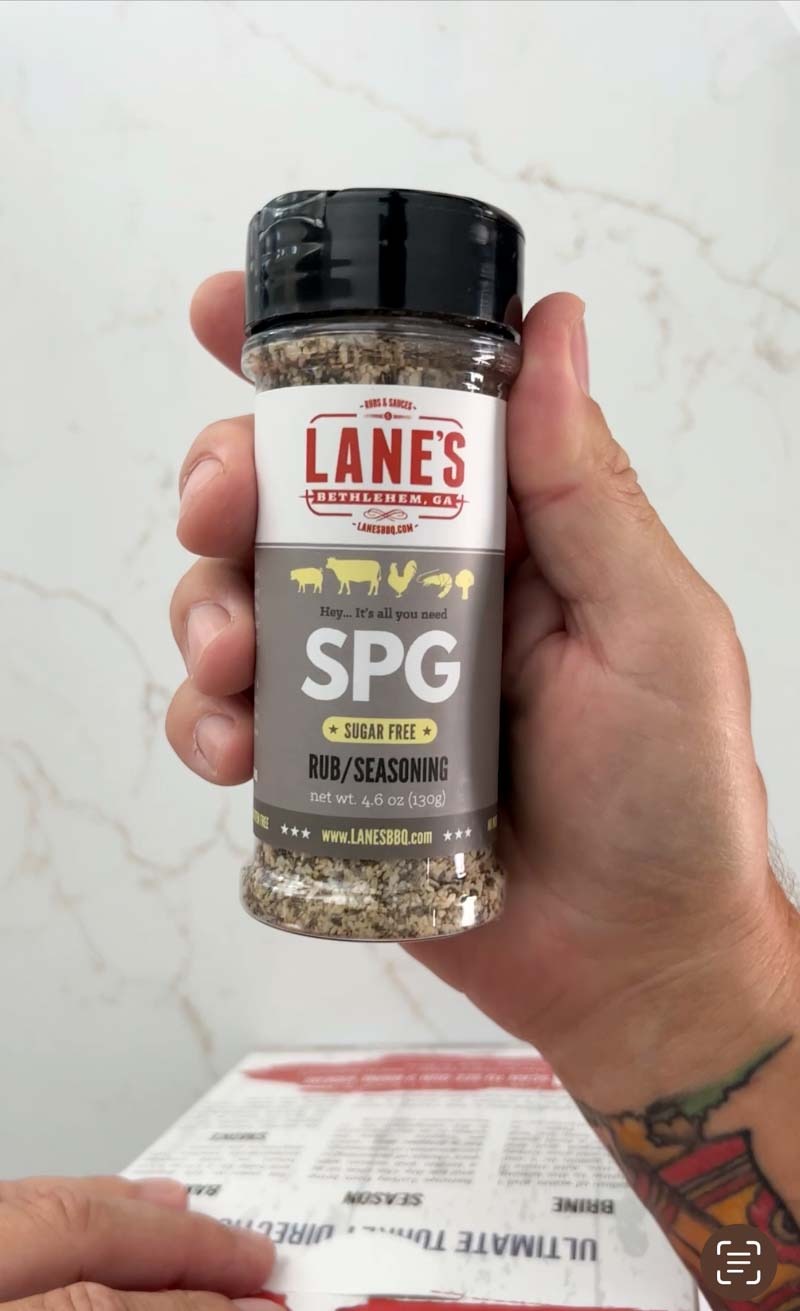
- SPG Seasoning: A classic Salt, Pepper, and Garlic base that provides the foundation of savory flavor.
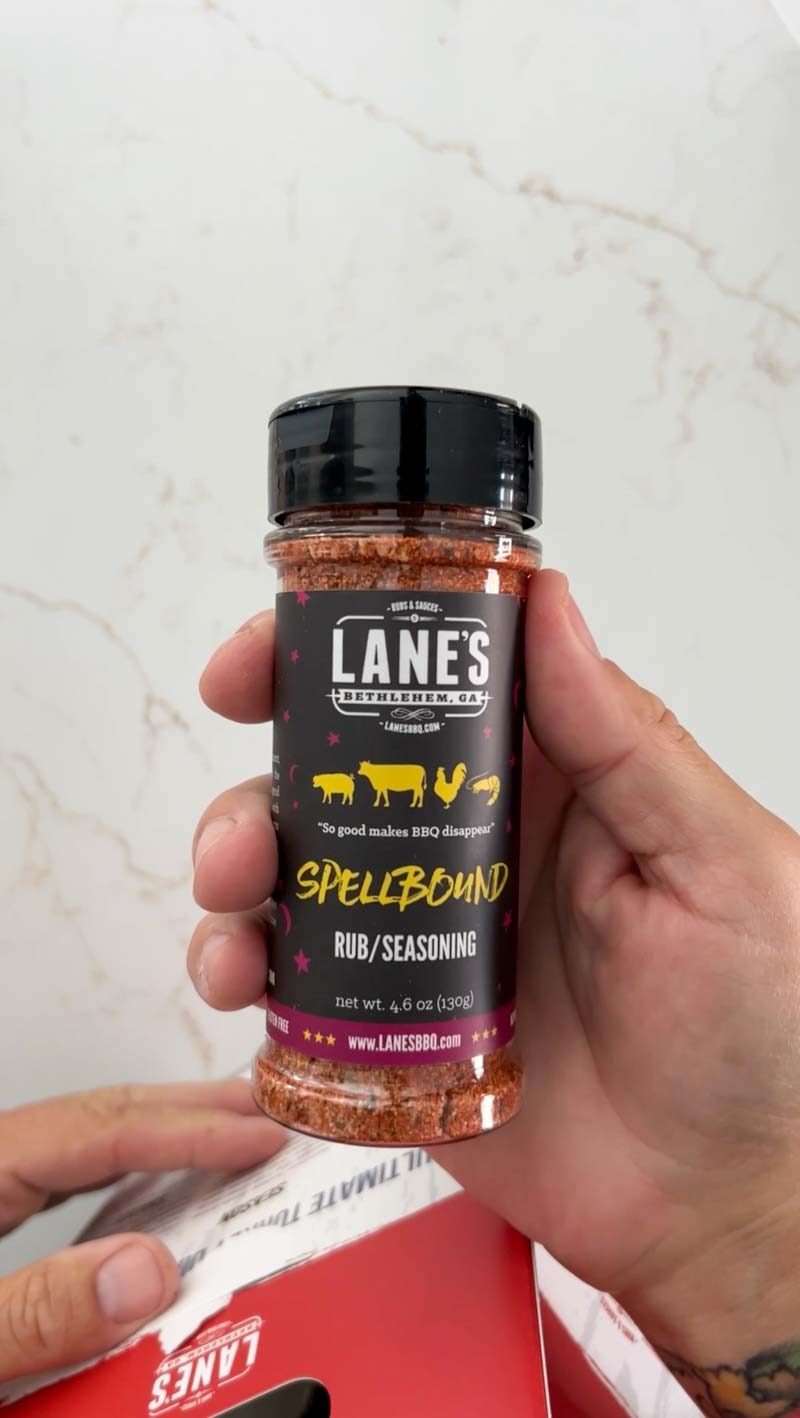
- Spellbound Seasoning: This is Lane’s “secret weapon.” It is a sweet and savory rub that provides that iconic reddish-brown color and a hint of sweetness that balances the salt from the brine.
Alternative Options for Your Bird
If you can’t get your hands on the Lane’s kit or prefer a different flavor profile, you have plenty of great options to ensure a moist turkey.
Other Top-Tier Brine Brands
If you are looking for other proven winners in the BBQ community, these brands offer excellent kits:
- Meat Church (Bird Bath): Extremely popular for its herbaceous, citrus-forward flavor profile.
- Kosmos Q (Turkey Brine): Known for being heavy on the moisture retention, perfect if you are worried about overcooking.
- Traeger (Orange Brine & Turkey Rub): A great option if you want a distinct citrus note to your Thanksgiving bird.
The DIY Route (The “Pantry” Brine)
If you want to go the old-fashioned way, you can build a basic brine with items you likely already have in your kitchen.
Basic DIY Brine Recipe:
- 1 gallon of water
- 1 cup of Kosher salt
- 1/2 cup of Brown sugar
- 2 tablespoons of Black peppercorns
- 4-5 cloves of Garlic (smashed)
- 2-3 sprigs of Rosemary or Thyme
- 1 Orange (sliced)
Pro Tip: If you go the DIY route, always boil half of your water first with the salt and sugar to ensure they fully dissolve. Then, add the remaining half as ice or cold water to chill the mixture down before the turkey goes in. Never put a turkey into warm brine!
Step 2: Mixing the Brine
Now that your bird is prepped and your water is ready, it is time to build the flavor bath. Precision matters here to ensure the salt concentration is high enough to tenderize but not so high that it overwhelms the meat.
The Perfect Ratio
Mix 1 cup of Lane’s Signature Brine with one gallon of water.
For the best results, use a large pot or a dedicated brining bucket. If you find the brine is not dissolving quickly in cold water, you can heat up one quart of the water, stir in the brine until dissolved, and then add the remaining three quarts of ice-cold water.
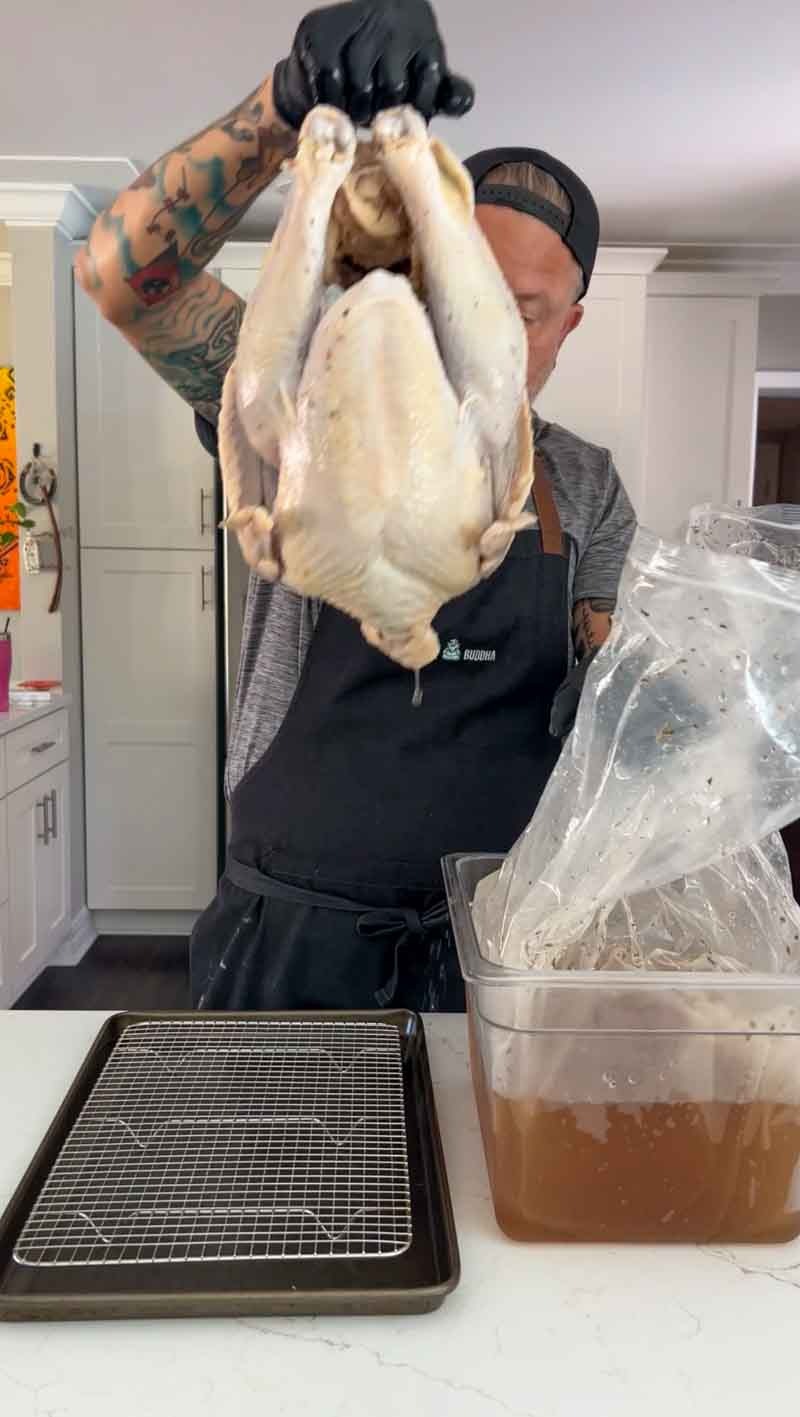
Submerging the Bird
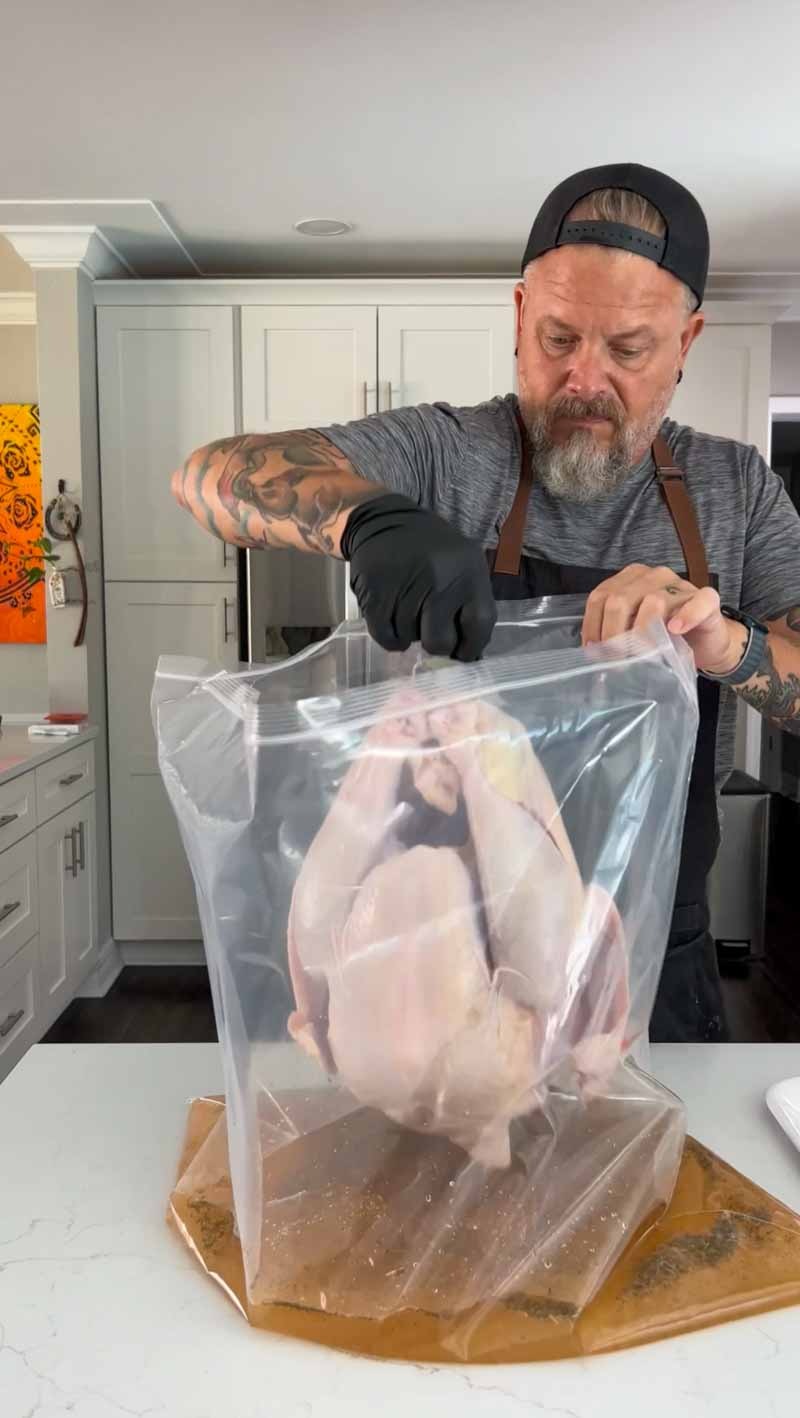
Place your turkey into the brining bag provided in the kit, then pour the mixture over the top.
- Pro Tip: Squeeze as much air out of the bag as possible before sealing. This forces the liquid to stay in constant contact with the entire surface of the turkey.
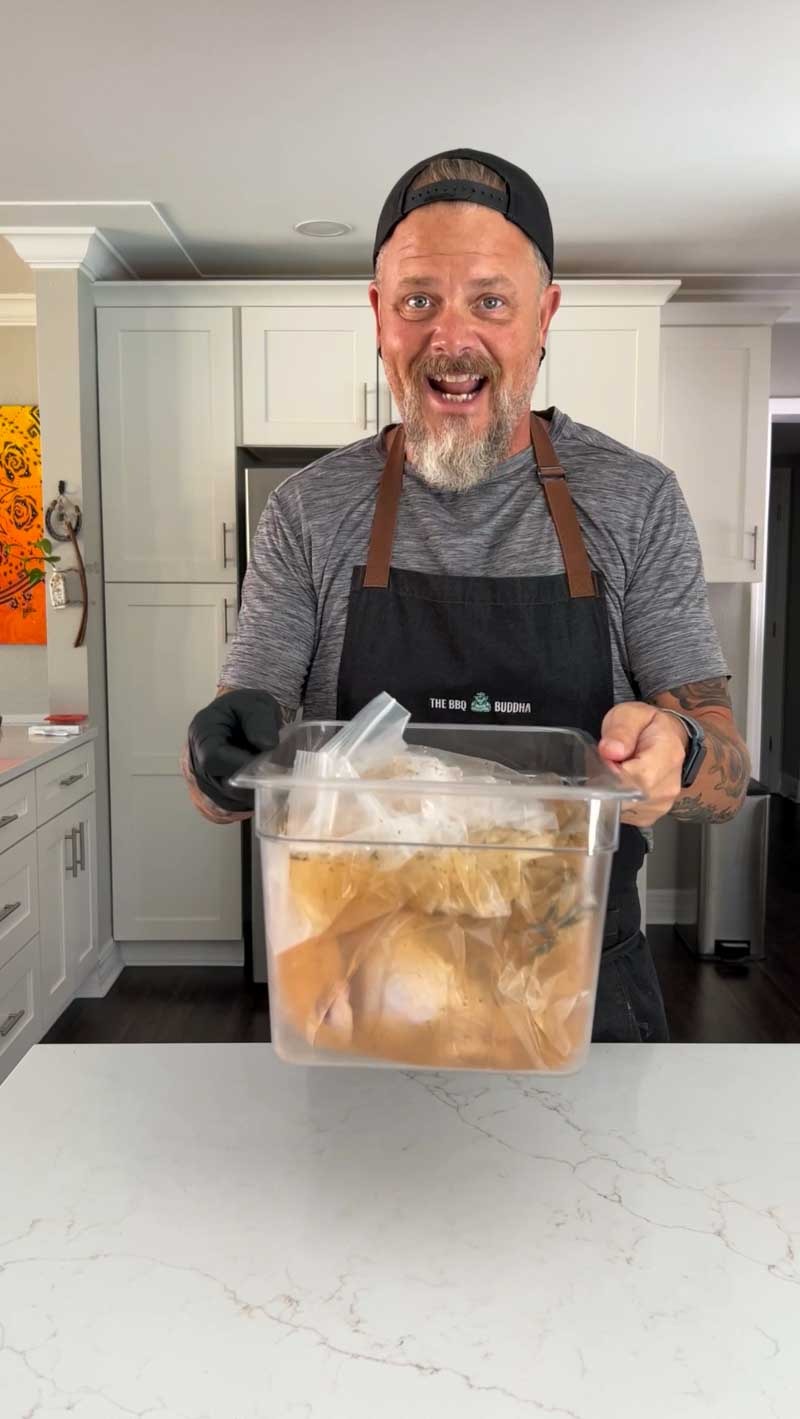
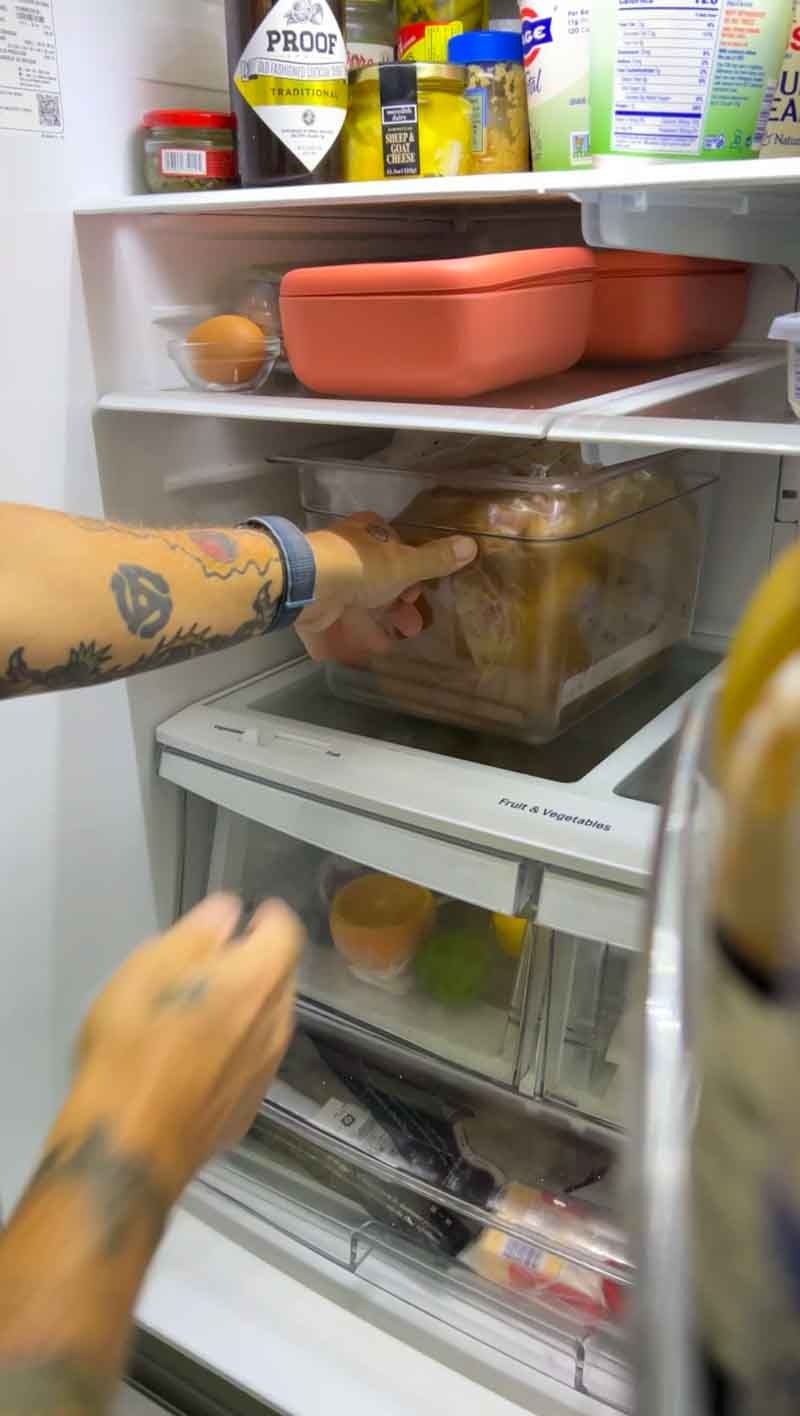
- The Safety Check: Place the bagged turkey inside a large roasting pan or a secondary bucket before putting it in the fridge. This acts as an insurance policy in case the bag develops a small leak.
Let the turkey soak in the refrigerator for 12 to 24 hours. For an 11-pound bird, 18 hours is usually the “sweet spot” for maximum flavor without making the meat too salty.

Step 3: The Critical Air Dry
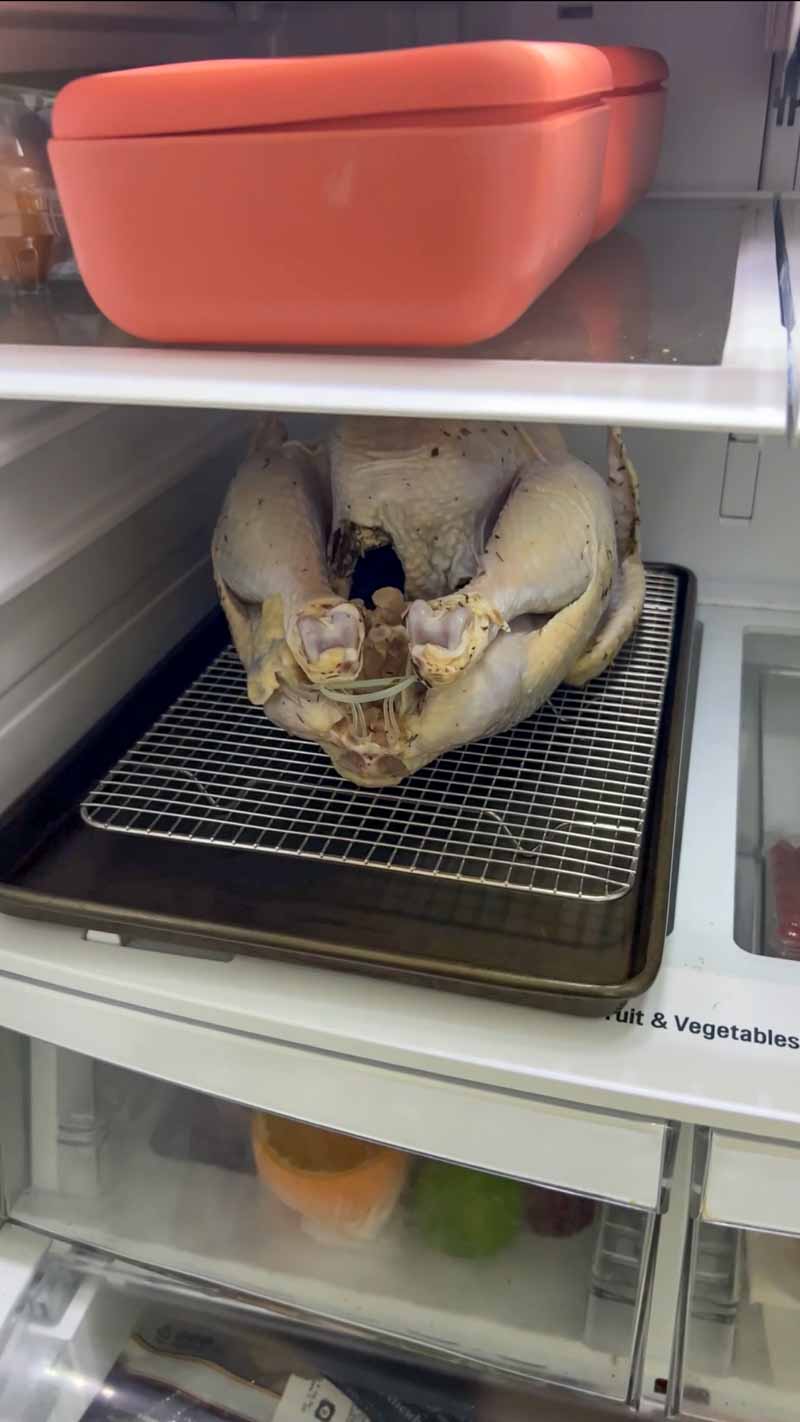
Once the brining time is up, remove the turkey from the bag and discard the liquid. Do not rinse the turkey. Rinsing just spreads bacteria around your kitchen and undoes the work of the brine. Instead, pat the bird thoroughly dry with paper towels inside and out.
Place the turkey on a wire rack over a baking sheet and put it back in the fridge, uncovered, for at least 12 to 24 hours (this is that “Day 3” we talked about earlier). This air-drying step is what allows the skin to become translucent and tacky, ensuring it crisps up beautifully on the Big Green Egg rather than turning out rubbery.
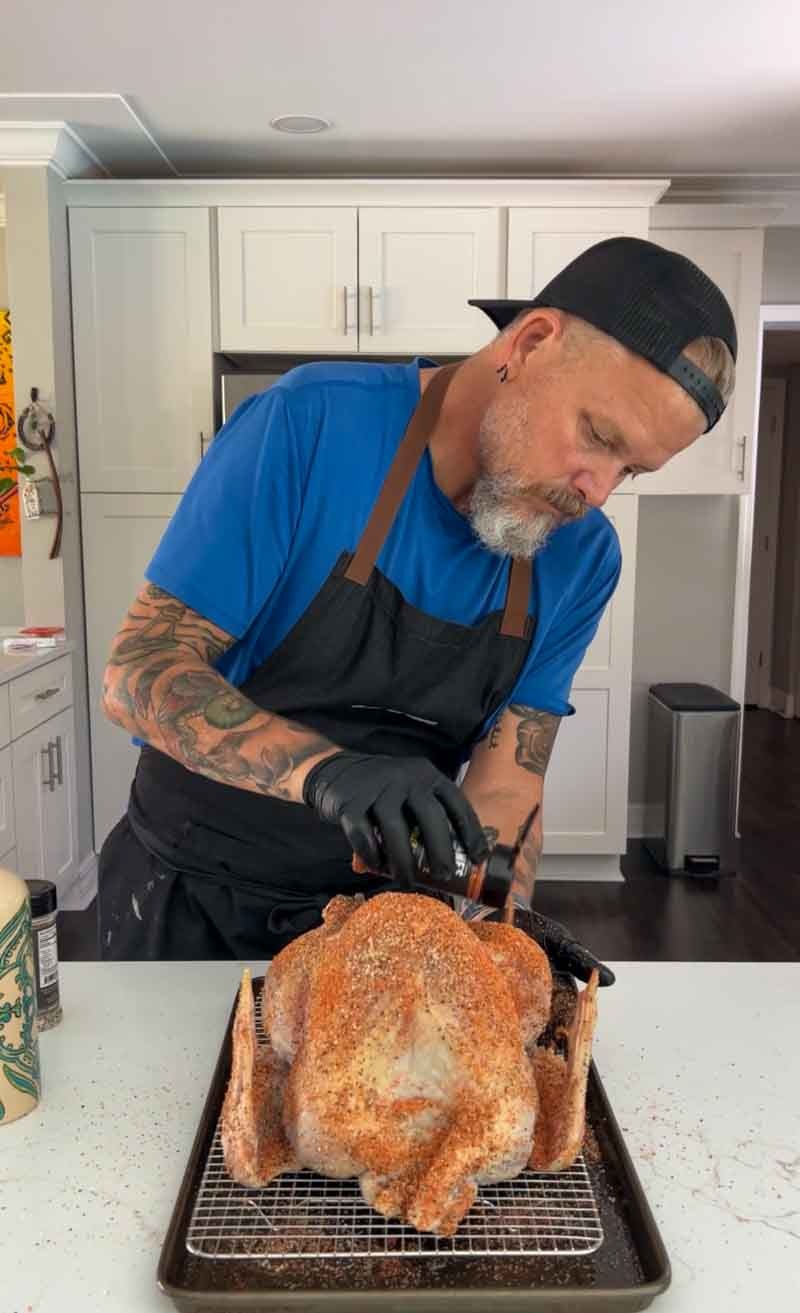
Step 4: Seasoning for Color and Flavor
After the turkey has spent the night air-drying in the fridge, the skin should look slightly translucent and feel tacky to the touch. This is exactly what we want. Now it is time to build the crust that will give your bird that gorgeous, photo-ready mahogany finish.
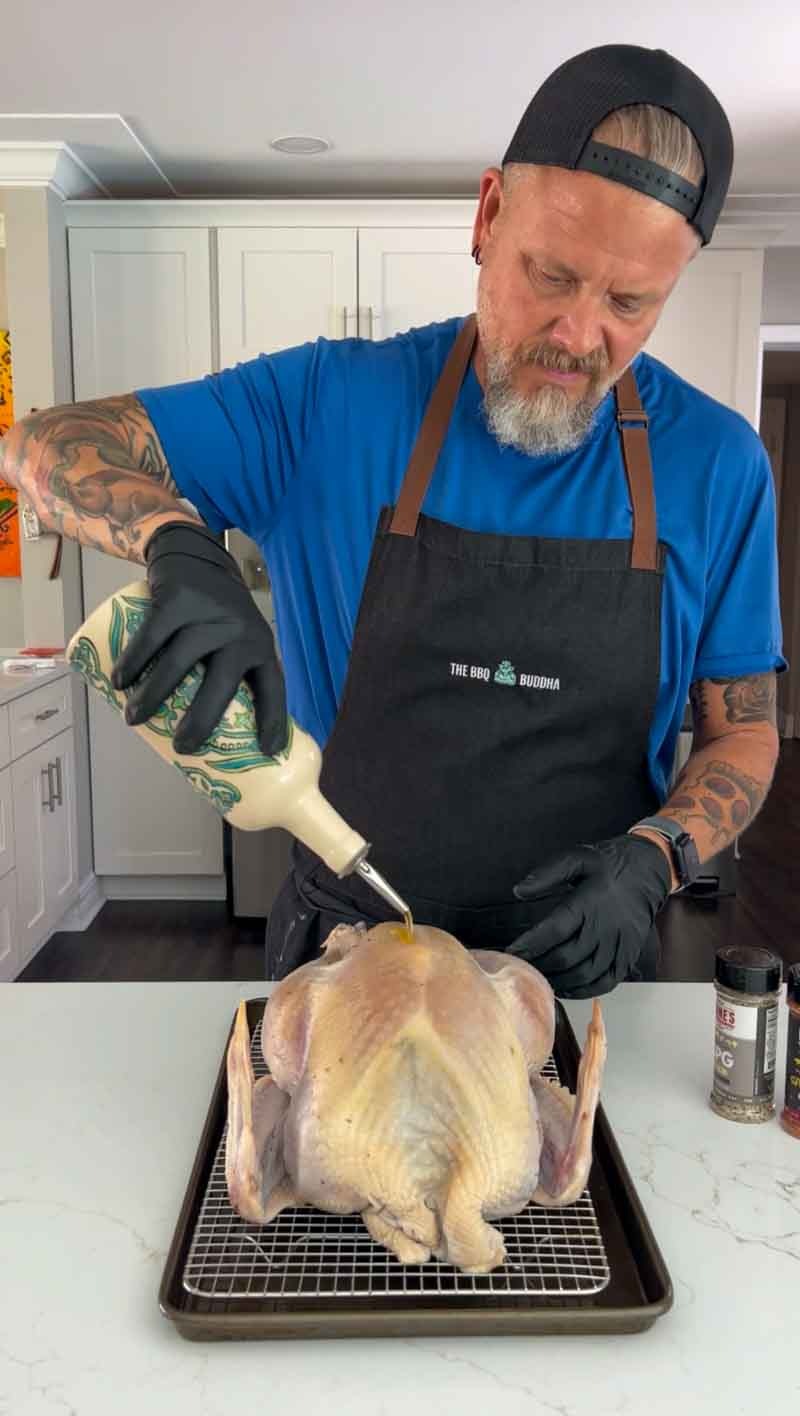
Applying the Binder
To ensure the spices stick to the skin and stay there throughout the cook, you need a binder. Lightly coat the entire exterior of the bird with 1 tablespoon of olive oil. You don’t need much; just a thin, even layer will do the trick.
The oil serves two purposes:
- It acts as the “glue” for your seasonings.
- It helps conduct heat to the skin, encouraging it to crisp up even further.
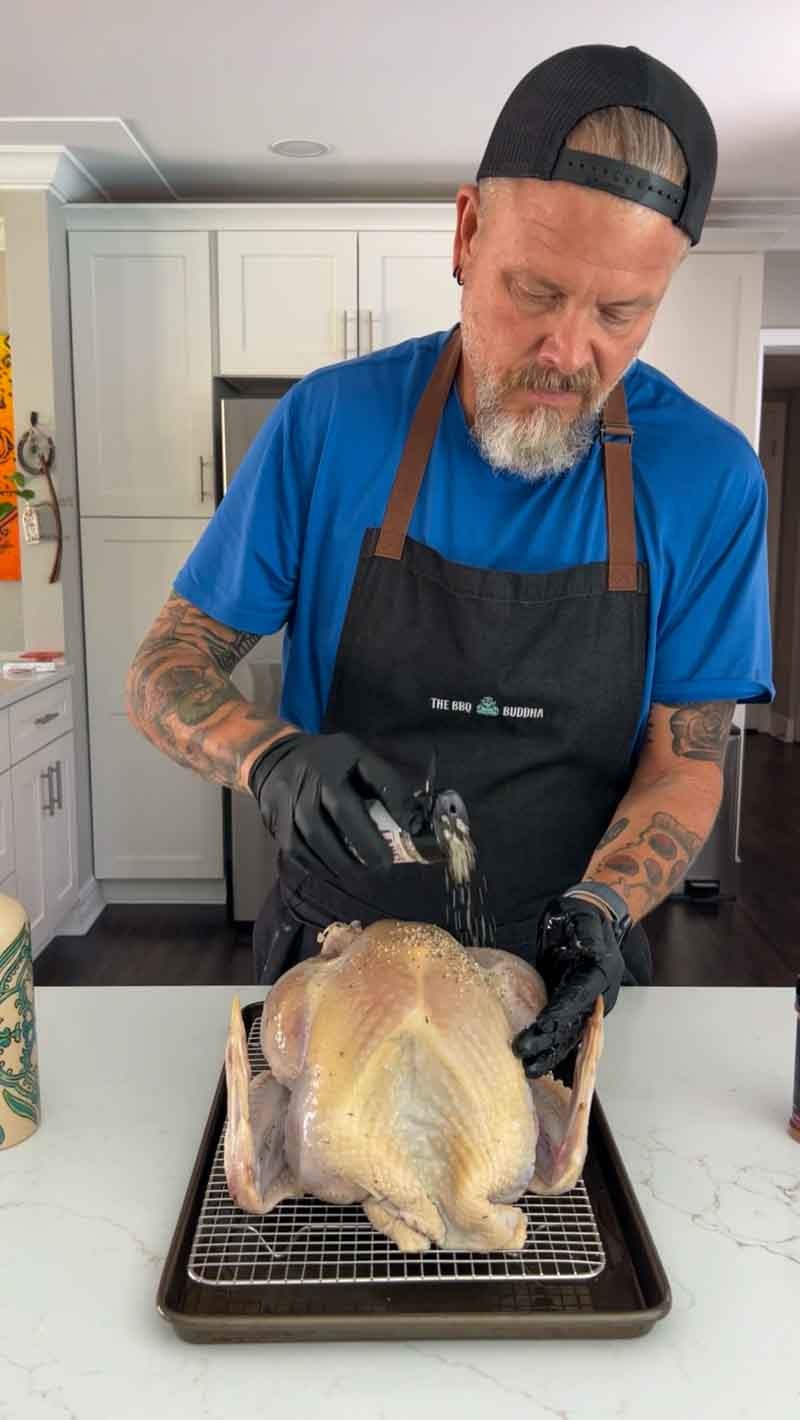
Layering the Flavor
Since we are using the Lane’s Ultimate Turkey Kit, we are going to layer the two seasonings for maximum impact.
- The Base Layer (SPG): Start with a steady hand and apply the SPG (Salt, Pepper, Garlic) first. This reinforces the savory foundation of the bird.
- The Color Layer (Spellbound): Next, follow up with a generous coating of Spellbound. This rub contains ingredients that caramelize beautifully under heat, providing that deep, rich color and a subtle hint of sweetness that defines a world-class smoked turkey.
Buddha Note: Don’t forget the cavities! While the skin gets the most attention, tossing a little seasoning inside the cavity (along with some aromatics like onion, celery, or citrus) will help flavor the bird from the inside out as it roasts.
Step 5: The Big Green Egg Setup
With your bird perfectly seasoned, it is time to prepare the grill. For this cook, we are aiming for a roasting environment that balances a clean wood fire with consistent, indirect heat.
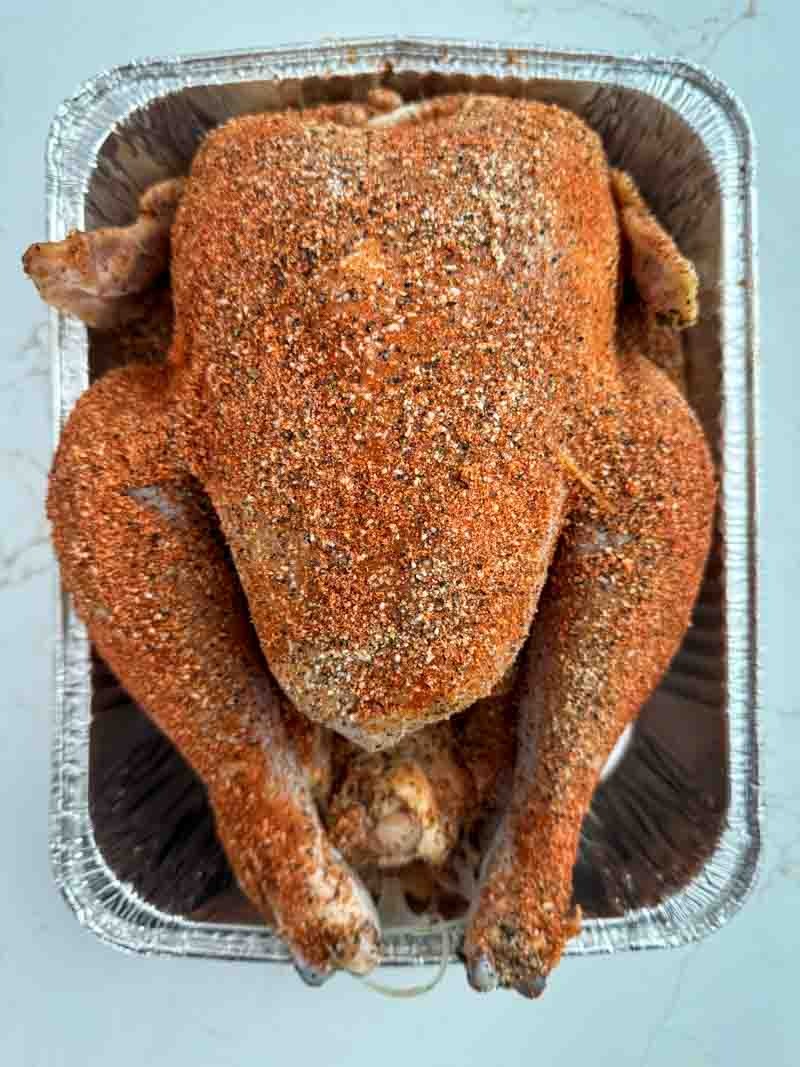
The Pan Prep
Place your seasoned turkey into a half-sized aluminum pan. Using a pan is a strategic move for two reasons:
- The Drippings: It catches all those liquid gold drippings that you will want for your gravy later.
- The Cleanup: It keeps your ConvEGGtor clean and makes moving the bird on and off the grill much easier.
The Grill Configuration
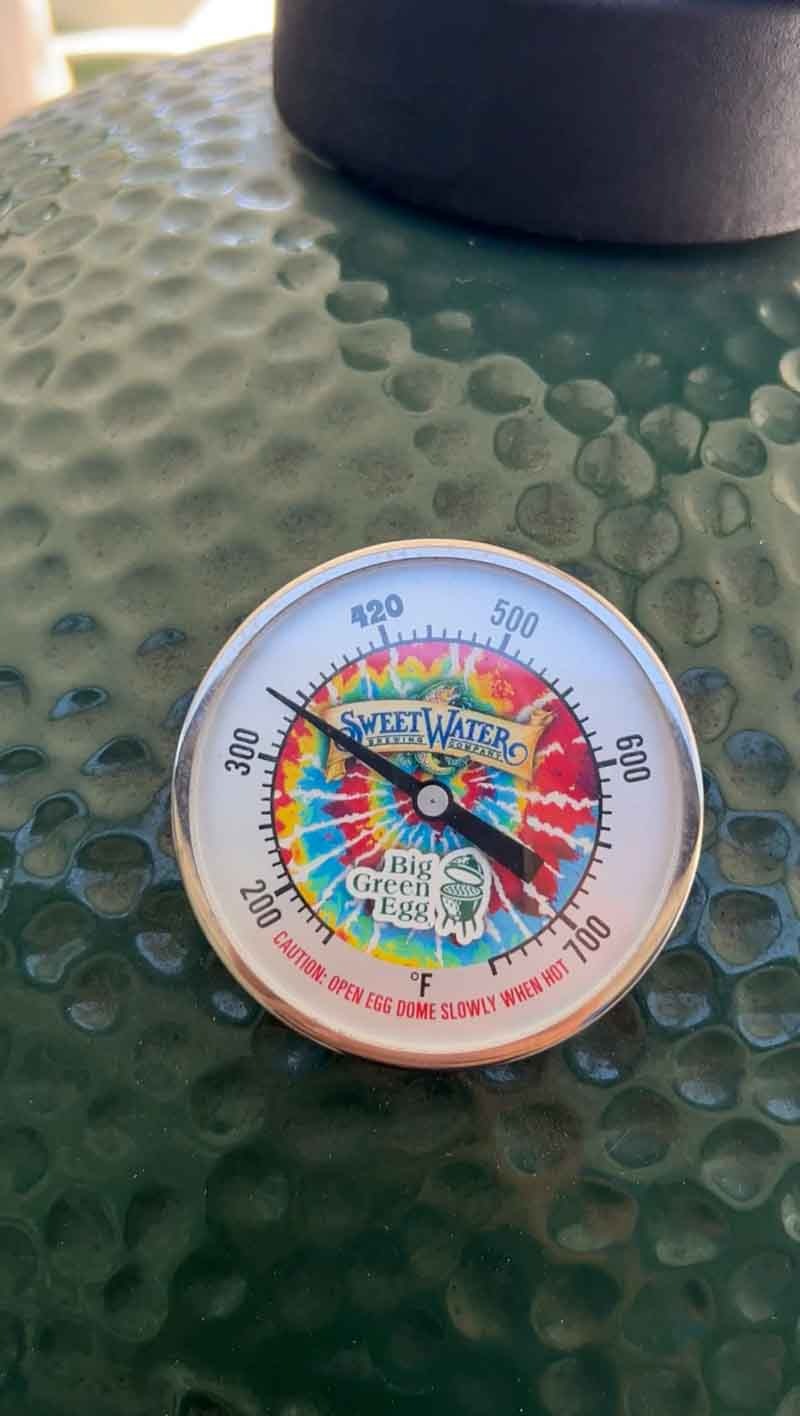
Preheat your Big Green Egg to 350°F. This temperature is the “sweet spot” for poultry; it is hot enough to crisp the skin and render the fat, but gentle enough to keep the breast meat from drying out.
To achieve the perfect indirect environment, use one of these two setups:
- The ConvEGGtor: Place it in the “legs up” position with your stainless steel grate on top.
- The EGGspander: Use the base with two ceramic half-moon inserts to create a full indirect barrier.
Choosing the Smoke
For this cook, I used two chunks of Apple wood. Turkey is a “sponge” for smoke, so you want to be careful not to overdo it.
- Why Apple? It provides a mild, sweet, and fruity profile that complements the natural flavor of the bird and the sweetness in the Spellbound rub.
- Alternatives: Pecan or Cherry are also excellent choices for poultry. Avoid heavy woods like Hickory or Mesquite for Thanksgiving, as they can easily overpower the delicate meat.
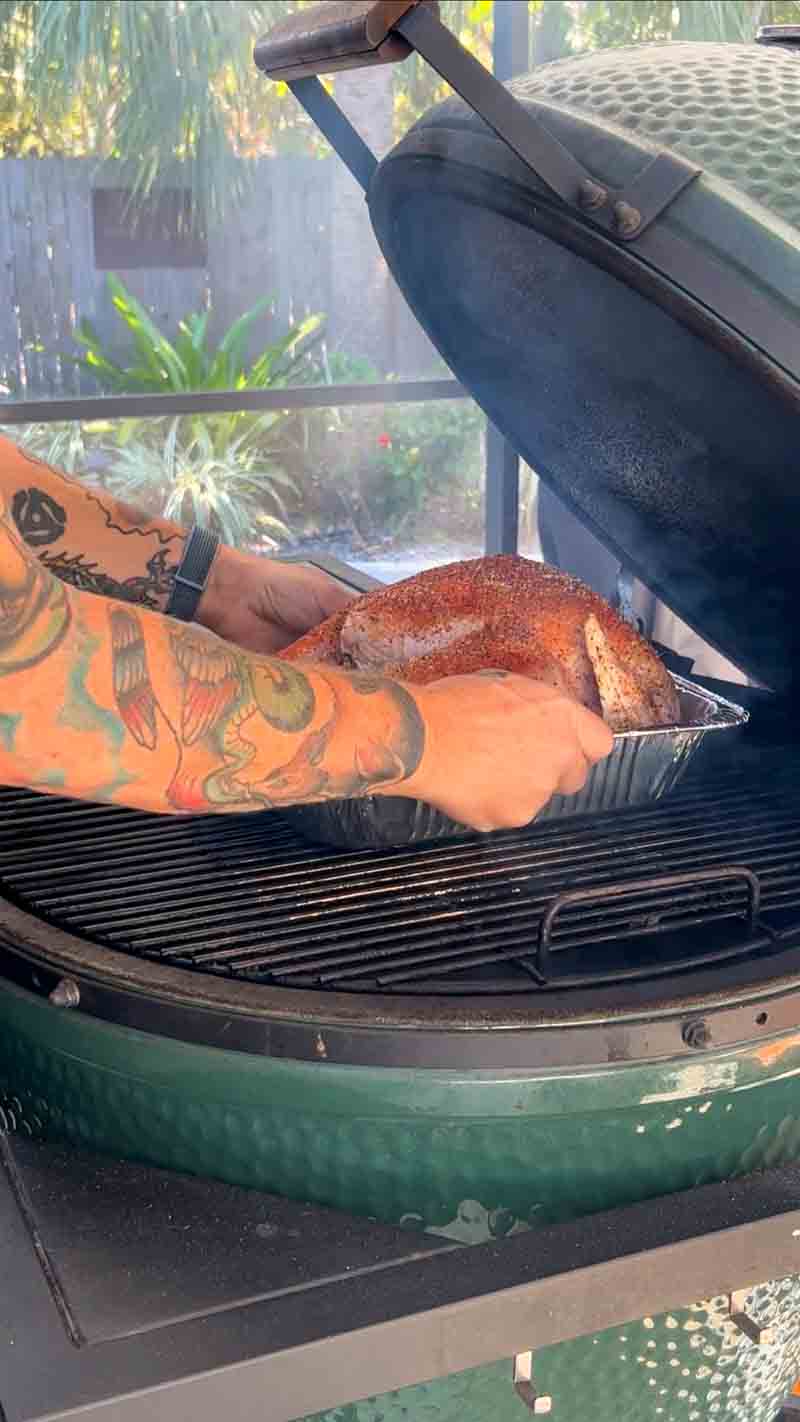
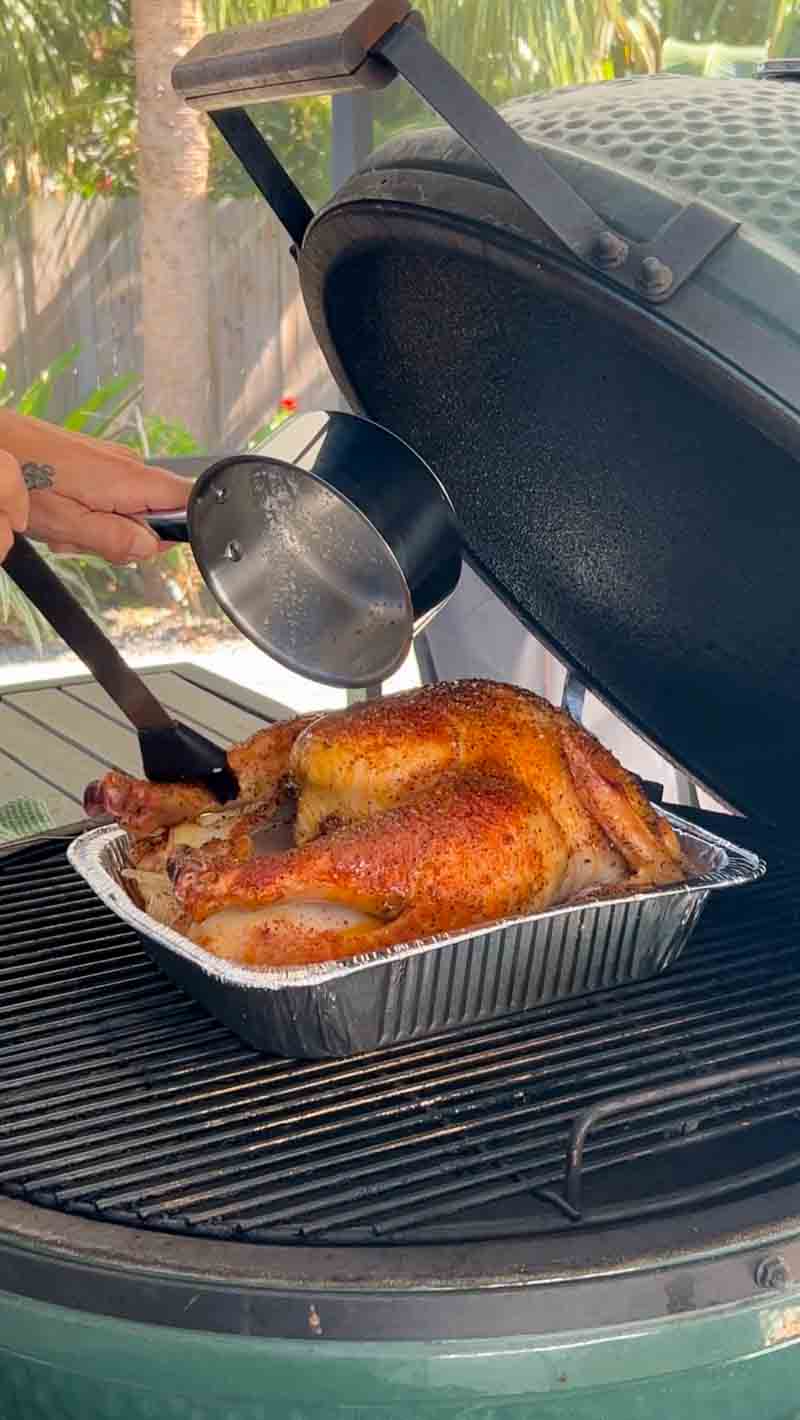
Once the Egg is stabilized at 350°F and the smoke is burning “thin and blue,” place the pan with the turkey directly onto the grate.
Step 6: The Cook
Once your Big Green Egg is stabilized at 350°F and that thin blue smoke is rolling, it is time to get the bird on the grill.
Placement
Place the aluminum pan with the turkey directly onto the center of the cooking grate. By using the indirect setup, the heat will circulate around the pan like a convection oven, while the apple wood chunks infuse the meat with a subtle, fruity smoke.
Maintaining the Temp
Keep the lid closed as much as possible. Every time you open the dome, you lose that carefully managed heat and moisture. On the Big Green Egg, the ceramic walls do a fantastic job of insulating the bird, which is why this method produces a much juicier result than a standard kitchen oven.
Monitoring Progress
For an 11-pound bird, you can expect the cook to take roughly 2 to 2.5 hours. However, remember the golden rule of BBQ: cook to temperature, not to time. * The Target: Use a reliable leave-in thermometer to track the internal temperature.
- The Pull Point: You want to pull the turkey when the thickest part of the breast reaches 160°F.
- The Thighs: The dark meat in the thighs can handle more heat and is usually best around 175°F.
Don’t worry about the breast being at 160°F instead of the FDA-recommended 165°F at the moment you pull it. The internal temperature will continue to rise during the rest, bringing it to that perfect, safe, and juicy finish.
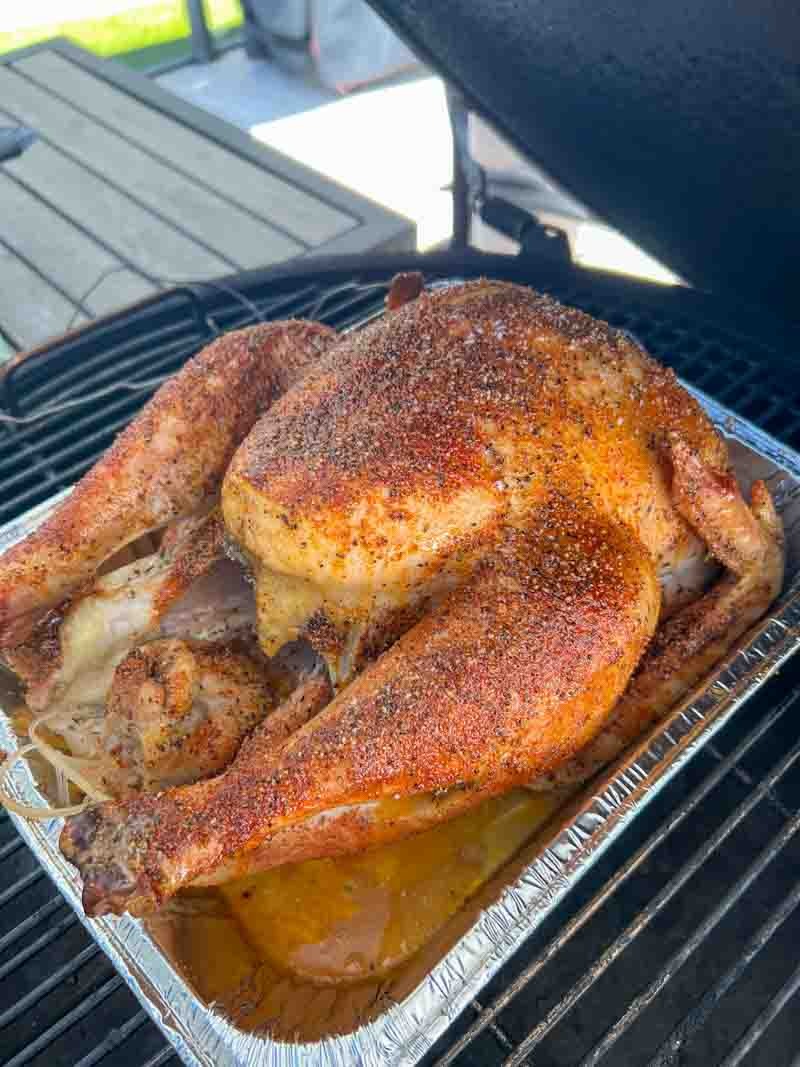
Step 7: The Baste and the Finish
Patience is key during the first half of the cook. Let the turkey roast undisturbed for one hour before you open the dome. This allows the smoke to set the color and the internal temperature to start climbing steadily.
The Secret to Golden-Brown Skin
When you hit that one-hour mark, it is time to add another layer of flavor and texture. Melt one stick of butter and have a basting brush ready.
- Basting: Gently brush the melted butter over the entire surface of the turkey skin.
- The Result: The butter mingles with the Spellbound rub to create a beautiful, golden-brown lacquer. More importantly, the fats in the butter help “fry” the skin on the grill, ensuring it stays crispy rather than becoming soft or rubbery.
Continue to check the bird every 30 minutes after the initial hour, basting as needed until you hit your target temperature.
Knowing When It’s Done
As mentioned earlier, you are looking for that perfect internal temperature of 160°F in the breast.
Buddha Note: The Carryover Cook
Because the Big Green Egg is such a high-quality thermal mass, the turkey will continue to cook even after you remove it from the heat. This is called carryover cooking. By pulling the bird at 160°F and letting it rest, the internal temperature will naturally rise to 165°F while sitting on your counter. This is the secret to a turkey that is safely cooked but still incredibly moist.
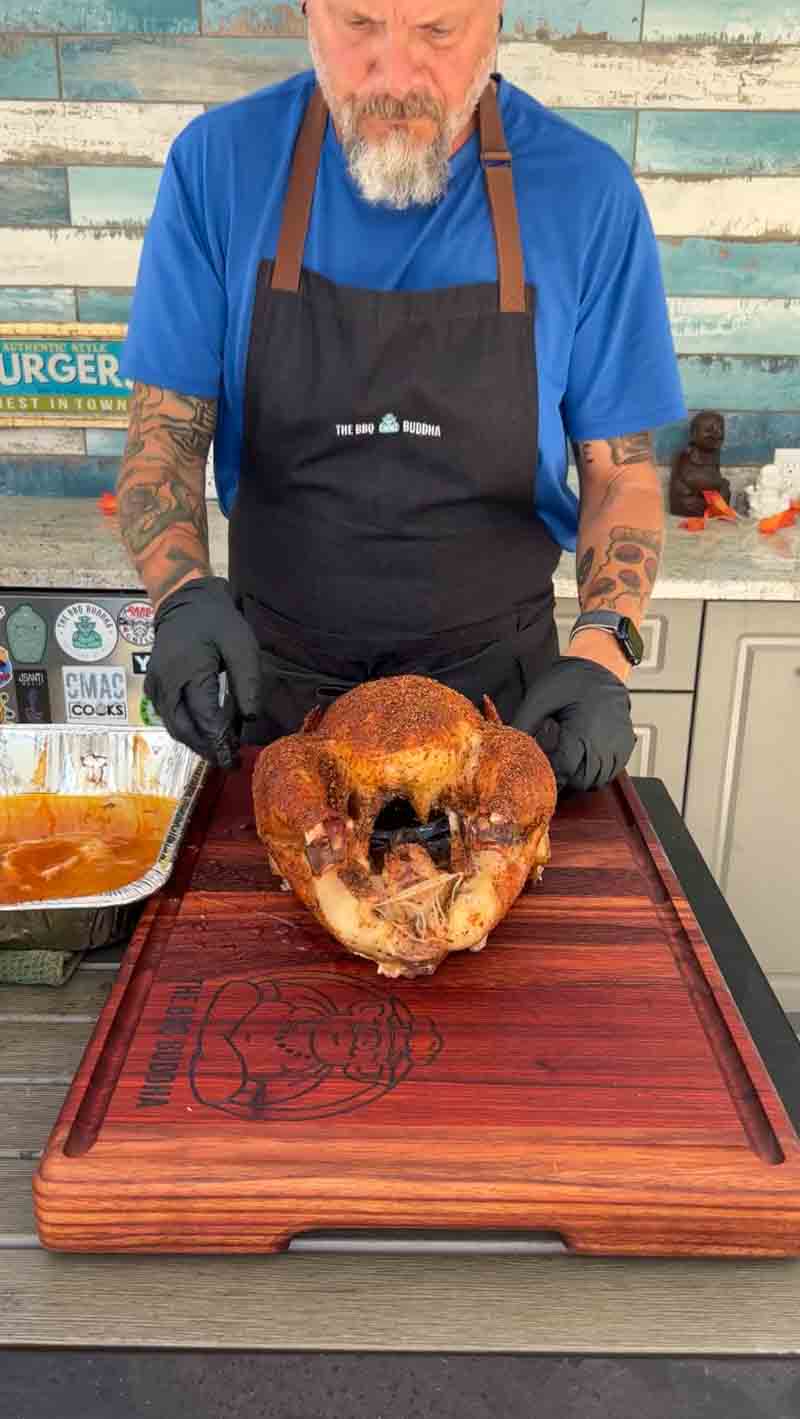
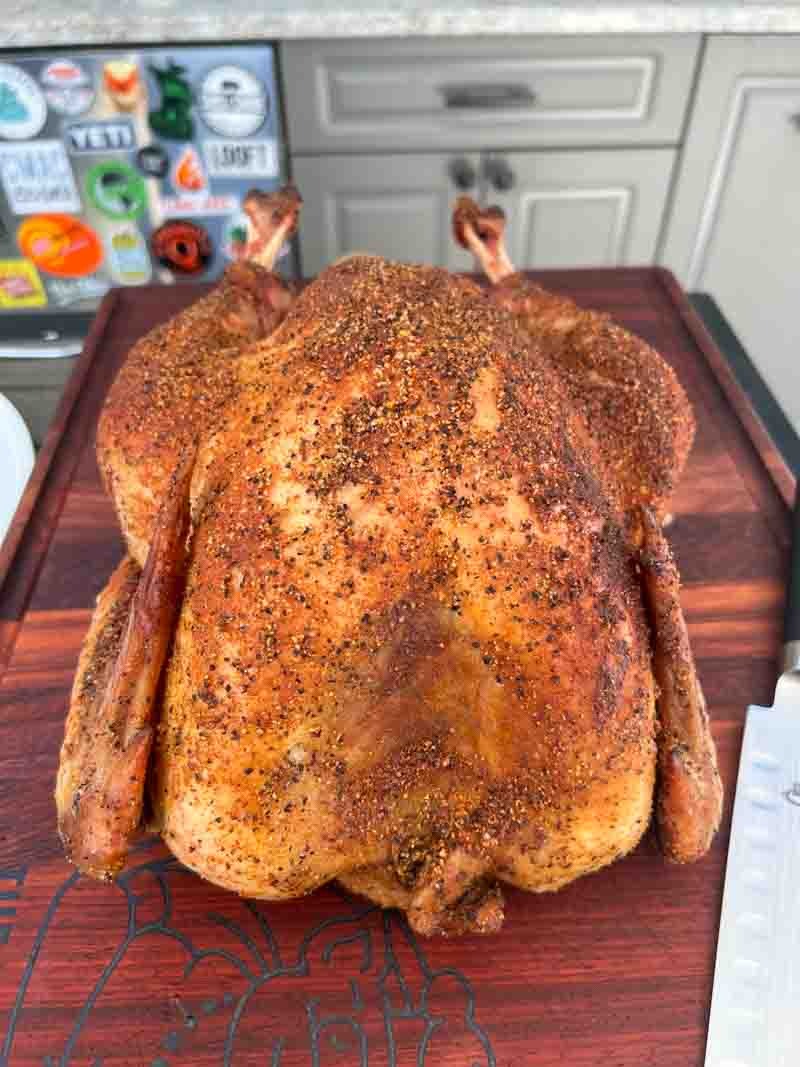
Step 8: The Rest and The Reveal
Once you pull the bird, let it rest in the pan for at least 20 to 30 minutes. This gives you plenty of time to use those buttery, smoky drippings in the bottom of the pan to make the best Thanksgiving gravy you have ever had.
When you finally slice into the breast, you will see the results of the 3-day process: a distinct smoke ring, perfectly rendered skin, and meat that is dripping with moisture thanks to the Lane’s brine.
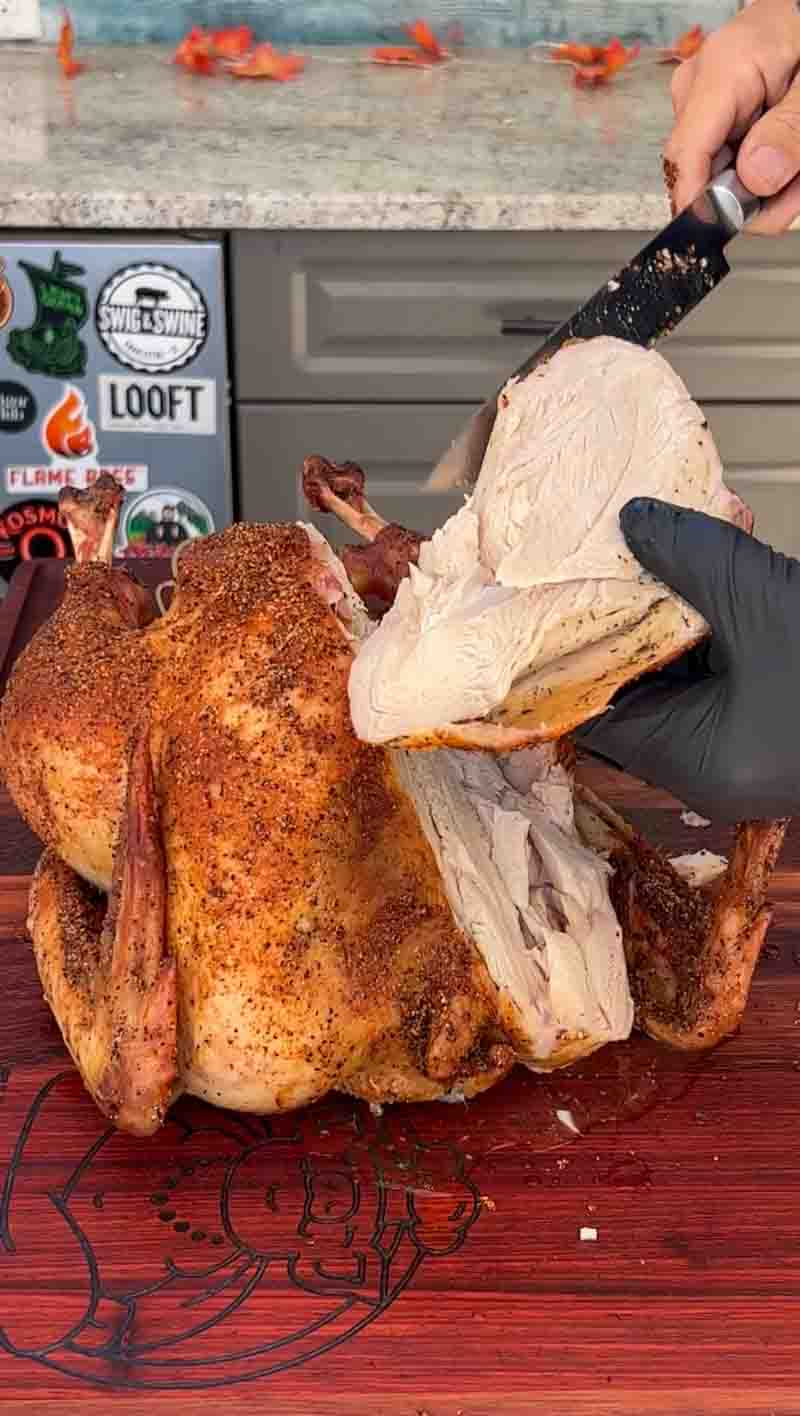
Step 9: Carving for the Table
After the turkey has rested and the juices have redistributed, it is time for the final act. To do justice to a bird this good, you need the right tools and a little bit of technique.
Prepare Your Station
Place the turkey on a large, stable cutting board. If your board has a “juice groove” around the edge, now is the time to use it. Most importantly, get your sharpest knife ready. A dull blade will tear the skin and squeeze the moisture out of the meat, while a sharp carving or chef’s knife will glide through the breast like butter.
The Best Way to Slice
Instead of carving thin slices directly off the bird while the breast is still attached, try the “steakhouse” method:
- Remove the Breast Half: Cut down along one side of the breastbone, following the curve of the ribcage until the entire breast removes in one large piece.
- Slice Across the Grain: Lay the breast flat on the board and slice it crosswise into thick medallions.
- The Benefit: This ensures every single slice has a beautiful piece of that crispy, butter-basted skin attached and keeps the meat incredibly tender.
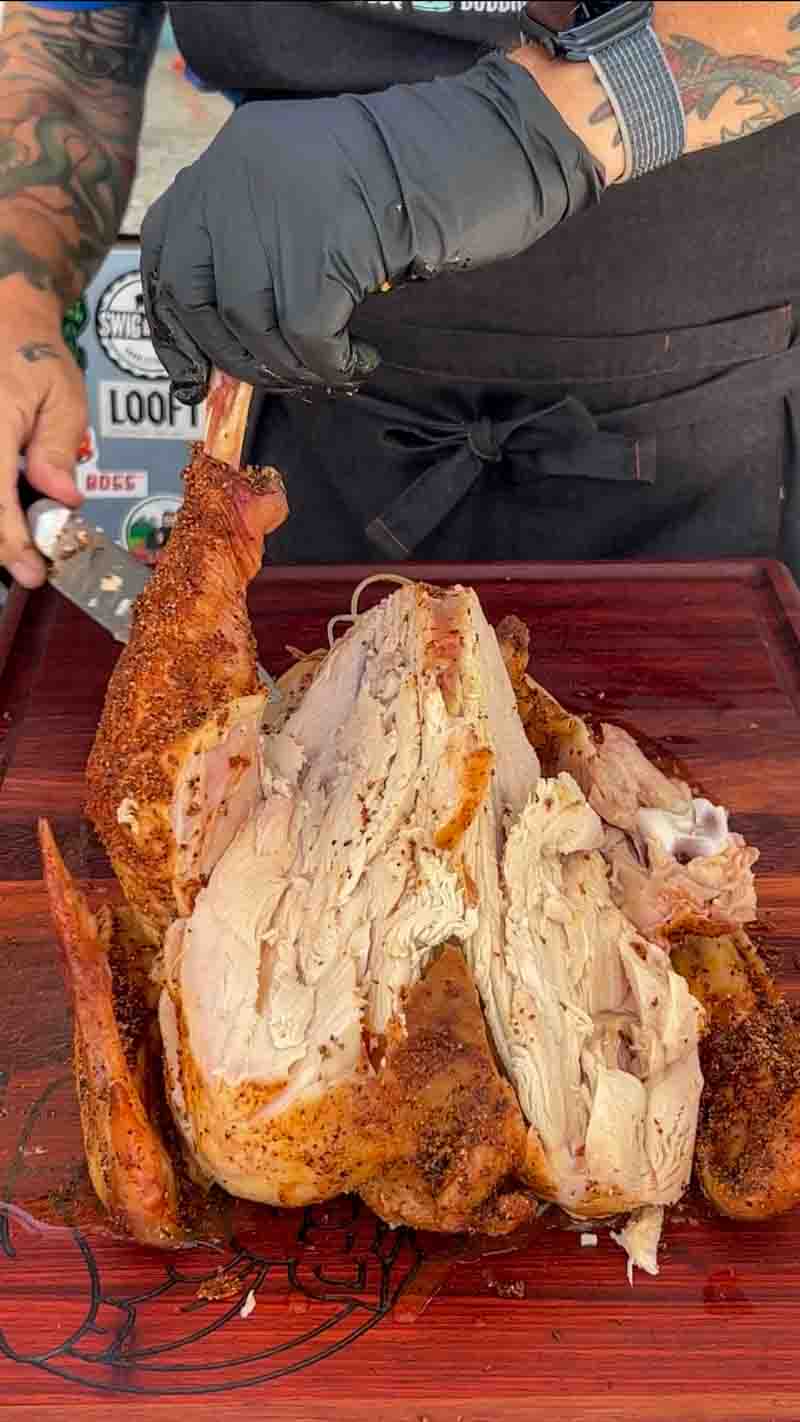
Arrange the slices on a platter, surround them with the drumsticks and wings, and get ready for the compliments. Thanks to the Lane’s Ultimate Turkey Kit and the steady heat of the Big Green Egg, you have just served the most flavorful bird of the year.

The “So What?” — Why This Method Wins
At the end of the day, you might wonder if a three-day process is really worth the effort. The answer is in the first bite.
When you follow this specific combination of a long brine, a thorough air dry, and a butter-basted roast on the Big Green Egg, you aren’t just making a “good” turkey; you are making a masterpiece. Most Thanksgiving turkeys are tolerated rather than enjoyed, often requiring a lake of gravy to make them palatable. This bird is different.
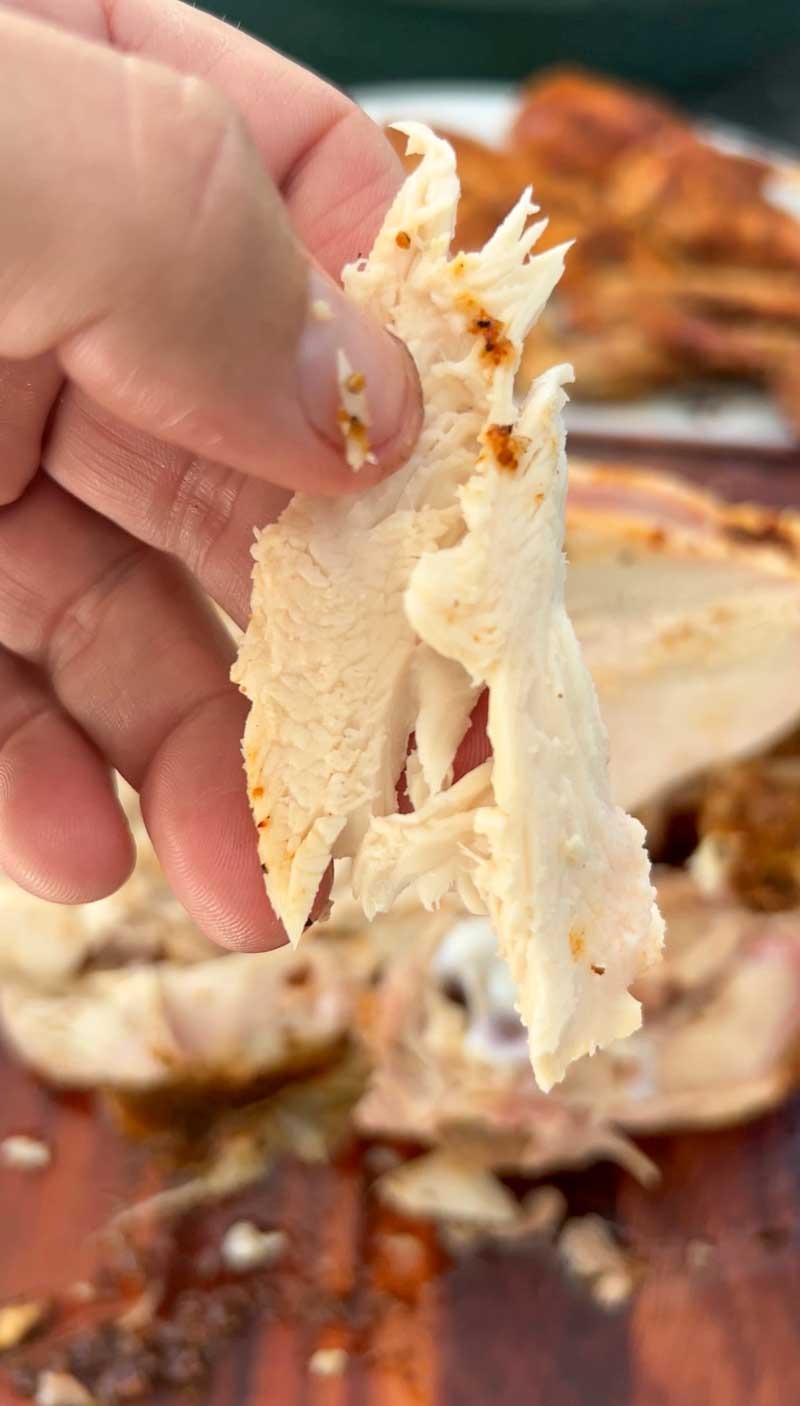
Unrivaled Juiciness
The real “so what” here is the moisture level. Thanks to the osmosis from the Lane’s Signature Brine, the muscle fibers are packed with seasoned moisture that simply doesn’t evaporate during the cook. When you slice into the breast, you will see juices glistening on the meat—not just running off onto the board. It has a texture more akin to a high-end pork tenderloin or a prime rib than the dry, stringy poultry most people are used to.
The Texture Contrast
By taking the time to air dry the skin and then basting with melted butter at the one-hour mark, you achieve the holy grail of BBQ: shatter-crisp skin paired with buttery, tender meat. The Big Green Egg’s ceramic insulation acts like a moisture-lock, while the apple wood provides a clean, sophisticated smokiness that highlights the natural flavor of the turkey rather than masking it.
This is the bird that turns “Turkey Day” into a culinary event. It is the reason you bought a Big Green Egg in the first place.
Big Green Egg Smoked Turkey: Quick Reference
| Step | Action | Timing/Temp |
| Brine | Submerge in Lane’s Signature Brine | 12 to 24 Hours |
| Air Dry | Uncovered in Fridge | 12 to 24 Hours |
| Cook Temp | Indirect Heat on the BGE | 350°F |
| The Baste | Melted Butter | After 1 hour of cooking |
| Pull Temp | Internal Breast Temp | 160°F |
Print
The Best Big Green Egg Smoked Turkey: A Complete Brining Guide
This recipe for The Best Big Green Egg Smoked Turkey: A Complete Brining Guide will produce an amazing Thanksgiving turkey every time!
Course Poultry
Cuisine American
Keyword brine, holiday meal, thanksgiving, turkey
Prep Time 3 days days
Cook Time 2 hours hours 30 minutes minutes
Total Time 3 days days 2 hours hours 30 minutes minutes
Servings 5 people
- 11 pound turkey thawed
- 1 container Lane's Ultimate Turkey Brine Kit
- 1 Tbsp olive oil
- 1 stick Butter
Mix 1 cup of brine with 1 gallon of water in the brining bag.
Add the 11-pound turkey and place the bag in a food safe container.
Place the container with the bad containing the brined turkey into the fridge for 24-hours
Remove the bird from the brine and place it on a wire rack in the fridge overnight to dry out the skin.
The next day, take the turkey out of the fridge and place it on the counter. Use the olive oil as a binder then generously season with the Lane's SPG and Spellbound rubs.
Setup your Big Green Egg for indirect cooking and preheat to 350°F using apple wood chunks for smoke flavor (optional).
Let the bird cook for 1-hour uninterrupted. Then melt 1-stick of butter and baste the turkey at the 1-hour mark to help crisp and brown the skin.
When the bird measures 165°F in the breast, remove and rest 20 minutes before slicing. This cook took me 2.5 hours to get to 165°F.
The post The Best Big Green Egg Smoked Turkey: A Complete Brining Guide appeared first on The BBQ Buddha.
