Australia’s off road landscapes offer everything from outback red dust to salt covered coastal tracks. After tackling Lancelin sand dunes or the rocky trails of the Cape Range, your 4×4 is likely covered in mud, grime, and debris that should be cleaned off as soon as possible.
Mud, salt, and accumulated grit create far more than just an unsightly appearance, they pose genuine threats to your vehicle’s longevity and performance. Clogged radiators, corroded underbodies, and compromised engine components represent just the beginning of potential damage when post trip cleaning gets delayed. Sand particles work like sandpaper against moving parts, rapidly filling air filters and reducing engine efficiency. Salt from coastal drives proves particularly aggressive, penetrating every gap and crevice beneath your vehicle where it accelerates corrosion. The harsh reality is simple. Neglecting proper maintenance after an off road session can transform minor cleaning tasks into expensive mechanical repairs.
This guide shows you how to clean mud, salt, and grime from your 4×4 after off roading in Australia. It covers tyres, the underbody, and other key parts so your vehicle stays safe, reliable, and ready for the next trip.
Immediate Post Trip Actions – The Walk Around Check

Toyota Prado Lancelin
Smart off roaders know that catching problems early saves both money and potential stranding situations in remote areas. A detailed walk around inspection becomes your first line of defence against the inevitable wear and damage that Australian terrain inflicts on 4×4 vehicles. Establishing a consistent routine from the same starting point ensures nothing gets overlooked, particularly after the punishment of corrugated roads or salt laden coastal tracks.
Tire and Wheel Assessment
Begin with your tires, as these components bear the brunt of rocky trails and abrasive surfaces. Examine each tire for sidewall damage, embedded stones, or punctures that might have occurred during your adventure. Check tread depth across the tire surface and look for uneven wear patterns that signal alignment problems developing. Don’t forget to inspect your spare tire, discovering a flat spare when you need it most ranks among the most frustrating off road experiences.
Exterior and Lighting Systems
Walk around your vehicle’s body panels, bumpers, and exposed components. Mud and trail debris can crack light lenses or disconnect wiring, leaving you without proper illumination for the drive home. Test all lights, indicators, and warning systems before departing. Note any new dents, scratches, or damaged trim pieces that might require attention.
Underbody Inspection
Get underneath your vehicle if possible. This reveals problems that surface inspections miss entirely. Look for fresh fluid leaks by checking for wet spots or shiny trails on components. The old cardboard trick works well here. Place a sheet beneath your vehicle overnight and check for any drips in the morning. Red fluid typically indicates transmission problems, while brown or black suggests engine oil issues. Clear to yellow fluid points to brake problems requiring immediate attention, as compromised brakes present serious safety risks. Coolant leaks appear as green, pink, or orange puddles with a distinctive sweet odour.
Mechanical Components
Test wheel bearings by grasping each wheel and attempting to wobble it. Excessive play indicates developing bearing failure. A problem that becomes expedition ending in remote locations. Listen for unusual humming or grinding sounds that change with vehicle speed, as these often signal bearing deterioration. Inspect suspension components for obvious damage, including shock absorber leaks, worn bushings, or loose linkages that trail obstacles might have compromised.
This quick routine takes only a few minutes and can stop small issues from turning into major problems on your next trip.
The Deep Clean: Removing Australian Mud, Salt, and Grime
Park on grass rather than concrete or asphalt to contain the inevitable mess during clean up. This simple choice saves hours of driveway scrubbing later. Remove bash plates where accessible, as this reveals hidden accumulations of red dust and mud that standard washing misses entirely. Heavy chunks of dried mud laugh off gentle washing. Blast these stubborn deposits first with a pressure washer or strong hose stream before attempting any detailed cleaning.
Chassis Rail Flushing: The Critical Task
Chassis rail flushing represents the most important post trip maintenance task you can perform. Mud and dust accumulate inside these rails where you can’t see them, creating perfect moisture traps that accelerate rust formation. Standard methods like parking over sprinklers or using underbody pressure sprayer attachments prove ineffective at removing salt and sand from chassis component nooks and crannies.
The proper technique requires specific positioning and patience. Park nose down on a slight incline with the handbrake engaged and wheels chocked for safety. Remove the hose connector to create a steady water stream. Starting at the rear, locate the furthest back chassis rail hole and insert the hose end, pushing as far as possible into the rail. Watch underneath as sand and mud flow from drain holes further along the chassis. Wait until the discharge runs completely clear, then reposition the hose in the same hole until water clarity confirms thorough flushing. Move to the next hole forward and repeat the process. Complete both sides with attention to detail. Rushing this step defeats the purpose.
Underbody Foam Treatment
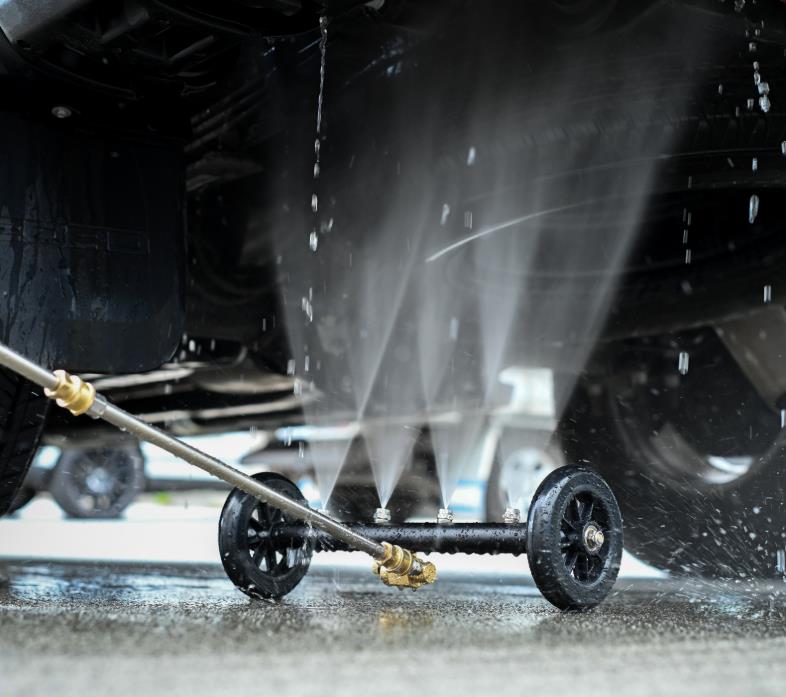
Kincrome Under 4WD Washer
After flushing the chassis rails, apply foam to the entire underbody with a snow cannon or foam gun. Focus on the wheel arches, exhaust, plastic bumpers, and suspension components, where grime tends to build up most. Let the foam sit for a few minutes before rinsing so it has time to loosen stubborn dirt and improve cleaning results.
Mechanical Inspection and Fluid Checks
Off road adventures place extraordinary demands on mechanical systems, especially when tackling corrugated outback tracks or navigating creek crossings common throughout remote Australia. The harsh conditions require methodical post trip inspections to catch developing issues before they strand you in the middle of nowhere.
Engine oil tells the story of your recent adventure. After deep water crossings, check for the tell tale milky appearance that signals water contamination. A problem requiring immediate attention before catastrophic engine damage occurs. Transmission fluid deserves equal scrutiny, particularly for burnt smells or dark discoloration that indicate heat degradation. Differential fluid needs similar inspection, as these components bear extreme loads when climbing rocky terrain or powering through sand.
The relentless red dust of outback tracks creates havoc with air filtration systems. Bull dust finds its way past standard air boxes with alarming efficiency, rapidly clogging filters and choking engine performance. Pull the air filter for inspection after every dusty adventure. Replace disposable types when heavily contaminated, or clean reusable filters following manufacturer guidelines. Creek crossings and muddy conditions necessitate brake drum inspections for contamination.
Battery terminals suffer badly in the Australian environment, with corrosion causing frustrating starting failures and erratic electrical behaviour in remote locations. Clean corrosion from terminals and verify tight connections. Test battery voltage, particularly for units over three years old.
Suspension components endure punishing impacts on Australia’s challenging terrain. Shock absorbers, control arms, and bushings show wear patterns that reveal developing problems. Search for loose bolts, bent linkages, and fluid leaks that signal impending failure. Brake systems require careful attention after steep descents through places like the Kimberley or Perth hills, where brake pads, rotors, and lines take substantial punishment. Monitor brake fluid levels, as drops indicate pad wear or dangerous leaks.
Conclusion
Australia’s challenging terrain demands respect, and proper post trip maintenance represents your vehicle’s best defense against the elements. Whether you’ve just returned from the corrugated tracks of the Kimberley or the salt laden coastal routes near Broome, consistent cleaning and inspection routines keep your 4×4 ready for whatever adventure lies ahead.
The time you spend on thorough post trip care pays off when you’re hundreds of kilometers from the nearest service station. A well maintained vehicle not only looks better but also performs more reliably when conditions are tough. These consistent maintenance habits help extend your 4×4’s lifespan and reduce the risk of costly breakdowns that can derail an otherwise great trip.
Remember, every successful off road trip depends on preparation, proper equipment, and consistent vehicle care. Stick to these proven methods after each outing, and your 4×4 will reward you with years of dependable service across Australia’s diverse landscapes.
Key Takeaways
Proper post trip cleaning and maintenance are essential for protecting your 4×4 from Australia’s harsh conditions and preventing costly damage from mud, salt, and grime buildup.
- Conduct immediate walk around inspections after every off road trip to catch damage early and check for fluid leaks, tire damage, and suspension issues
- Flush chassis rails thoroughly using a hose inserted into drain holes while parked nose down to remove hidden salt and mud that cause rust
- Clean air filters regularly as bull dust and red dirt clog filters rapidly, reducing engine performance and potentially causing damage
- Inspect all fluids post trip including engine oil for water contamination, transmission fluid for burning, and brake fluid levels for safety
- Focus on underbody cleaning using pressure washers and foam cannons on wheel arches, suspension components, and exhaust systems where grime accumulates
Consistent maintenance after each adventure prevents expensive repairs and ensures your 4×4 remains reliable for future Australian outback expeditions.
FAQs
Q1. What’s the best method for removing mud from a 4WD vehicle?
Apply a specialised off road wash formula using a foam cannon or foam gun to break down mud and salt without scrubbing. Let the product sit for about 60 seconds to penetrate the grime, then rinse thoroughly with water. This approach minimises the risk of scratching your paint while effectively removing stubborn dirt.
Q2. Why is it important to clean your 4×4 immediately after off roading?
Mud, salt, and grime left on your vehicle can cause serious long term damage including clogged radiators, rusted underbodies, and corroded components. Sand particles are abrasive and can clog air filters, reducing engine efficiency, while salt from beach driving is particularly corrosive and penetrates hard to reach areas underneath the vehicle.
Q3. How should I clean the undercarriage of my 4×4?
Use a pressure washer to effectively clean the undercarriage, focusing on wheel arches, suspension components, and chassis rails. For hard to reach areas, consider using an underbody blaster attachment. Park the vehicle nose down on an incline and flush chassis rails by inserting a hose into drain holes, working from rear to front until water runs clear.
Q4. What should I check during a post trip vehicle inspection?
Conduct a detailed walk around checking tires for damage and embedded objects, inspect body panels for dents or scratches, and look underneath for fluid leaks. Check wheel bearings for excessive play, examine suspension components for wear, and verify all lights are functioning properly. Place cardboard under the vehicle overnight to identify any fluid leaks.
Q5. How often should I clean my 4×4’s air filter after off roading?
Inspect your air filter after every off road trip, especially when driving through dusty outback conditions or bull dust. Red dust and dirt accumulate rapidly and can clog filters, reducing engine performance and potentially causing damage. Replace disposable filters when heavily soiled, or clean reusable types according to manufacturer specifications.
Read more at Total 4x4
https://total4x4.com.au/how-to-clean-4x4/
 Backyard GrillingWeekend WarriorsAdvice from DadBeard GroomingTV Shows for Guys4x4 Off-Road CarsMens FashionSports NewsAncient Archeology World NewsPrivacy PolicyTerms And Conditions