The Ultimate Thanksgiving Shortcut: Big Green Egg Smoked Turkey Breast
Let’s be honest: the best part of Thanksgiving isn’t just the big meal, it’s the legendary late-night sandwiches made with the leftovers. But you don’t need to wrestle with a 20-pound bird to get that iconic holiday flavor. Whether you are hosting a smaller, intimate gathering or you simply want to ensure you have plenty of juicy white meat for the table, the split turkey breast is the ultimate holiday “pro-tip.”
Smoking a turkey breast on the Big Green Egg is the fastest, most reliable way to achieve a succulent, wood-fired main dish while keeping your kitchen oven free for the sides. By focusing on just the breast, you eliminate the biggest turkey challenge: trying to keep the white meat from drying out while waiting for the dark meat to finish.
This recipe is simple, efficient, and delivers that deep, smoky Thanksgiving profile that only a ceramic grill can provide. It’s seasonal soul food at its finest, designed for the pitmaster who wants maximum flavor with half the hassle.
So, let’s get the charcoal lit. Sit back, grab a glass of this year’s Beaujolais Nouveau, and enjoy this recipe for the perfect Big Green Egg Smoked Turkey Breast.
Why the Split Breast Wins Thanksgiving:
- Precision Cooking: You can pull the meat at the exact moment of peak juiciness (165°F), without worrying about undercooked legs or wings.
- Better Smoke Penetration: With more surface area exposed, the turkey absorbs that clean wood smoke more evenly than a whole, cavity-heavy bird.
- The Sandwich Factor: This cut is built for slicing. It provides those perfect, uniform medallions that look beautiful on a platter and even better on a roll the next day.

Brining the Turkey Breast
To Brine or Not to Brine? (Spoiler: Always Brine)
When it comes to poultry, especially a lean cut like turkey breast, brining is your insurance policy. Because white meat is prone to drying out quickly on the grill, a brine acts as a “flavor marinade” that works from the inside out. Through the process of osmosis, the turkey absorbs the seasoned liquid, ensuring that every slice stays succulent and seasoned all the way to the bone.
The Pioneer Woman’s “Scale-Down” Brine
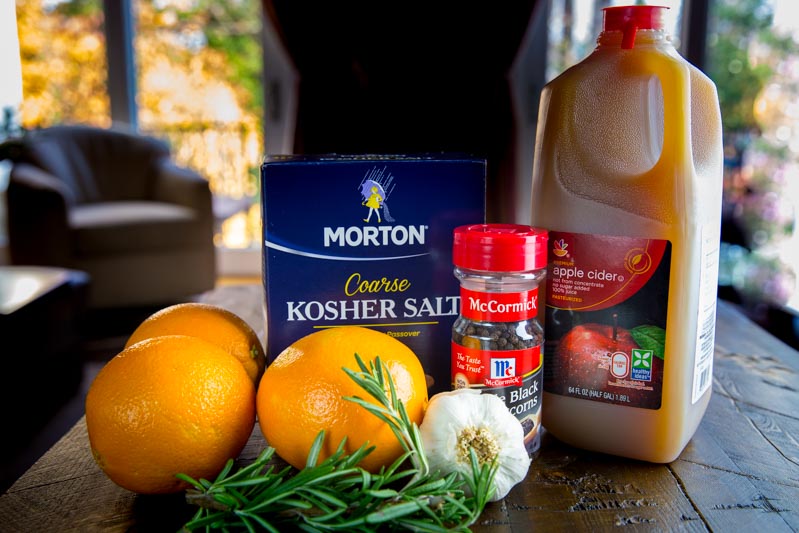
For this cook, I looked to a classic. The Pioneer Woman has a legendary turkey brine that I’ve scaled down to perfectly fit a split turkey breast. It isn’t just about salt; it’s about a complex layering of citrus, herbs, and aromatics that screams “Thanksgiving.”
What’s Inside:
- The Base: Apple cider and brown sugar (for sweetness and color).
- The Aromatics: Fresh orange peel, smashed garlic cloves, and black peppercorns.
- The Herbs: Fresh rosemary sprigs for that woodsy, holiday scent.
- The Science: Kosher salt to break down the proteins and lock in moisture.
How to Make It (The “Low and Slow” Steep)
Making the brine is incredibly simple, but it requires a little bit of foresight:
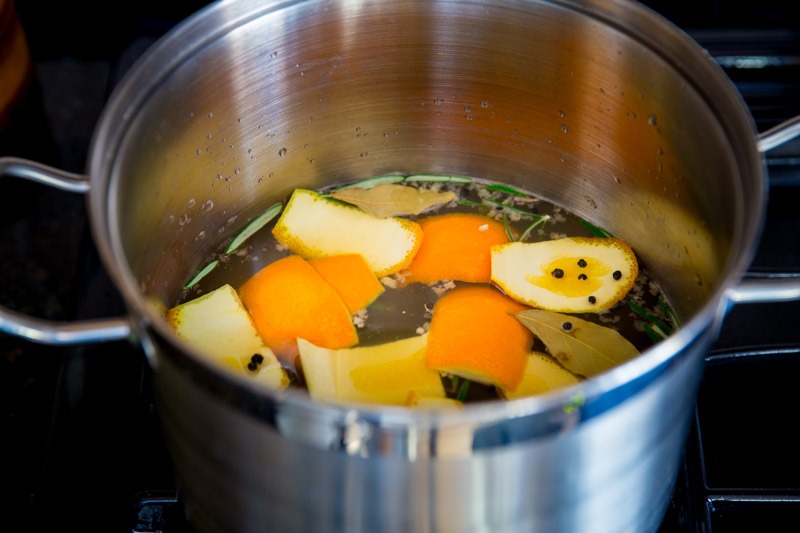
- The Boil: Mix all your ingredients in a large pot. Bring the mixture to a rolling boil, stirring occasionally to ensure the salt and sugar are completely dissolved.
- The Steep: As soon as it hits a boil, turn off the heat and cover the pot. This allows the rosemary and orange peel to “steep” like a tea, extracting all those essential oils.
- The Cool Down: Critical Step: You must allow the brine to cool completely before adding the turkey. Submerging raw poultry in warm liquid is a food safety “no-no” and will start to cook the outside of the bird. I usually make my brine the night before and keep it in the fridge.
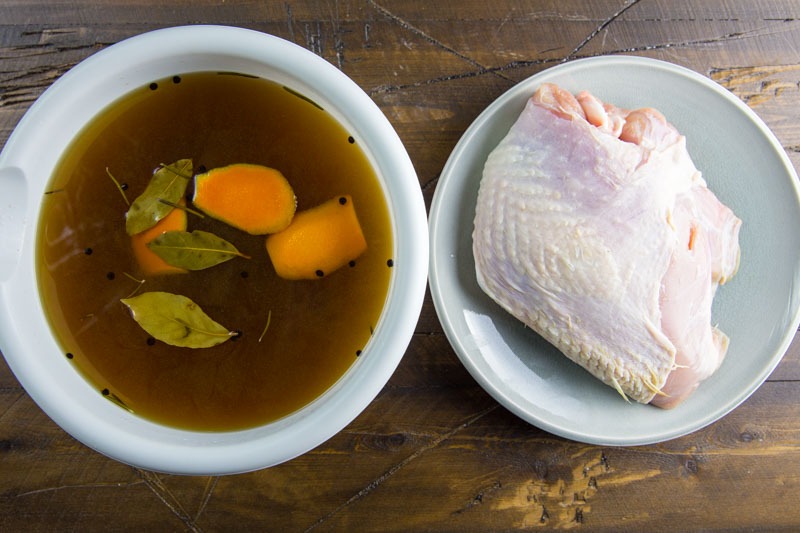
The Soak
Once the liquid is ice-cold, place your split turkey breast in a large glass bowl or a heavy-duty zip-top bag. Pour the brine over the top until the meat is fully submerged. Let it brine in the refrigerator for 12 to 24 hours. Any longer, and the salt can start to change the texture of the meat (making it more like deli ham), but a 12-hour soak is the “sweet spot” for a 5-7 lb breast.
Brine the Turkey Overnight
The Overnight Soak: Patience for Perfection
Once your brine has cooled completely, it’s time for the most important phase of the preparation. This isn’t just about “wetting” the meat; it is a transformative overnight soak that fundamentally changes the chemistry of the turkey breast.
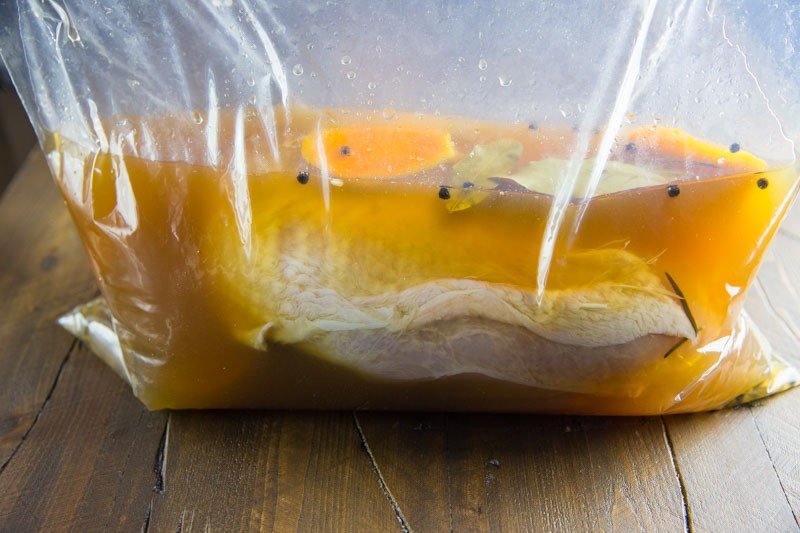
Submerging the Bird
Place your split turkey breast into a non-reactive container: a large glass bowl, a heavy-duty food-safe bucket, or even a double-bagged, gallon-sized zip-top bag works perfectly. Pour the chilled aromatics and liquid over the turkey, ensuring the meat is completely submerged.
If the breast wants to float, you can weigh it down with a heavy plate to keep it “under the sea” of apple cider and citrus.
Why “Overnight” is the Magic Window
I recommend letting the turkey sit in the refrigerator for 12 to 24 hours. Here is why that time frame is crucial:
Texture Modification: The salt in the brine works to denature the proteins in the breast. This means that even if you accidentally overcook the turkey by a few degrees on the Egg, the meat will still retain its moisture. It’s the ultimate “safety net” for any holiday cook.
Total Saturation: A split breast is thick. It takes hours for the salt and brown sugar to penetrate deep into the center of the muscle.
Flavor Infusion: The rosemary, garlic, and orange peel need time to impart their oils into the meat. By the next morning, the turkey won’t just be “salty”—it will be infused with the bright, floral notes of the Mediterranean herbs and the sweetness of the cider.
The Morning Prep: The “Dry-Out” Secret
When you wake up on the day of the cook, pull the turkey from its bath. Do not just toss it on the grill. Discard the brine and give the turkey a quick rinse under cold water to remove any excess surface salt. Then, take paper towels and pat the turkey incredibly dry. > Pro Tip: For the absolute best skin, place the rinsed and dried turkey breast back in the fridge, uncovered, for about an hour before smoking. This “air-dries” the skin, which is the secret to getting that thin, crispy, parchment-like texture rather than rubbery skin.
Setting up the Big Green Egg
Setting the Stage: The Big Green Egg Setup
With the turkey breast fully brined and patted dry, it’s time to transform the Big Green Egg into the ultimate outdoor roasting oven. For poultry, we want a clean, stable heat and a wood profile that complements, rather than overpowers, the delicate flavor of the turkey.
The Indirect Foundation
For this cook, we are utilizing indirect heat. Install your convEGGerator in the “legs up” position and place the stainless steel cooking grate on top. This creates a barrier between the fire and the meat, allowing the heat to circulate around the turkey breast just like a convection oven. This setup is the secret to getting an even, edge-to-edge cook without scorching the bottom of the bird.
Stabilizing at 250°F
I like to stabilize the Egg at 250°F. While many people roast turkey at higher temperatures, keeping it at 250°F allows the meat to gently come up to temperature, giving the fat under the skin more time to render and the smoke more time to work its magic.
The “Harvest” Smoke Blend: Apple and Pecan
The wood choice is where you really define the character of your Thanksgiving meal. For this split breast, I used a mix of Apple and Pecan chunks:
- Apple Wood: Provides a mild, sweet, and fruity smoke that gives the turkey a beautiful, light mahogany color.
- Pecan Wood: Adds a rich, nutty depth that is slightly more “traditional” and robust than fruit woods alone.
- The Duo: Together, these two create a “Harvest Blend” that perfectly matches the rosemary and orange notes from our brine.
The Pitmaster’s “Clean Fire” Check
Before you put the turkey on, ensure your fire is burning “clean.” You are looking for that thin blue smoke not thick, white, billowy clouds. Because turkey skin is porous and acts like a sponge, a “dirty” fire can lead to a bitter, ashy taste. Wait until the smoke is almost translucent before sliding that turkey onto the grate.
Pro Tip: Place a small drip pan on top of the convEGGerator (below the grate) with a splash of water or apple cider. This catches the turkey drippings, preventing them from burning on the hot ceramic and keeping the cooking environment nice and humid.
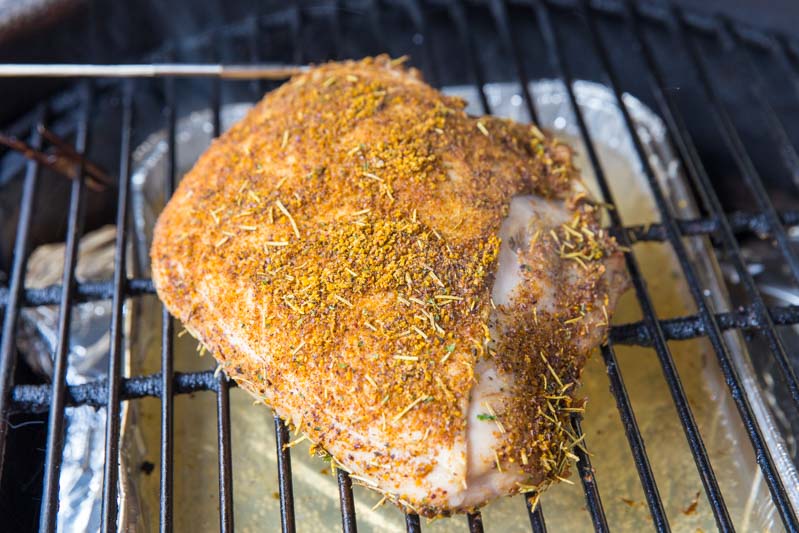
Seasoning the Turkey Breast
The Seasoning: Bottling the Flavors of Fall
While the Big Green Egg was humming along and coming up to temperature, it was time for the final prep. After the turkey breast was removed from the brine, I placed it in a bowl of cool, fresh water for 15 minutes. This is a vital “Heavy Hitter” step; it pulls any excess salt off the surface of the skin, ensuring your final seasoning and the natural flavor of the bird shine through without being overly salty.
Once the 15-minute soak was over, I patted the turkey breast completely dry with paper towels. To get that iconic Thanksgiving profile, I used a blend that highlights the savory herbs and warm notes we associate with the holiday.
The “Thanksgiving Essential” Rub Recipe
If you don’t have a go-to seasonal poultry rub on hand, you can create this incredible “Harvest Blend” right in your kitchen. It melds all the flavors of a traditional Thanksgiving feast (sage, rosemary, and garlic) with a hint of sweetness and nuttiness that perfectly complements the pecan smoke.
Mix together:
- 2 tbsp Brown Sugar (for that deep, caramelized color)
- 1 tbsp Garlic Powder
- 1 tsp Dried Sage (the “secret ingredient” for turkey)
- 1 tsp Dried Rosemary (crushed fine)
- 1 tsp Smoked Paprika (for a boost in mahogany hue)
- 1/2 tsp Ground Pecans or Pecan Meal (optional, for a nutty depth)
- 1/2 tsp Black Pepper
The Application
I applied the seasoning generously over the entire breast, making sure to get it into every fold and even under the skin where possible. Because the breast was patted dry, the rub adheres perfectly, forming a “crust” that will eventually turn into a beautiful, savory bark.
Why These Flavors Matter
Garlic: It provides the savory backbone that prevents the sweeter notes from becoming too dominant.
Sage and Rosemary: These are the “power couple” of the holiday. They provide that woodsy, aromatic scent that fills the house (or the backyard) and makes it feel like Thanksgiving.
Brown Sugar: In a 250°F environment, the sugar won’t burn; instead, it will melt into the rendered turkey fat, creating a sticky, golden skin that is as tasty as the meat itself.
Cook the Turkey Breast
Turkey Breast Cooking Estimates
Setup: Indirect heat @ 250°F (300°F for the final 30-45 mins)
| Turkey Cut | Weight | Estimated Cook Time | Servings |
| Small Split Breast | 2 - 2.5 lbs | 1.5 - 2 hours | 2 People |
| Large Split Breast | 3 - 4 lbs | 2.5 - 3 hours | 3 - 4 People |
| Standard Whole Breast | 5 - 6 lbs | 3.5 - 4.5 hours | 5 - 6 People |
| Large Whole Breast | 7 - 8 lbs | 4.5 - 5.5 hours | 7 - 8 People |
The Cook: Monitoring the Stall and the Crispy Finish
Once the turkey breast is on the Big Green Egg, the name of the game is patience. At 250°F, the hickory and fruitwood smoke are gently kissing the meat, slowly raising the internal temperature without shocking the proteins.
The 1.5-Hour Checkpoint
After about 1.5 hours in the smoke, it’s time to check your progress. I use a Thermapen for this because speed and accuracy are everything! You want to know the exact temperature in the thickest part of the breast without leaving the dome open and losing all your heat.
At this stage, the turkey should be measuring right around 140°F internally. The meat is well on its way to being cooked, and by now, the skin has absorbed a beautiful, light mahogany color from the apple and pecan smoke. However, at 250°F, while the meat is juicy, the skin can sometimes remain a bit soft or “rubbery.”
The Heat Kick: Cranking to 300°F
This is the “Pro Move” for perfect poultry. Once you hit that 140°F mark, open up the vents on your Big Green Egg to bring the temperature up to 300°F. Why the temperature spike?
- The Render: The higher heat helps the remaining fat under the skin render out more quickly.
- The Crunch: We’ve spent 90 minutes getting the smoke flavor in; now we want to “fry” that skin from the outside in. Increasing the temp to 300°F tightens the skin and creates that signature “bite-through” texture we all crave.
- The Finish Line: This extra heat carry-over will push the turkey through the final 25 degrees efficiently, ensuring the center stays moist while the exterior finishes strong.
The Target: 165°F
Continue monitoring with your Thermapen. You are looking for a final internal temperature of 160°F to 165°F.
Pitmaster Note: I typically pull my turkey breast at 160°F. Because of “carry-over cooking,” the internal temperature will continue to rise about 5 degrees while it rests on the cutting board. This ensures you land perfectly at the USDA-recommended 165°F without a single degree of overcooking.

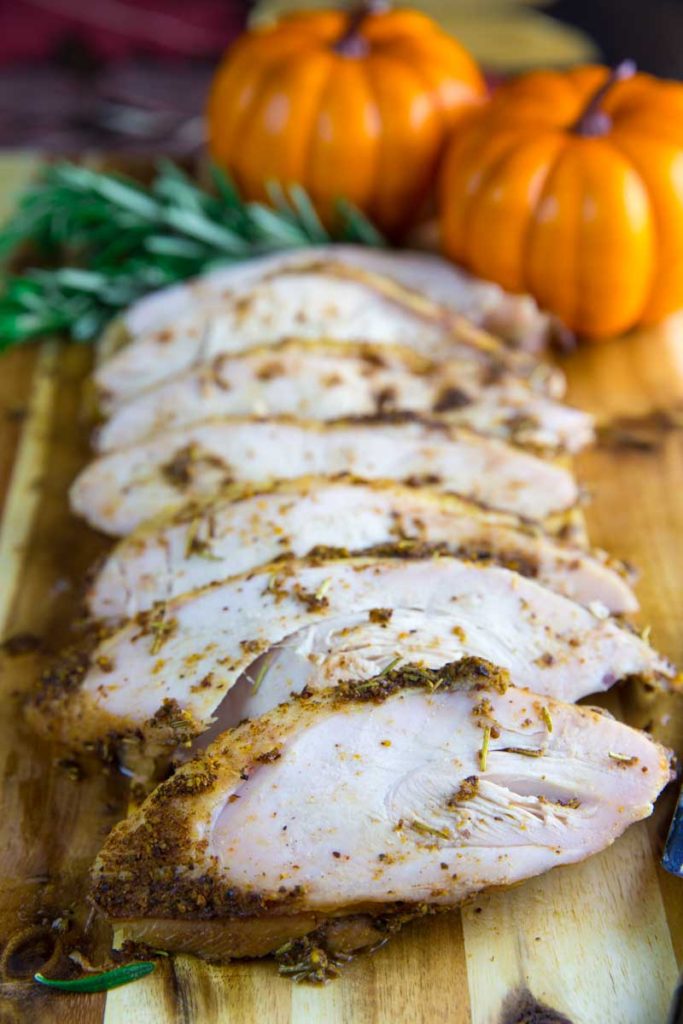
The Finish: Pull, Rest, Slice, and Serve
The Finish: Pull, Rest, and Slice
After 30 minutes of that 300°F “heat kick,” the transformation was complete. The skin had tightened into a beautiful, mahogany-colored crust, and the aroma of sage, rosemary, and pecan smoke was incredible.
The Pull
Using the Thermapen, I checked the thickest part of the breast one last time. It measured 155°F internally. Now, you might be thinking, “Wait, isn’t 165°F the magic number?” Here is the secret: Carry-over cooking. Because the Big Green Egg is a ceramic powerhouse, the exterior of that turkey is holding a significant amount of residual heat. Once you pull it and set it on the cutting board, that heat continues to travel inward. By pulling at 155°F, the bird will naturally climb to that perfectly safe, ultra-juicy 160°F-165°F range while it sits. If you wait until 165°F to pull it, you’ll likely end up with 175°F turkey which is the fast track to “dry-sandwich territory.”
The Essential Rest
I moved the breast to a carving board and let it rest for 20 minutes.
Why we wait: During the cook, the muscle fibers tighten and push moisture toward the center. If you slice it immediately, all those flavorful juices we worked so hard to keep inside through the brining process will spill out onto the board. A 20-minute rest allows the fibers to relax and reabsorb that moisture, ensuring every slice is succulent.
The Master Carve
For a split breast, I find the best way to serve it is to remove the entire breast from the bone before slicing:
- Find the Keel Bone: Run your knife along the center breastbone to separate the meat.
- Follow the Ribs: Use long, smooth strokes with a sharp carving knife to follow the curve of the bone until the entire breast “lobe” comes away in one piece.
- Slice Against the Grain: Lay the breast flat on the board and slice it into 1/4″ thick medallions. By slicing against the grain, you ensure the most tender “bite-through” texture.
The Serve
Arrange the medallions on a warm platter, perhaps with a few sprigs of fresh rosemary or some charred orange slices for garnish. The skin should stay crisp, the meat should be glistening, and the flavor should be a perfect balance of savory herbs and sweet apple-pecan smoke.
Whether this is your main Thanksgiving dish or just a supplement for extra sandwiches, it’s a recipe that proves you don’t need a massive bird to have a massive success on the Big Green Egg.

The Final Verdict: Seasonal Soul Food
When the carving knife finally met the meat, it was clear that the effort was worth it. This wasn’t just “another turkey cook” it was a reminder of why we fire up the Big Green Egg in the first place.
A Meal for the Moment (and the Next Day)
This split breast made for a fantastic, stress-free dinner that captured every bit of the traditional Thanksgiving spirit. The meat was incredibly moist and tender, a direct result of that overnight brine and the gentle infusion of apple and pecan smoke. Every bite carried the woodsy notes of sage and rosemary, balanced by a hint of sweetness from the cider and the brown sugar rub.
But as good as the dinner was, the real victory happened the next day. Those few leftover slices, chilled and layered onto a soft roll with a little cranberry sauce and mayo, were the ultimate “pitmaster’s prize.” Cold or warm, the turkey retained its succulent texture, proving that when you treat a smaller cut with the same respect as a whole bird, the results are world-class.
Final Thoughts
If you’re looking to simplify your holiday, or if you just want to master a “small batch” version of a classic, this Big Green Egg Smoked Turkey Breast is the answer. It’s a manageable, rewarding cook that keeps you in the backyard enjoying the crisp air rather than being trapped in a steaming kitchen.
So, this year, don’t feel like you have to go “whole bird or bust.” Grab a split breast, light the charcoal, and enjoy the peace and quiet of a perfectly smoked meal.
Happy Thanksgiving to you and yours—and may your late-night sandwiches be legendary.
Print
Big Green Egg Smoked Turkey Breast
This recipe for Big Green Egg Smoked Turkey Breast is the perfect meal to make when having a smaller Thanksgiving meal. The brine creates a moist turkey breast that is infused with smoke flavor from the low and slow cook.
Course Main
Cuisine American
Prep Time 20 minutes minutes
Cook Time 2 hours hours
Total Time 2 hours hours 20 minutes minutes
Servings 2
Author The BBQ Buddha
- 4 pound Split Turkey breast skin on
Brine Ingredients:
- 1.5 cups Apple Juice Or Apple Cider
- 1 gallon Cold Water
- 2 tbsp Fresh Rosemary Leaves
- 3 cloves Garlic Minced
- 3/4 cup Kosher Salt
- 1 cups Brown Sugar
- 1.5 tbsp Peppercorns
- 2 whole Bay Leaves
- 2 Peels of large oranges
Rub Ingredients:
- 2 tbsp brown sugar
- 1 tbsp garlic powder
- 1 tsp dried sage
- 1 tsp dried rosemary
- 1 tsp smoked paprika
- 1/2 tsp pecans ground fine
- 1/2 tsp black pepper
Combine all ingredients in a large pot. Stir until salt and sugar dissolve. Bring to a boil, then turn off heat and cover.
Allow to cool completely, then pour into a large brining bag or pot. Place uncooked turkey in brine solution, then refrigerate for 16 to 24 hours.
When ready to roast turkey, remove turkey from brine. Submerge turkey in a pot or sink of fresh, cold water. Allow to sit in clean water for 15 minutes to remove excess salt from the outside.
Discard brine. Remove turkey from clean water, pat dry, and cook according to your normal roasting method.
Pat turkey breast dry and apply BBQ rub (recipe above)
Set up the Big Green Egg for indirect cooking measured to 250°
Use a drip pan full of water sitting on top of the convEGGerator
Add chunks of a light flavored wood (e.g. Pecan, Apple) for the smoke
Once the temp stabilizes and you see the thin blue smoke place the turkey breast inside
Smoke for 1.5 hours or until the turkey measures 145° internally
Increase the heat in the Big Green Egg to 300° and cook turkey for another 30 minutes or until it measures 155° internally
Remove the turkey breast and let rest for 20 minutes before slicing and serving
The post Big Green Egg Smoked Turkey Breast appeared first on The BBQ Buddha.
