The Ultimate Game Day Wing: Spicy & Crispy
There is no better way to celebrate the return of football season than by firing up the Big Green Egg for a big batch of juicy, wood-fired chicken wings. Whether it’s the NFL kickoff or a high-stakes Saturday in college ball, wings and a cold craft beer are the undisputed champions of the tailgate. To take things up a notch this year, I’m leaning into a bold, spicy profile using Lane’s BBQ Spellbound Hot. While their SPF53 was a classic, Spellbound Hot has taken the throne as the go-to for anyone who wants that perfect balance of sweet heat and savory depth.
The Secret to the Perfect Wing
Great wings on the Big Green Egg aren’t just about the seasoning; they are about the technique. To get that “fried-like” crispy skin without the mess of a deep fryer, we use a specific raised direct method. By elevating the wings away from the coals, we allow the heat to circulate evenly, rendering the fat and crisping the skin while the smoke provides that authentic backyard flavor.
For this cook, the Spellbound Hot rub brings a punch of heat that pairs perfectly with the natural sweetness of the chicken. It’s a rub designed for those who want their wings to have a little “kick” without losing the complexity of the spices. Now sit back, grab a cold DC Brau Pale Ale (or your favorite local brew), and enjoy this updated recipe for Big Green Egg Spicy Chicken Wings.
Note from the Buddha: When I originally created this recipe back in 2015, I used Lane’s BBQ SPF53 rub. Since that blend has been retired, I have updated this post to feature Spellbound Hot, which delivers that same spicy spirit with an even better flavor profile for the modern palate.
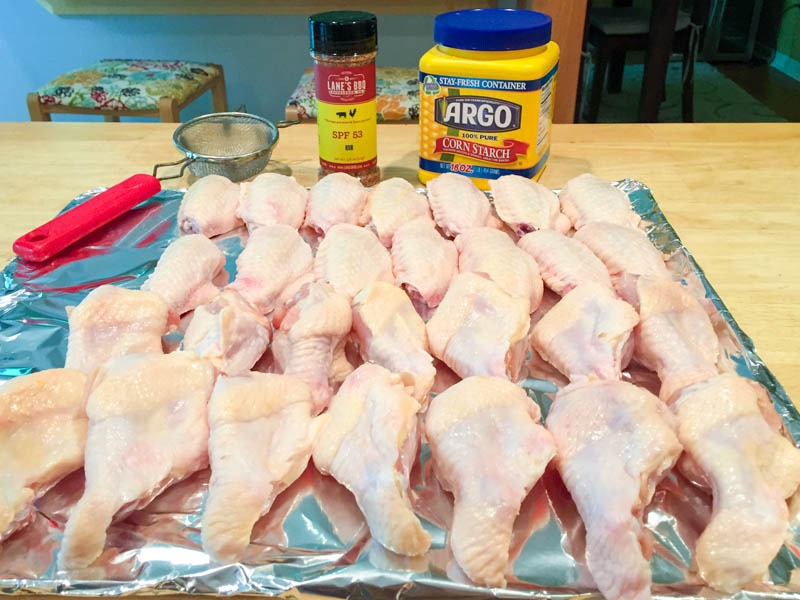
Step 1: Prep the Chicken Wings
The Quest for the Perfect Crunch
I have cooked chicken wings every way imaginable… smoked, fried, grilled, you name it. But the “Holy Grail” of wing cooking is achieving that glass-shattering, crispy skin on the Big Green Egg without the mess and hassle of a deep fryer.
After years of experimenting with various techniques like the “Orth Method” (a popular high-heat raised direct approach), I’ve found that the real game-changer is a simple pantry staple: cornstarch.
The Science of the Crunch
It sounds like a basic hack, but there’s a reason this works so well. Cornstarch is an incredible moisture-absorber. When you dust it onto chicken skin, it mixes with the rendering fat and the natural juices of the bird to create a thin, brittle “crust.” On the Big Green Egg, this layer hardens under the convection heat, giving you a texture that mimics a deep-fried wing while keeping the meat inside incredibly juicy.
My Technique: Season, Then Starch
My preferred method is to apply the Lane’s Spellbound Hot rub first. This ensures the spices are locked directly against the skin for maximum flavor. Once the wings are well-seasoned, I follow up with a light, even dusting of cornstarch.
By using this “dusting” technique in a raised direct setup, you’re essentially air-frying the wings with the added benefit of real wood-fired flavor. The result? A wing that has a distinct “snap” when you bite into it, perfectly highlighting that spicy, sweet heat from the rub.
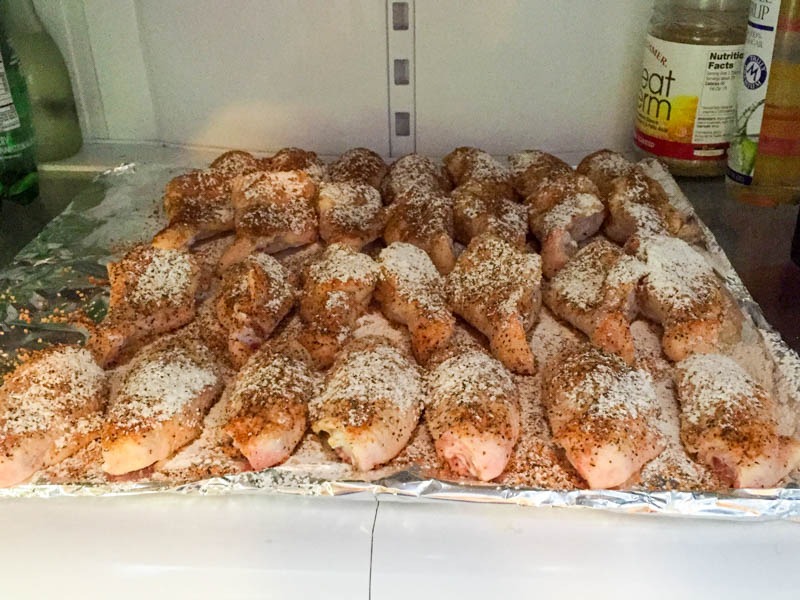
Prepping the Wings
Before the wings ever touch the grate, the prep work determines the final texture. I start by breaking down the whole wings into drumettes and wingettes, discarding the tips (or saving them for a future stock).
Once separated, I lay them out on a large baking sheet, making sure they are all skin-side up. At this stage, I take a paper towel and pat each wing as dry as possible; moisture is the enemy of crispiness!
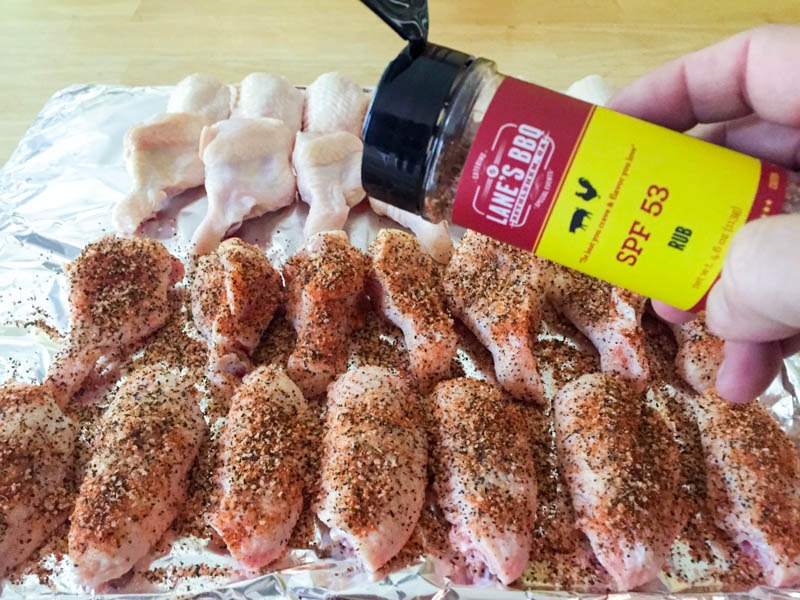
Seasoning with Spellbound Hot
With the wings prepped, I apply the Lane’s BBQ Spellbound Hot liberally across the skin side. You want a consistent, edge-to-edge coating. Because this rub has a perfect balance of salt and sugar, it’s going to caramelize beautifully, while the heat from the peppers provides that signature spicy kick we’re after.
Pro Tip: Don’t be afraid to be generous here. A lot of the seasoning can get rendered off during the cook, so a heavy initial coat ensures the final product is packed with flavor.
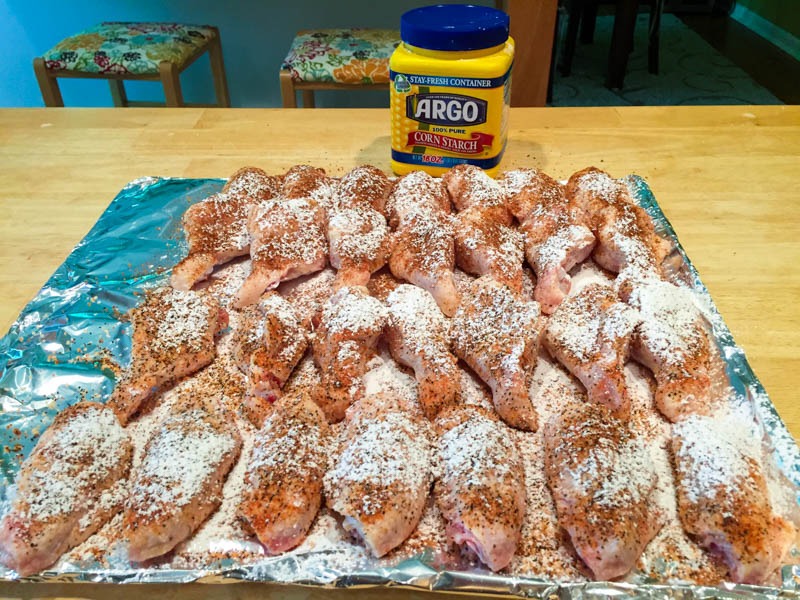
The Cornstarch “Crust” Application
After the wings are seasoned with the Spellbound Hot, it’s time for the secret weapon. Taking a small shaker or a fine-mesh sieve, I lightly dust the cornstarch over the top of the wings.
The goal here is a translucent “ghost” layer, not a thick coat of white powder. If you go too heavy, you risk a chalky texture; if you go too light, you won’t get that “fried” crunch. You want just enough starch to interact with the fat as it renders out during the cook.
Step 2: The “Dry Brine” Advantage
Once the wings are seasoned and dusted with cornstarch, there is one final, crucial step before they hit the grill: the cold rest. I place the entire tray in the refrigerator, uncovered, while I head outside to get the Big Green Egg up to temp. This serves a dual purpose:
- Moisture Extraction: The cold, circulating air of the refrigerator acts as a dehumidifier. It dries out the skin, which is the ultimate secret to avoiding “rubbery” wings.
- Setting the Rub: This short rest allows the salt in the Spellbound Hot rub to penetrate the meat, while the cornstarch begins to bond with the skin’s surface.
By the time your Egg is stabilized at 400°F, the wings will have a slightly tacky, “cured” appearance. This is exactly what you want. When that dry skin hits the high-convection heat of the Big Green Egg, it will puff up and crisp almost instantly, giving you that deep-fried texture with all the benefits of wood-fired smoke.
Step 3: Big Green Egg Setup: The Raised Direct Method
To get that signature “fried” crunch on the Big Green Egg, we are utilizing a Raised Direct cook. This is easily achieved with the EGGspander System, which is designed to lift your food higher into the dome.
Why Raised Direct?
Normally, “direct” grilling means your meat is sitting just inches away from the glowing coals… perfect for a steak, but a recipe for disaster for chicken wings. The high fat content and the sugars in the Spellbound Hot rub would char and turn bitter long before the chicken is cooked through.
By using the EGGspander, we use the main grilling surface in its naturally elevated position. This height allows the intense radiant heat to mellow out, transforming it into a high-heat convection environment. It crisps the skin and renders the fat perfectly while infusing that unmistakable wood-fired flavor without the constant threat of flare-ups.
Lighting and Temp Control
- Clean Out the Ash: Start with a clean firebox to ensure maximum airflow for a hot, clean fire.
- Light the Lump: Pile your high-quality lump charcoal and light it in the center. I prefer using one or two natural fire starters.
- The Climb to 400°F: Leave the lid open for about 5-10 minutes until the embers are established, then close the lid. Open both the bottom vent and the top daisy wheel (or Regulated Air Controller) wide.
- Stabilizing: As the temperature gauge approaches 350°F, begin closing the vents down. Your goal is a rock-steady 400°F. This is the “sweet spot” where the cornstarch and chicken fat transform into a crispy crust.
Once your temperature is dialed in and the smoke is running thin and blue, place the EGGspander base and the main cooking grate into the Egg. You are now ready to cook “in the dome,” where the heat is most consistent and the air circulation is at its peak.

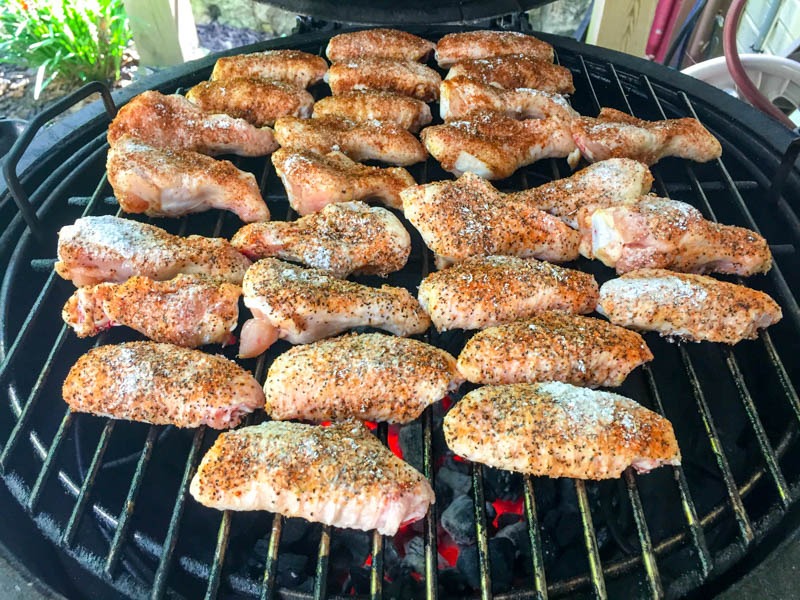
Step 4: Hitting the Grate
Once the Big Green Egg has stabilized at 400°F, it’s time to get the wings on. Open the lid and arrange the wings across the elevated grate, ensuring you place them skin-side up.
Space them out slightly so they aren’t touching; good airflow is the difference between a wing that is “steamed” and a wing that is truly “fried” by the heat of the Egg.
The First Half of the Cook
With the wings positioned high in the dome, close the lid immediately to maintain that convection heat. By starting them skin-side up, you allow the heat to rise from the coals and begin rendering the fat underneath the skin while the cornstarch on top starts to dry out and “set.”
At this temperature, you are looking at a total cook time of about 35 to 45 minutes. Here is what’s happening inside the dome:
- The First 20 Minutes: The internal temperature of the chicken climbs, and the fat begins to liquify.
- The Sizzle: You’ll start to hear a gentle sizzle as that rendered fat interacts with the Spellbound Hot rub and the cornstarch.
- The Aroma: This is when the kitchen-grade spices in the Lane’s rub really start to bloom, filling the air with a sweet and spicy wood-fired scent that will have your neighbors peaking over the fence.
Pitmaster Note: Resist the urge to “peek.” Every time you open the lid, you lose that pressurized convection heat that is doing the hard work of crisping the skin. Trust the process!
Step 5: The Flip and the Finish
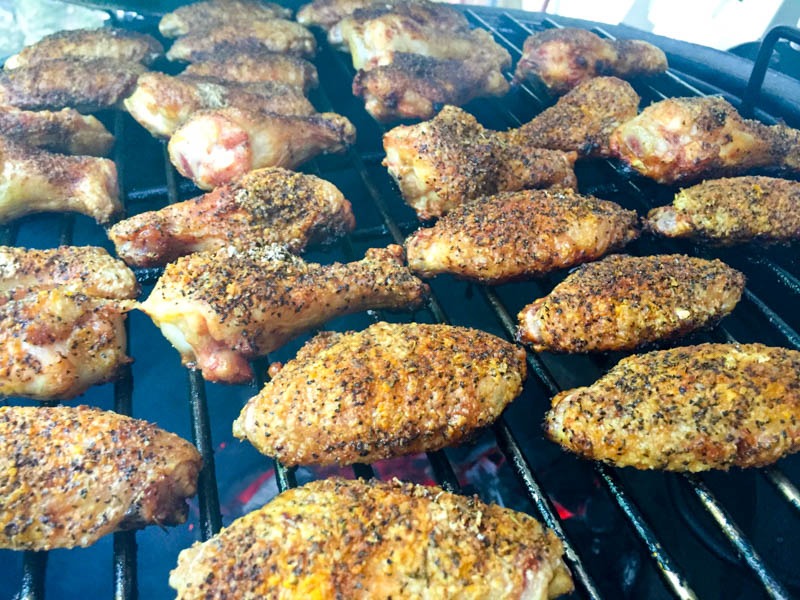
Patience is key here, but timing is everything. I let the wings roast in that high-convection environment for about 25 minutes before opening the lid for the first time.
At this halfway mark, you’ll notice the skin has started to tighten and the Spellbound Hot rub has turned a beautiful, deep mahogany. Now, it’s time to flip. Using long-handled tongs, turn each wing over to ensure the underside gets some of that direct radiant heat from the coals.
Pushing for Maximum Crunch
After the flip, let them go for another 20 to 25 minutes (bringing the total cook time to about 50 minutes). You are looking for a few specific cues to know they are done:
- The Visual: The skin should be dark golden-brown and look visibly “bumpy” and textured from the cornstarch reaction.
- The Touch: If you tap the skin with your tongs, it should feel firm and “clack” rather than feel soft or squishy.
- The Internal Temp: While most chicken is safe at 165°F, wings are actually best when pushed to 185°F or even 190°F. This extra time breaks down the collagen in the joints, making them “fall-off-the-bone” tender while the skin stays crispy.
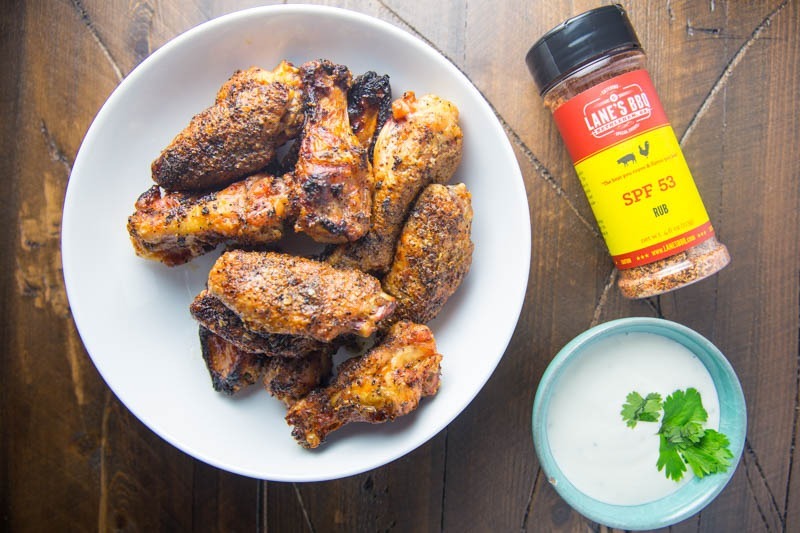
The Result
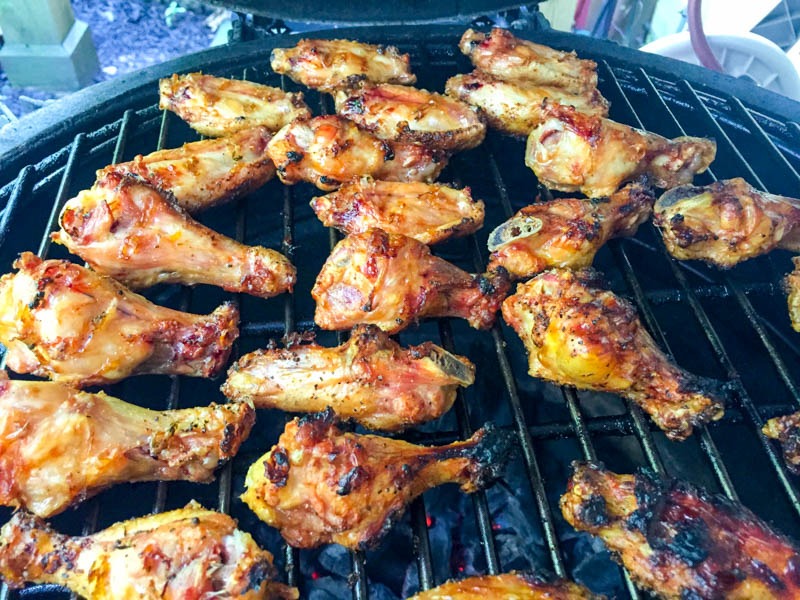
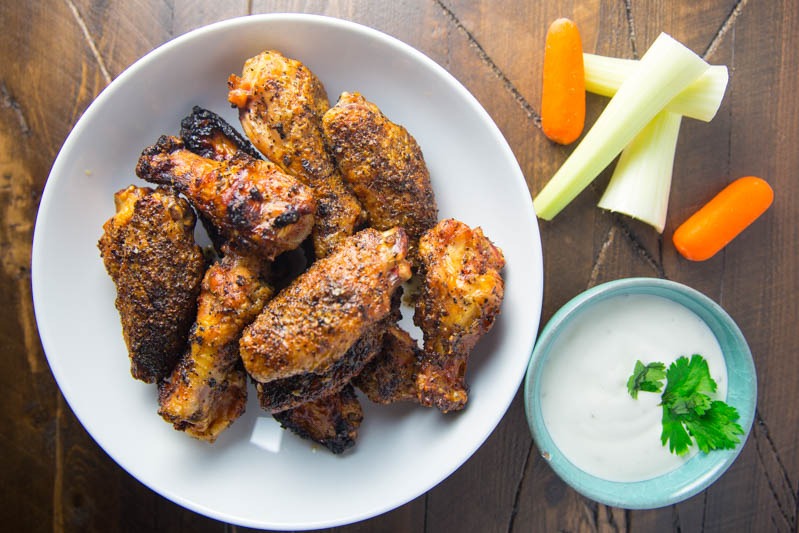
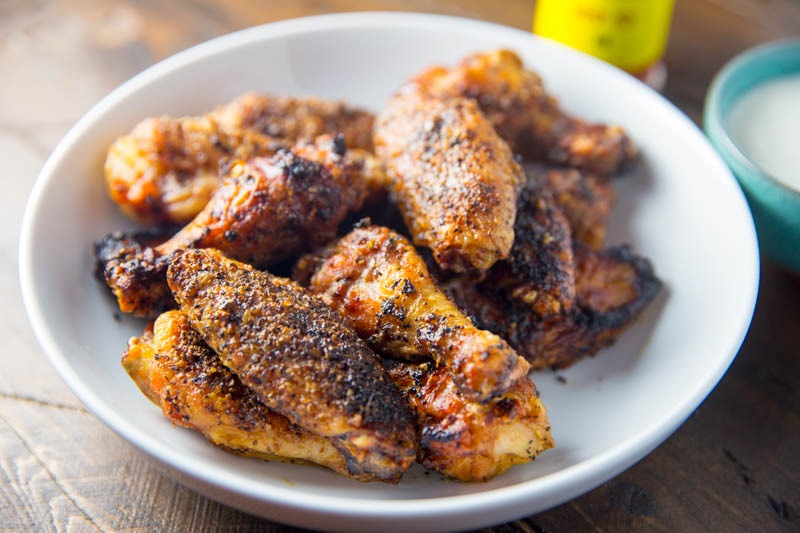
When I pulled these off the Egg, the skin was perfectly brown and incredibly crispy to the touch, exactly the sensation of a deep-fried wing but with the depth of flavor you can only get from lump charcoal. The Lane’s Spellbound Hot rub provides a lingering heat that builds with every bite, making them the ultimate companion for a cold beer and a Saturday afternoon of football.
Step 6: The Final Touch: The “Dry-Buffalo” Finish
Once the wings hit that perfect level of crunch and hit an internal temp of around 190°F, I pulled them off the Egg and moved them into a large stainless steel bowl. Now, you could eat these straight off the grate, the Spellbound Hot rub is that good, but I wanted to take them over the top.
The Buddha’s Glaze
I tossed the hot wings with 4 Tbsp of melted butter and an extra dusting of the Lane’s BBQ Spellbound Hot.
This “Dry-Buffalo” technique is a game-changer. The melted butter acts as a vehicle, carrying the spices into every nook and cranny of the crispy skin, creating a rich, velvety coating that isn’t as heavy or messy as a traditional wet sauce. The combination of the heat from the rub and the richness of the butter makes for a fantastic wing-eating experience that will have you reaching for another beer.
Final Verdict
I’m a huge fan of this rub. It has that signature Lane’s complexity, and the heat level is punchy enough to let you know it’s there without being overwhelming. My only personal recommendation? If you’re like me and have a very high tolerance for heat, don’t be afraid to go even heavier on that final dusting of rub… I like it when my wings fight back a little!
I’m already looking forward to trying this blend on some pork tenderloin or even a spicy smoked mac and cheese soon.
Print
Big Green Egg Spicy Chicken Wings
This recipe for Big Green Egg Spicy Chicken Wings features the new rub from Lane's BBQ Spellbound Hot. A great balance of heat and savory that works well with Chicken Wings.
Course Poultry
Cuisine BBQ
Prep Time 10 minutes minutes
Cook Time 1 hour hour 10 minutes minutes
Total Time 1 hour hour 20 minutes minutes
Servings 4
Author The BBQ Buddha
- 3-4 pounds Chicken Wings
- 5 tbsp Lane's BBQ Spellbound Hot
- 3 tbsp Corn Starch
Finishing Glaze Ingredients:
- 4 tbsp unsalted butter melted
- 1 tbsp Lane's BBQ Spellbound Hot
Cut the whole wings up in to the drumettes and wingettes.
Lay them out on a baking sheet skin side up. Apply the SPF53 liberally to skin side of the wings.
After the rub was applied shake the cornstarch over the wings dusting each wing with the corn starch.
Place the tray in the refrigerator while you setup the Big Green Egg for this cook. This allows the skin to dry which helps get that crispiness.
Light the charcoal using a raised grid for this cook.
Once the BGE was at temp (400° measured at the dome) place the wings on skin side up.
Let the wings cook that way for 25 minutes until the skin was brown and crispy to the touch.
Flip the wings over and cooked them another 25 minutes until the skin browned.
After the wings were done pull them and toss with 4 Tbls of melted butter and more rub.
Serve with Blue Cheese dressing, celery stalks, and carrots.
The post Big Green Egg Spicy Chicken Wings appeared first on The BBQ Buddha.
