Overlanding is the ultimate expression of freedom, blending off-road exploration with self-reliant travel. But true freedom on the trail isn’t just about having a capable 4×4; it’s about being prepared for whatever the backcountry throws your way. A forgotten item can turn a dream trip into a logistical nightmare, while the right gear can transform a challenging obstacle into a triumphant memory.
This comprehensive overlanding checklist moves beyond the basics, offering a detailed breakdown of ten critical gear categories that form the backbone of any successful expedition. We’ll explore not just what to bring, but why each item is crucial, how to use it effectively, and what separates professional-grade equipment from the weekend warrior’s setup. Whether you’re a seasoned explorer or just starting to venture past the pavement, this guide is designed to be your definitive resource. As part of your master plan for self-sufficient adventure, especially when traveling abroad, it’s wise to ensure your vehicle is capable. For example, adventurers exploring North Africa might consider options like renting a 4×4 in Morocco without a driver to guarantee they have a trail-ready vehicle suited for diverse terrains.
Our goal is simple: to help you build a kit that empowers you to explore farther, stay out longer, and handle any situation with unwavering confidence. By the end of this guide, you will have a clear, actionable plan for outfitting your vehicle for true self-sufficiency. Prepare to dive into the essential systems, from vehicle recovery and navigation to camp comfort and emergency preparedness, turning your rig into a mobile base for any adventure you can imagine.
1. Recovery Gear (Winch, Straps, Shackles)
Overlanding, by its very nature, means pushing into remote and unpredictable terrain. The first and most critical category on any comprehensive overlanding checklist is self-recovery gear. This isn’t just a “nice-to-have”; it’s a fundamental safety system for when you inevitably encounter mud, sand, snow, or a tricky obstacle that brings your journey to a halt. Being stranded without a way to self-extract can turn a minor inconvenience into a dangerous, trip-ending emergency.
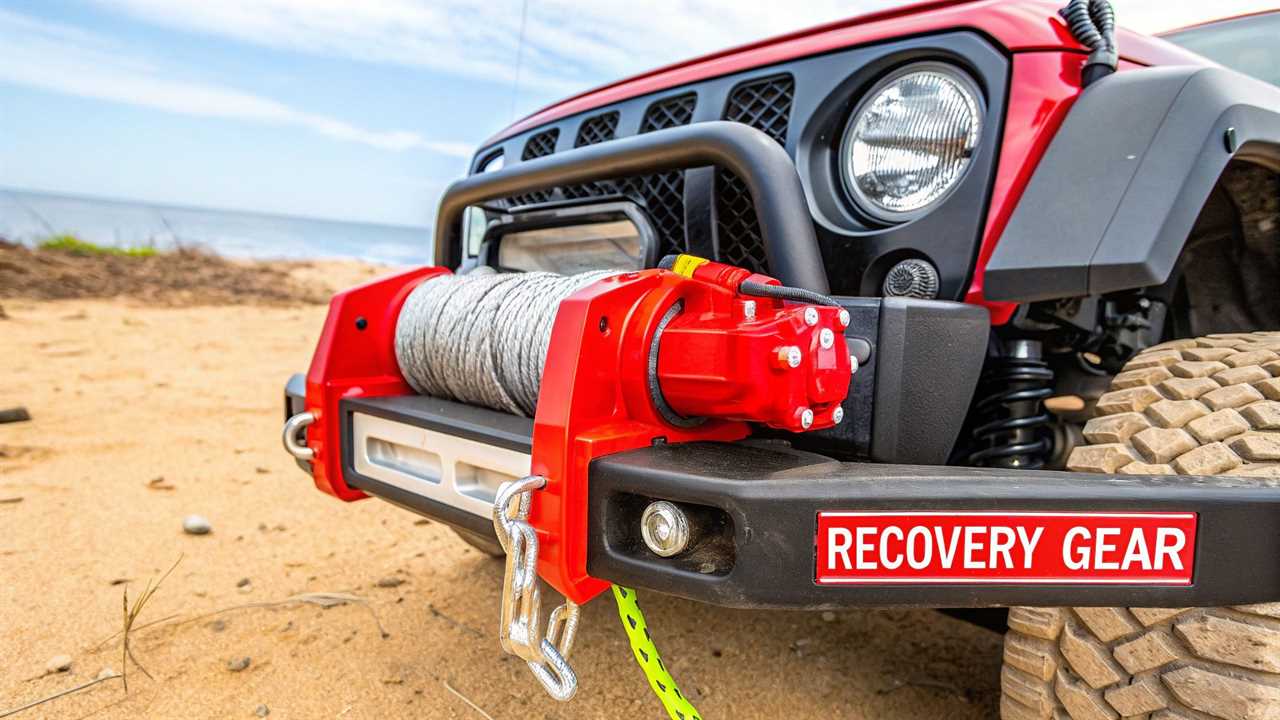
This equipment is designed to use mechanical advantage and secure anchor points to pull your vehicle free. For instance, professional expedition teams often rely on Warn VR EVO winches for their reliability in remote regions, while ARB’s complete recovery kits have become a standard in the harsh Australian outback. The core principle is to have a robust, safe method to move a multi-ton vehicle when its own power isn’t enough.
Key Components of a Recovery Kit
A basic yet effective recovery kit should include several key items, each with a specific purpose:
- Winch: A powerful electric or hydraulic tool mounted to your vehicle’s front bumper. It allows for controlled, powerful pulls to extract yourself or another vehicle.
- Recovery/Snatch Strap: A strap with built-in elasticity designed to “snatch” a stuck vehicle free using kinetic energy. Crucially, never use a tow strap (which has no stretch) for this purpose.
- Shackles & D-Rings: Heavy-duty, load-rated metal loops used to connect straps, winch lines, and tree savers to your vehicle’s recovery points. Factor 55 has innovated in this space with closed-system winching hardware for enhanced safety.
- Tree Trunk Protector: A wide, non-stretch strap wrapped around a tree to create a secure anchor point for winching without damaging the tree or your gear.
Mastering Recovery Techniques
Simply owning the gear is not enough; you must know how to use it safely and effectively. Channels like Matt’s Off Road Recovery have become popular not just for entertainment, but for demonstrating real-world recovery techniques. Before heading out, find out how to pick the right winch for your needs and practice using your equipment in a controlled environment.
Always inspect your gear for frays, cracks, or damage before each trip. During a recovery, wear heavy-duty gloves, use a winch line dampener to absorb energy in case of a snap, and ensure all bystanders are at a safe distance. Proper training transforms this equipment from dead weight into your most valuable trail asset.
2. Portable Fridge/Freezer
Transitioning from a traditional ice cooler to a portable 12V fridge/freezer is a game-changer for any serious overlanding checklist. Unlike coolers that require constant ice refills and result in soggy food, an electric fridge provides consistent, reliable refrigeration or freezing. This allows for longer trips, better meal planning with fresh ingredients, and eliminates food waste, elevating your entire camp kitchen experience from basic to gourmet.
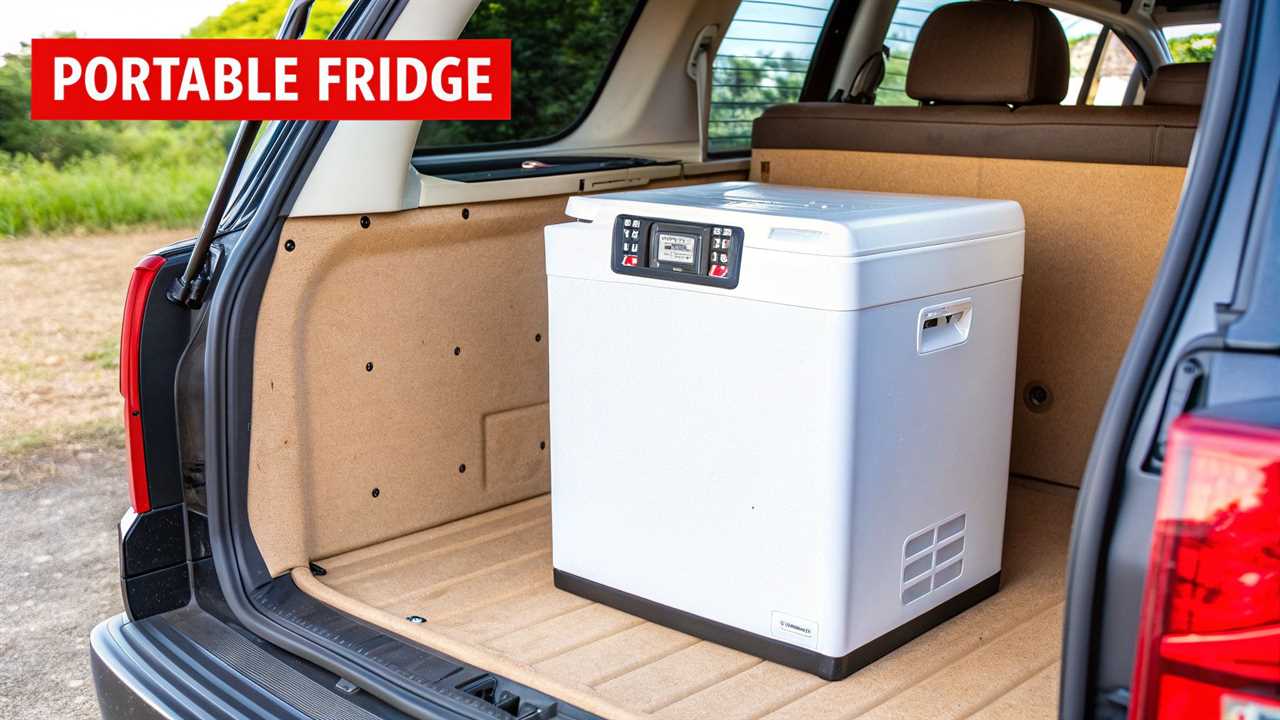
These units are built for the rigors of off-road travel, capable of running efficiently on your vehicle’s 12V DC power. For instance, the Dometic CFX series is trusted on extreme expeditions for its durability, while ARB’s fridge/freezers are a common sight in demanding industrial environments like Australian mining operations. The core value is food safety and convenience, ensuring you can store perishables for days or even weeks in remote locations. For truly remote travel where you need to stay connected for weather updates or work, dedicated off-grid internet options become just as crucial as reliable food storage.
Key Considerations for a Portable Fridge
Choosing the right fridge involves balancing size, power consumption, and features. Here are the essential aspects to consider:
- Single vs. Dual Zone: A single-zone unit can be set as either a fridge or a freezer. A dual-zone model has separate compartments, allowing you to refrigerate and freeze food simultaneously.
- Power Consumption: Modern fridges from brands like Engel and ARB feature highly efficient compressors and low-voltage cutoffs to protect your vehicle’s starting battery.
- Capacity: Measured in liters or quarts, the size you need depends on trip length and the number of people. A 40-50L fridge is a popular choice for couples or small families on weekend trips.
- Durability: Look for robust construction, strong handles, and a design that can withstand constant vibration and operate at steep angles without failing.
Mastering Fridge Efficiency
Simply plugging in your fridge is the first step; optimizing its performance for off-grid use is key. Before you head out, read up on how to pick an overland fridge that matches your power system and travel style.
To maximize efficiency, pre-cool the fridge and its contents at home using AC power before your trip. Always ensure there is adequate ventilation around the unit’s compressor to allow heat to dissipate. For extended journeys far from civilization, a dual-battery system is highly recommended. This provides a dedicated power source for your accessories, ensuring your fridge can run 24/7 without ever draining the battery needed to start your engine.
3. Roof Top Tent (RTT)
A cornerstone of modern overlanding, the Roof Top Tent (RTT) has revolutionized how adventurers camp in the wild. This elevated shelter mounts directly to your vehicle’s roof rack system, providing a comfortable, secure sleeping area that is off the ground. Its primary advantage is rapid deployment; most RTTs can be set up or packed away in minutes, a massive benefit after a long day of driving or when breaking camp in bad weather. This efficiency is a key reason an RTT is a high-priority item on any serious overlanding checklist.
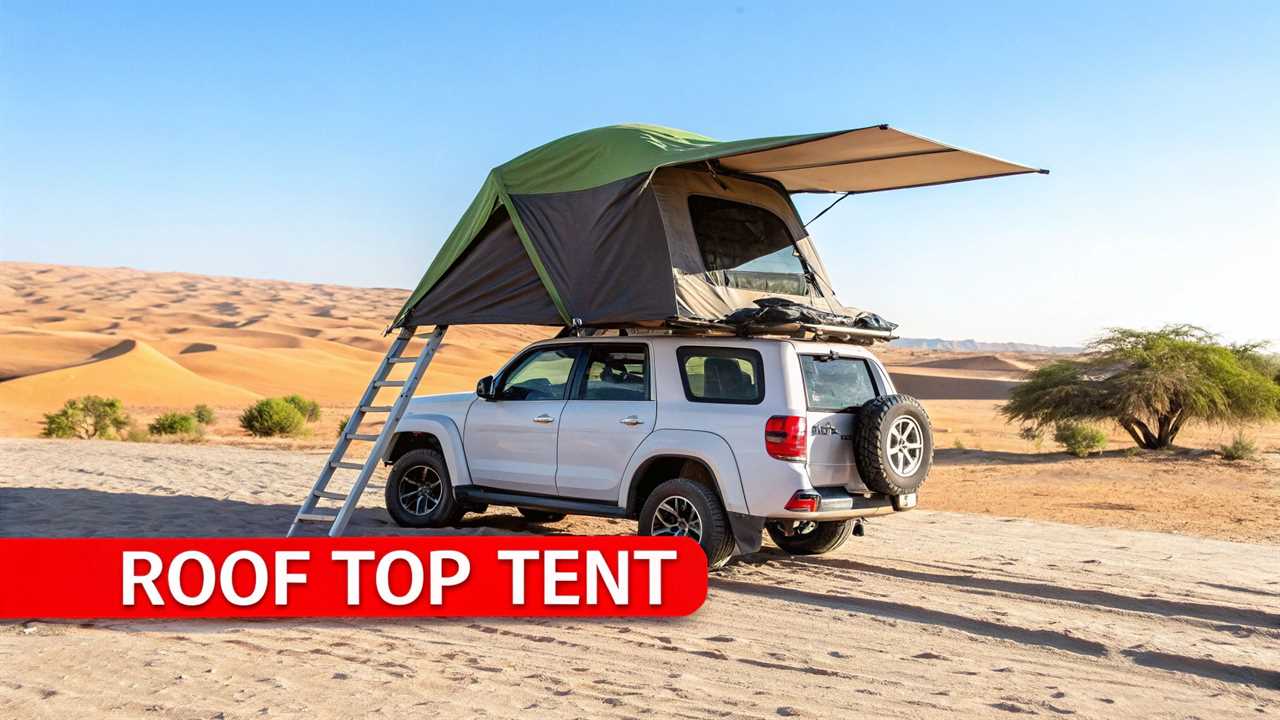
By lifting your sleeping quarters above ground, you are protected from moisture, uneven terrain, and curious wildlife. This design maximizes usable ground space around your vehicle for cooking and relaxing. The utility of RTTs is proven in demanding environments worldwide; for example, CVT tents are a common sight in African safari operations for their durability, while support crews for the grueling Baja 1000 race have relied on brands like Tepui for quick, reliable shelter.
Key Components and Considerations
Choosing the right RTT involves more than just picking a brand. It requires matching the tent’s features to your travel style and vehicle capabilities.
- Soft Shell vs. Hard Shell: Soft shell tents are often more spacious and affordable, unfolding like a book. Hard shell tents offer faster setup, better aerodynamics, and superior weather protection.
- Roof Rack Compatibility: Your vehicle’s roof rack system must have a Dynamic Weight Capacity (DWC) that exceeds the weight of the tent itself for safe driving. The Static Weight Capacity (SWC), which is much higher, must support the tent plus its occupants.
- Mattress and Materials: A quality built-in mattress is crucial for comfort. The tent’s fabric (canvas weight, waterproofing) determines its durability and performance in different climates.
Mastering RTT Usage
Proper setup and maintenance are vital for getting the most out of your investment. Events like Overland Expo have been instrumental in educating users, offering hands-on demonstrations and best-practice clinics that show how to correctly mount and deploy these systems.
Before your first trip, practice setting up and taking down the tent at home. This ensures you are familiar with the process and can do it efficiently on the trail. Always use the provided travel cover and secure all tie-downs correctly for highway travel to prevent damage. Regularly check all mounting hardware to ensure it remains tight and secure throughout your journey.
4. Portable Power Station/Solar Setup
Modern overlanding blends rugged exploration with essential comforts, and the key to powering those comforts off-grid is a reliable portable power and solar setup. This system allows you to generate, store, and use clean, quiet electricity far from any outlet. It’s an indispensable part of any serious overlanding checklist, enabling you to run everything from refrigerators and communication devices to camp lights and laptops without idling your vehicle’s engine, preserving fuel and peace in the backcountry.
These lithium battery-based power stations are essentially silent, fume-free generators that you can recharge via portable solar panels, your vehicle’s 12V socket while driving, or a standard wall outlet before you leave. The concept has been proven in extreme environments; for example, Goal Zero systems are often used to power remote scientific research stations, while Jackery units have become vital tools in disaster relief operations where grid power is nonexistent. This technology brings self-sufficient energy management to your campsite.
Key Components of a Power System
A capable off-grid power solution consists of two primary parts working in tandem:
- Portable Power Station: This all-in-one unit contains a lithium-ion battery, a charge controller to manage incoming power, an inverter to convert DC to AC power, and multiple output ports (AC, DC, USB).
- Solar Panels: Foldable, portable panels that capture sunlight and convert it into DC electricity to recharge your power station. Brands like Renogy and Bluetti offer efficient panels designed for mobile use.
- Cabling and Connectors: The necessary wiring to connect your solar panels to the power station and any accessories you need to run directly from the unit.
Mastering Your Power Needs
Simply buying the biggest power station isn’t always the best strategy; you need to understand your own consumption to build the right system. YouTuber Will Prowse has become a go-to resource for demystifying off-grid solar, offering in-depth reviews and educational content that empower users to build efficient setups.
Before purchasing, calculate your daily energy usage in watt-hours (Wh) to select an appropriately sized station. When in the field, always position your solar panels perpendicular to the sun for maximum charging efficiency, and monitor your battery levels to prevent over-discharge, which can shorten its lifespan. Keeping spare fuses and basic electrical repair supplies on hand will ensure your power stays on throughout your adventure.
5. Comprehensive First Aid Kit
When traveling to remote destinations, access to professional medical care can be hours or even days away. A basic store-bought first aid kit is simply not enough. A comprehensive, wilderness-specific medical kit is a non-negotiable part of any serious overlanding checklist, providing the tools and supplies necessary to manage injuries and illnesses until you can reach definitive care. Being unprepared for a medical emergency can have far more severe consequences than a mechanical failure.
This goes beyond simple bandages and antiseptic wipes. A proper overland kit is designed for trauma care and environmental injuries common to backcountry travel. Organizations like NOLS and Wilderness Medical Associates have pioneered the field of wilderness medicine, developing protocols and kit contents specifically for these austere environments. For instance, the kits carried by search and rescue teams often include supplies for splinting, severe bleeding control, and managing allergic reactions, reflecting the real-world risks involved.
Key Components of a Wilderness First Aid Kit
An effective kit is organized and tailored to your trip’s specific risks, duration, and the number of people in your group. It should contain:
- Trauma Supplies: This includes tourniquets (like a C-A-T), Israeli bandages, chest seals, and ample gauze. These items are for managing life-threatening bleeding, which is a primary concern in remote accidents.
- Wound Care: A robust selection of antiseptic wipes, irrigation syringes, various bandage sizes, butterfly closures, and medical tape to clean and close minor to moderate lacerations.
- Medications: Beyond standard pain relievers, include antihistamines for allergic reactions, anti-diarrhea medication, and any necessary personal prescription medications for your group. Crucially, include a list of each person’s medications and known allergies.
- Splinting Materials: A SAM Splint is a lightweight, versatile, and indispensable tool for immobilizing fractures and sprains.
Mastering Medical Preparedness
Having the kit is only half the battle; knowing how to use it under pressure is what truly matters. Before a big trip, it is highly recommended to take a Wilderness First Aid (WFA) or Wilderness First Responder (WFR) course. These hands-on courses teach you how to assess a patient and improvise solutions with limited resources.
Regularly inspect your kit before every outing. Check for expired medications, restock used items, and ensure everything is organized and easily accessible. Practice scenarios, like splinting an arm or applying a pressure dressing, with your travel partners. This preparation transforms your first aid kit from a box of supplies into a life-saving system.
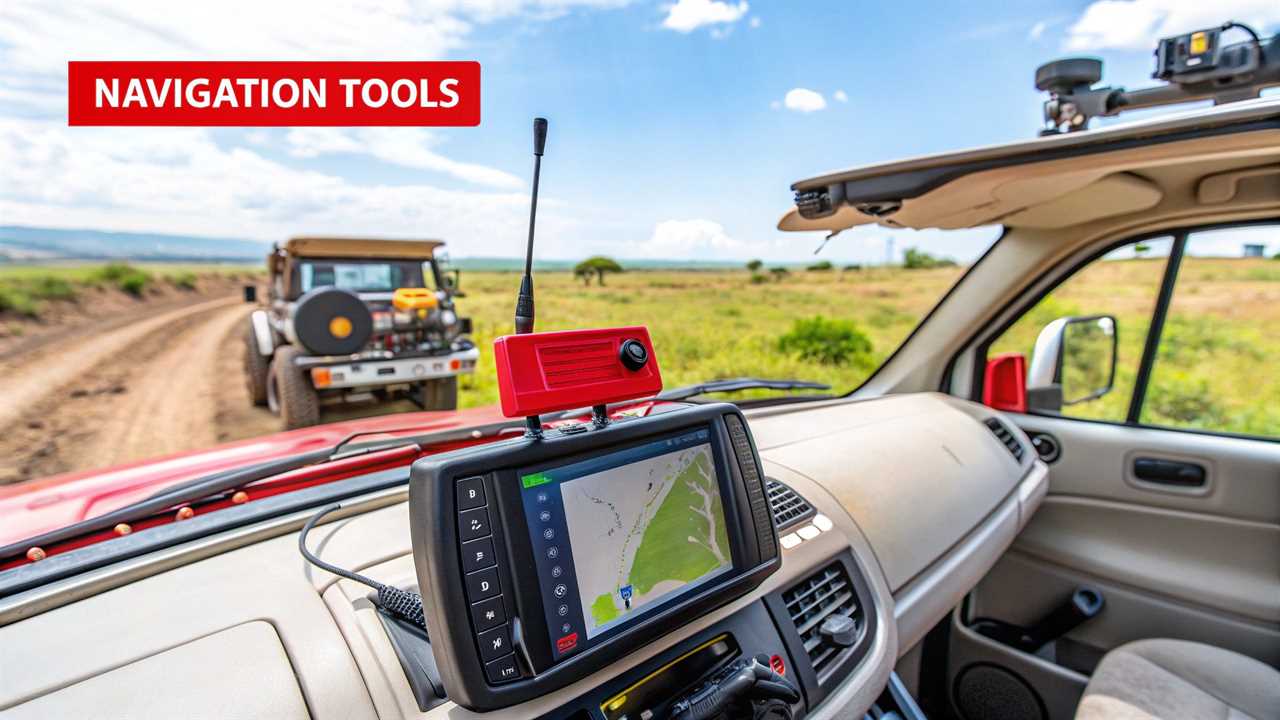
6. Navigation and Communication Systems
When your route takes you beyond the reach of cell towers, reliable navigation and communication systems are no longer a luxury; they are your lifeline. A core tenet of any overlanding checklist is preparing for the loss of modern conveniences, and that starts with knowing where you are, where you’re going, and how to call for help if needed. Relying solely on a cell phone is a rookie mistake that can lead to being dangerously lost.
The goal is to build a redundant system, layering modern technology with proven traditional methods. For instance, solo motorcycle adventurers often depend on a Garmin inReach for its two-way satellite messaging and SOS functions, while commercial rafting operations have used SPOT devices for years to track trips in deep canyons. The principle is simple: never have a single point of failure for your most critical directional and safety information.
Key Components for Navigation and Communication
A well-rounded setup ensures you can navigate and communicate in any scenario, combining digital precision with analog reliability:
- GPS Unit: A dedicated off-road GPS device offers ruggedness, detailed topographic maps, and tracking features that far surpass a standard car unit or phone app.
- Satellite Communicator/Messenger: Devices like the Garmin inReach or SPOT X provide two-way messaging, location sharing, and a critical SOS button that connects you to a global emergency response coordination center, completely independent of cellular service.
- Paper Maps & Compass: Technology can fail. High-quality, detailed topographic paper maps of your intended area (like those from National Geographic) and a reliable compass are your ultimate backup. Crucially, you must know how to use them together.
- Offline Mapping Apps: Applications like OnX Offroad or Gaia GPS allow you to download detailed trail maps directly to your phone or tablet, providing GPS-based location tracking even without a cell signal.
Mastering Your Nav-Comm Systems
Having the right gear is only half the battle; proficiency is what truly keeps you safe. Before you even leave the driveway, download all necessary offline maps for your entire planned route and potential detours. Test every single piece of electronic equipment, from its battery life to its satellite signal acquisition.
Always share your itinerary and planned check-in times with a reliable contact back home. Provide them with your satellite device’s tracking link. Most importantly, practice basic land navigation. Learn how to read a topographic map and take a bearing with a compass. This fundamental skill ensures that even if every battery dies, you can still find your way. To go deeper, learn more about how to get the ideal off-road GPS on offroading.com.
7. Tire Repair and Inflation Kit
Your tires are the single point of contact between your multi-ton vehicle and the demanding terrain you’re traversing. A flat tire in the city is an inconvenience; in a remote, off-grid location, it can be a serious expedition-ending problem. A comprehensive tire repair and inflation kit is a non-negotiable part of any serious overlanding checklist, providing the tools to fix punctures and adjust tire pressure for optimal performance and safety on varied surfaces.
This system is about more than just a spare tire; it’s about self-sufficiency. For instance, high-quality onboard air compressors from ARB are not only staples in overland builds but are also trusted in grueling environments like the Dakar Rally. The core principle is having a reliable method to repair common tire failures and manage air pressure, which is crucial for traction, ride comfort, and preventing further damage when moving from pavement to sand, rock, or mud.
Key Components of a Tire Kit
A robust tire management system goes beyond what comes standard with your vehicle. It should empower you to handle multiple punctures and dynamic conditions.
- High-Volume Air Compressor: An essential tool for reinflating tires after repairs or airing down. Onboard models like those from ARB provide fast, high-volume air, while portable units from brands like Viair offer flexibility.
- Tire Plug Kit: The heart of your repair system. A quality kit includes a reamer tool to clean the puncture, an insertion tool, and a supply of sticky plugs to seal the hole.
- Tire Pressure Gauge: A reliable, accurate gauge is critical for airing down correctly and ensuring even pressure across all tires.
- Spare Valve Stems & Core Tool: Valve stems can be damaged by rocks or debris. Carrying spares and a tool to replace them is a simple, effective precaution.
Mastering Tire Management
Having the kit is one thing; knowing how to confidently use it when you’re miles from help is another. Your overlanding checklist should include not just the gear, but the skill to use it. The Expedition Overland team regularly demonstrates the importance of airing down and making trailside repairs in their series, showcasing how vital this skill is for successful long-range travel.
Before any major trip, practice plugging an old tire in your driveway. Learn the appropriate tire pressure for your vehicle’s load on different terrains like sand, gravel, and rock. Always carry more plugs than you think you’ll need, and regularly inspect your compressor and tools to ensure they are in working order. This preparation turns a potential crisis into a manageable trailside task.
8. Water Storage and Purification System
Water is the most fundamental resource for survival, and in remote overlanding environments, you cannot assume a clean source will be available. A robust water storage and purification system is non-negotiable, providing the life-sustaining hydration needed for everything from drinking and cooking to cleaning. Relying solely on bottled water is inefficient for multi-day trips and creates unnecessary waste; a dedicated system ensures you can safely process water from streams, lakes, or questionable spigots, making you truly self-sufficient.
This system is about more than just a few jugs of water; it’s a comprehensive approach to carrying, filtering, and accessing clean water. For instance, many purpose-built overland rigs feature integrated water tanks and pumps, while weekend adventurers might use high-capacity portable containers like those from Scepter or Front Runner. The core principle is having enough stored water for your planned route, plus the means to replenish it safely from natural sources if your trip is extended or plans change.
Key Components of a Water System
An effective water management setup combines bulk storage with reliable purification, ensuring safety and convenience:
- Storage Tanks/Containers: These can range from built-in, under-vehicle tanks to portable, BPA-free plastic jerry cans. The goal is to carry enough water for your crew for several days (a common guideline is one gallon per person, per day).
- Primary Purifier: This is your main filtration method. Gravity-fed systems like the Katadyn BeFree or Berkey are excellent for base camp, while inline UV sterilizers or multi-stage filters can be plumbed directly into your vehicle’s water lines.
- Backup Filtration: Technology can fail. Always carry a secondary, simple purification method. This could be a portable squeeze filter like a Sawyer Squeeze, a pump filter, or purification tablets like Aquatabs.
- Hoses and Fittings: Food-grade hoses and quick-disconnect fittings are essential for cleanly filling your tanks and accessing water without contamination.
Best Practices for Water Management
Simply having the gear is the first step; using it correctly is what keeps you safe. Global aid organizations rely on LifeStraw technology in disaster zones, and military units have long trusted Katadyn filters in the field because their effectiveness is proven. Adopt a similar mindset of diligence and redundancy for your overlanding checklist.
Treat every natural water source as potentially contaminated with bacteria, protozoa, or viruses. Before your trip, test your entire system for leaks and flow, and be sure to check the lifespan of your filter cartridges. In colder climates, take steps to insulate your tanks and lines to prevent freezing, which can damage your equipment and leave you without access to water when you need it most. A well-planned water system is a cornerstone of safe and successful remote travel.
9. Vehicle Tool Kit and Spare Parts
The freedom of overlanding is directly tied to your self-sufficiency, and nowhere is this more apparent than with mechanical issues. A breakdown that’s a simple tow in the city becomes a major logistical crisis hundreds of miles from the nearest mechanic. A comprehensive vehicle tool kit and a curated selection of spare parts are your mobile garage, providing the means to diagnose, maintain, and repair your rig in the field. This element of your overlanding checklist isn’t just about convenience; it’s about resilience and maintaining control over your journey.
The philosophy behind a field kit is borrowed from military vehicle maintenance and rally racing service crews, where the ability to perform rapid, effective repairs under pressure is paramount. For example, many Trans-Africa expeditions carry not just tools but entire assemblies like spare CV axles or alternators. The goal is to transform a trip-ending failure into a manageable trailside fix.
Key Components of a Field Repair Kit
A robust kit goes beyond a basic socket set. It should be tailored specifically to your vehicle’s common failure points and maintenance needs.
- Vehicle-Specific Tools: Include tools required for your specific make and model, such as hub nut sockets, fan clutch wrenches, or specific Torx/Allen bits that standard kits often miss.
- Essential Spares: Carry parts that are known to wear or fail. This typically includes belts, hoses, fuses, U-joints, and a fuel or air filter.
- Fluids: Pack at least one quart of essential fluids like engine oil, brake fluid, coolant, and gear oil.
- Emergency Repair Supplies: Items like JB Weld, RTV silicone, rescue tape, zip ties, and a tire plug kit can perform incredible temporary fixes to get you back to civilization.
Mastering Field Repairs
Carrying tools without the knowledge to use them is pointless. The most prepared overlanders invest time in learning their vehicle’s systems. You don’t need to be a master mechanic, but you should be comfortable with basic maintenance and common repairs before heading into the backcountry.
Practice common tasks like changing a tire, replacing a serpentine belt, or swapping a filter in your driveway. Download your vehicle’s factory service manual (FSM) to a tablet or phone for offline access. Keep your tools organized and accessible, and always perform a full shakedown of your vehicle and kit before any major expedition to ensure everything is in working order.
10. Portable Cooking System
Good food is more than just fuel; it’s a critical component of morale on any extended overland journey. A reliable and efficient portable cooking system ensures you can prepare satisfying, safe, and hot meals far from civilization. This goes beyond just a camp stove; it encompasses a complete setup for food preparation, cooking, and cleanup, turning your campsite into a functional backcountry kitchen and forming a core part of any overlanding checklist.
A well-organized cooking system makes mealtime a pleasure rather than a chore, saving time and reducing stress after a long day of driving. Brands like Jetboil are renowned for their integrated, hyper-efficient systems popular in alpine expeditions, while pioneers like Primus and Coleman have set the standard for durable, versatile stoves used everywhere from family campgrounds to Arctic research stations. The goal is to have a setup that is easy to deploy, use, and pack away.
Key Components of a Camp Kitchen
A comprehensive cooking system is built around a few essential, purpose-driven items:
- Stove & Fuel: This is the heart of your kitchen. Options range from compact, single-burner canister stoves (like a Jetboil or MSR PocketRocket) to larger, dual-burner propane stoves (like a Coleman Classic) for more elaborate meals. Always carry more fuel than you think you’ll need.
- Cookware & Utensils: Choose durable, packable pots, pans, and utensils. Nesting cookware sets made from aluminum or stainless steel save valuable space. Don’t forget a cutting board, a good knife, and eating utensils.
- Food Storage: A quality cooler or a 12V portable fridge/freezer is essential for preserving perishable food and preventing spoilage. Use dry boxes or sealed containers to keep pests out of dry goods.
- Cleanup Kit: A collapsible sink, biodegradable soap, a sponge, and a quick-dry towel are non-negotiable for sanitation and following Leave No Trace principles.
Mastering Your Camp Kitchen
The difference between a frustrating meal and a delightful one often comes down to preparation and practice. Before you head into the remote backcountry, familiarize yourself with your equipment and plan your meals.
Prep ingredients at home by chopping vegetables or pre-mixing spices to minimize work at the campsite. Organize your entire system into a dedicated chuck box or storage bin for quick access. This not only speeds up cooking but also ensures you don’t forget a critical item like a can opener or coffee press. Practicing with your setup at home will make you a faster, more efficient, and happier camp chef.
Overlanding Gear Comparison Matrix
| Item |
Implementation Complexity

|
Resource Requirements

|
Expected Outcomes

|
Ideal Use Cases

|
Key Advantages

|
| Recovery Gear (Winch, Straps, Shackles) |
High: requires skill and vehicle electrical support |
Heavy and bulky; high-cost quality gear |
Enables self and assisted vehicle recovery in tough terrain |
Remote off-road recovery and vehicle extraction |
Reliable self-recovery; multi-use for others; durable gear |
| Portable Fridge/Freezer |
Medium: electrical setup and power management needed |
Requires steady power source; moderate weight |
Consistent cooling/freezing to keep food fresh |
Extended trips with perishable food needs |
Food safety without ice; dual temp zones; efficient cooling |
| Roof Top Tent (RTT) |
Medium: mounting system and setup practice required |
Adds roof load and wind drag; cost varies |
Elevated, quick shelter setup protecting from ground elements |
Camping in varied terrain needing fast setup |
Fast deployment; elevated protection; space-saving camp setup |
| Portable Power Station/Solar Setup |
Medium-High: requires electrical knowledge and setup |
Initial investment; solar panels and batteries |
Off-grid clean power for devices and appliances |
Extended off-grid camping with electrical needs |
Quiet, renewable energy; modular and emission-free operation |
| Comprehensive First Aid Kit |
Medium: requires medical knowledge/training |
Bulk and weight for full kit; needs updates |
Enables emergency medical treatment in remote locations |
Travel in remote areas with limited medical access |
Life-saving readiness; reduces evacuation; peace of mind |
| Navigation and Communication Systems |
Medium: learning curve for multiple devices |
Multiple devices with battery needs |
Reliable navigation and emergency communication |
Remote travel without cellular coverage |
Redundant navigation; satellite SOS; offline mapping |
| Tire Repair and Inflation Kit |
Medium: mechanical skills and power for air compressors |
Moderate weight; power draw for compressors |
Enables tire puncture repair and pressure maintenance |
Long journeys with variable terrain and tire risks |
Continued travel post-puncture; adjustable tire pressures |
| Water Storage and Purification System |
Medium-High: setup and maintenance of large water systems |
Heavy due to water weight; ongoing filter replacement |
Safe drinking water availability for extended trips |
Remote, multi-day trips without reliable water sources |
Reliable safe water; multiple purification methods; extended supply |
| Vehicle Tool Kit and Spare Parts |
High: requires mechanical skills and broad tool inventory |
Heavy and space consuming |
Enables on-the-spot mechanical repairs |
Remote travel with risk of vehicle issues |
Prevents breakdowns; promotes self-reliance; assists others |
| Portable Cooking System |
Low-Medium: basic setup, fuel management |
Fuel and cookware add weight and space |
Efficient meal prep and food safety in remote locations |
Outdoor cooking on multi-day trips |
Nutritious meals; dietary control; economical vs eating out |
Assembling Your Kit for Confident Exploration
Navigating the world of overlanding gear can feel as challenging as the trails you plan to conquer. This comprehensive overlanding checklist has detailed the essential systems, from critical recovery gear and vehicle tools to the camp comforts that make remote exploration sustainable and enjoyable. The goal isn’t just to accumulate equipment; it’s to build a cohesive, reliable system that empowers you to travel further, stay longer, and handle the unexpected with confidence.
The journey from a stock vehicle to a capable overland rig is one of incremental, thoughtful upgrades. Each item, whether it’s a robust winch or a simple water filter, represents a piece of a larger puzzle. Think of your build in layers, starting with the absolute non-negotiables that ensure your safety and ability to self-recover.
From Checklist to Confidence: Your Action Plan
The transition from theory to practice is where true capability is forged. Merely owning the gear is not enough. Your next steps should focus on integration, practice, and personalization.
-
Prioritize a Safety Foundation: Before investing in comfort items like a high-end fridge or a roof top tent, ensure your safety and recovery systems are complete. This means having a quality winch, appropriate straps and shackles, a comprehensive first aid kit, and reliable communication and navigation tools. These items are your lifeline when things go wrong.
-
Master Your Equipment: A winch is useless if you don’t know how to perform a safe pull. A tire repair kit is just dead weight if you’ve never plugged a puncture. Take the time to practice with your gear in a controlled, low-stakes environment. Set up your RTT in the driveway, test your portable power station with your fridge, and practice basic vehicle repairs.
Key Insight: Your confidence on the trail is directly proportional to your familiarity with your equipment. Practice builds muscle memory and removes the panic factor during a real-world incident.
- The Shakedown Run: The single most important step after assembling your initial kit is the shakedown run. This is a short, local trip, perhaps an overnight or a weekend getaway, designed to test your entire setup. You will inevitably discover what works, what doesn’t, what you forgot, and what you don’t actually need. This iterative process of testing and refining is what transforms a generic overlanding checklist into your perfect overlanding checklist.
Evolving Your Setup: The Art of Refinement
Your overlanding kit is not a static collection; it’s a living system that evolves with your experience. The gear that seems essential for a weekend trip might be replaced by a more robust or lightweight alternative for a multi-week expedition. Pay close attention to weight distribution, power consumption, and ease of access. A poorly organized setup can turn a simple task, like making lunch, into a frustrating ordeal.
Remember, the ultimate goal is not to have the most gear, but the right gear. Every item should earn its place by serving a distinct and necessary purpose, ideally more than one. A well-prepared overlander understands that self-sufficiency is a blend of equipment, knowledge, and mindset. This checklist provides the blueprint for the equipment, but the knowledge and mindset come from getting out there, making mistakes, and learning from every mile you travel. You’ve now got the foundational knowledge to assemble a kit that doesn’t just get you out there, but brings you back safely, time and time again.
Ready to turn your checklist into reality? Find expert reviews, in-depth buyer’s guides, and the latest deals on everything from recovery gear to camping systems at Offroading.com. We help you cut through the noise and choose the right equipment for your rig and your adventures, so you can build your kit with confidence.
https://offroading.com/overlanding-checklist/?utm_source=rss&utm_medium=rss&utm_campaign=overlanding-checklist
Did you miss our previous article...
https://manstuffnews.com/4x4-off-road-cars/your-guide-to-getting-unstuck-in-snow
