Thinking about rolling up your sleeves for a DIY truck bed liner? It’s easily one of the smartest and most satisfying upgrades you can give your rig. This isn’t just about a weekend project; it’s about adding a serious layer of custom-fit armor that protects your investment.
Why a DIY Truck Bed Liner Is a True Game Changer
A good truck bed liner is your first line of defense against the daily beating your truck takes. Every time you toss in gear, haul gravel, or slide a heavy toolbox across the bed, that factory paint is getting hammered. Those scratches and dings aren’t just cosmetic—they’re an open invitation for moisture to seep in, kicking off the dreaded rust and corrosion cycle.
When you apply a quality DIY bed liner, you’re essentially creating a seamless, impact-absorbing barrier. This new surface does more than just stop physical damage; it seals the metal off from the elements for good.
The Real-World Payoff
Beyond just protecting the metal, a DIY liner brings a ton of practical perks you’ll notice right away.
- Tough-as-Nails Durability: It lays down a resilient surface that shrugs off chemicals, harsh UV rays, and wild temperature swings, keeping your bed looking sharp for years.
- Keeps Your Cargo Put: The textured finish provides some much-needed grip. No more hearing your tools, coolers, and other gear sliding around every time you take a turn. It’s a simple but effective safety boost.
- Boosts Resale Value: A clean, protected truck bed is a huge plus for potential buyers. It screams “well-maintained” and shows the truck is ready for real work, which can directly increase what it’s worth.
- Serious Cost Savings: This is the big one. Professional spray-in liners can get pricey, often running several hundred dollars more than a top-notch DIY kit.
It’s no surprise that more truck owners are going the DIY route. The global truck bed liner market, valued at USD 512.47 million in 2023, is on track to hit USD 808.29 million by 2031. This surge shows just how many people are opting for the savings and satisfaction of doing it themselves. If you’re interested, you can read more about these market trends and projections.
There’s a special kind of pride that comes from getting a professional-grade finish with your own two hands. It’s not just about saving a few bucks. It’s the satisfaction of knowing you personally upgraded your truck, adding lasting protection and a custom look that’s ready for anything.
DIY vs Professional Bed Liner Installation At a Glance
Deciding between doing it yourself and hiring a pro? Both have their merits, and the best choice really depends on your budget, how much time you have, and how comfortable you are with this kind of project. Here’s a quick breakdown to help you weigh the options.
| Factor |
DIY Truck Bed Liner |
Professional Installation |
| Cost |
$100 – $300 |
$500 – $900+ |
| Time |
6-10 hours (including prep) |
3-5 hours (drop-off & pickup) |
| Customization |
Full control over texture, thickness, and coverage area |
Limited to the installer’s standard options and textures |
| Skill Level |
Beginner to Intermediate |
None required |
Ultimately, a DIY kit puts you in the driver’s seat, offering significant savings and total control over the final look. A professional job, on the other hand, offers speed and convenience if you’re short on time or prefer to leave it to the experts.
Choosing the Right DIY Bed Liner Kit for Your Needs
Walking into the world of DIY truck bed liner kits can feel like a lot to take in, but picking the right one is simpler than it looks. It all comes down to one thing: how you actually use your truck. Let’s cut through the noise and figure out which product is the right match for your real-world jobs and your comfort level with this kind of project.
The fact that there are so many options speaks volumes about how popular these kits have become. In 2024, the global truck bedliner market hit an estimated value of USD 559.6 million. While we see them all over North America, DIY solutions are also a huge driver of growth in places like Latin America and the Middle East because they’re so cost-effective. You can discover more insights about these global market trends on Cognitive Market Research.
More options are a good thing, but it means you need a clear idea of what you’re looking for.
Single-Part vs. Two-Part Systems
The first big choice you’ll make is between a single-part and a two-part liner. It’s kind of like the difference between standard house paint and a heavy-duty industrial epoxy you’d see on a factory floor.
- Single-Part Liners: These are usually polyurethane-based and are good to go right out of the can. No mixing, no fuss. They’re incredibly easy to work with, which makes them a fantastic choice for first-timers. They cure simply by reacting with the moisture in the air.
- Two-Part Liners: These kits come with a resin and a hardener that you have to mix together right before you start. This triggers a chemical reaction that creates an incredibly tough, durable, and chemical-resistant finish.
So, who needs what? If you’re a weekend warrior who’s mostly hauling camping gear, mulch, or making runs to the hardware store, you’ll probably be more than happy with the solid protection and sheer simplicity of a single-part system.
But if you’re a contractor tossing sharp tools, heavy equipment, and rough materials in the bed every day, you’ll want the superior impact resistance of a two-part epoxy or polyurea liner. That extra durability is worth the extra step.
Application Methods Compared
How you actually get the product onto the truck bed is just as critical as the product itself. Each method has its own learning curve, finish, and set of pros and cons.
| Application Method |
Best For |
Skill Level |
Finish Texture |
| Roll-On |
Beginners looking for a simple, controlled process. |
Easiest |
Generally smoother, but can be textured with special rollers. |
| Aerosol Can |
Quick touch-ups and getting into tight corners. |
Easy |
A consistent, fine texture, but tough to build thickness. |
| Spray Gun |
Getting that professional, evenly textured look. |
Intermediate |
Highly customizable texture, from fine to very aggressive. |
Pro Tip: If you go with a spray-gun kit, always do a few test passes on a big piece of cardboard. This is your chance to dial in the air pressure and find the perfect spraying distance to get the exact texture you want before you ever aim it at your truck bed.
The application method you choose directly affects the final look and feel, which also influences how you might organize your gear. For example, a really aggressive, textured liner provides incredible grip, which is a huge plus if you don’t use a truck bed toolbox. If you’re weighing storage options, our guide on how to pick the right truck bed tool box can help you find a solution that works perfectly with your newly finished liner.
Mastering the Prep Work for a Bulletproof Bond
Let’s get one thing straight about getting a professional-looking DIY truck bed liner finish: your final result is 90% preparation and only 10% application. If you cut corners here, I can guarantee you’ll be looking at a peeled, bubbled-up mess down the road. A truly permanent bond starts long before you even think about popping the lid on that liner can.
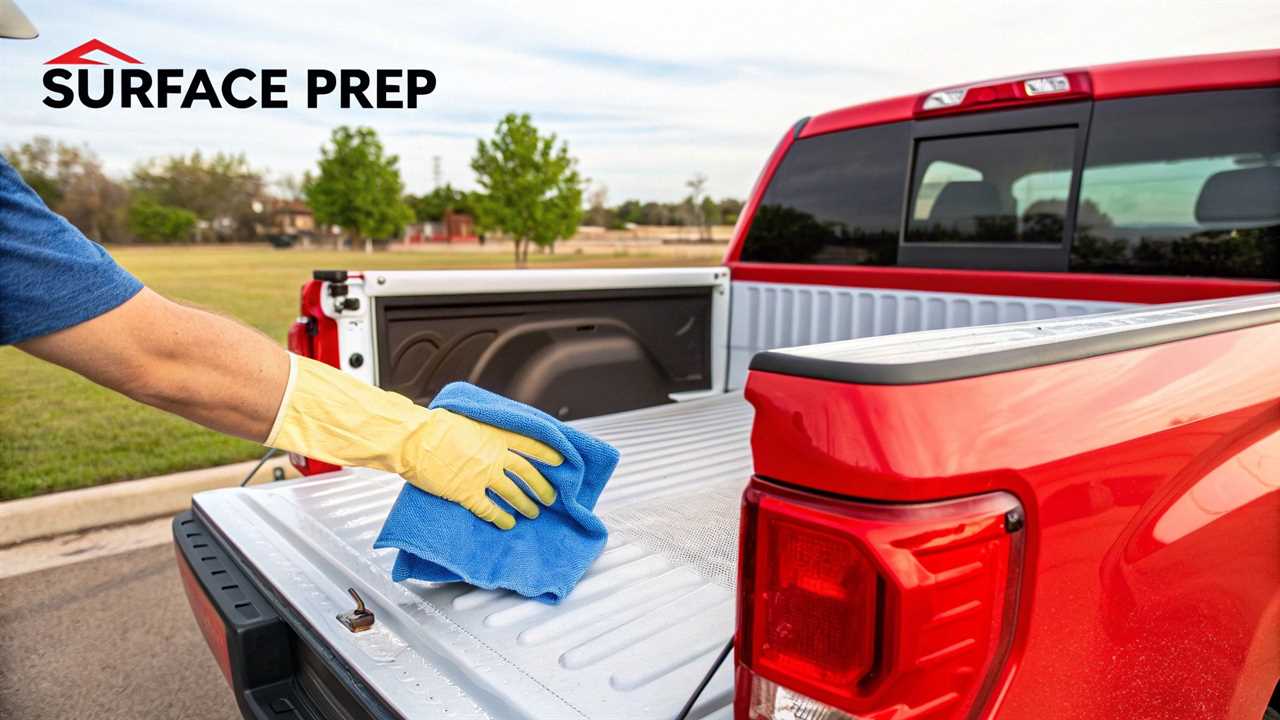
The whole job kicks off with a seriously deep clean. I’m not talking about a quick wash with car soap and a rinse, either. You need to get your hands on a powerful automotive degreaser. Think about all the oil, road grime, wax, and other gunk that’s built up in your truck bed over the years—all of it will prevent the liner from sticking.
Spray that degreaser everywhere, really soaking the corners and the valleys of the floor ribs where grime loves to collect. Grab a stiff-bristled brush and scrub every single square inch to break down that stubborn residue. Once you’re done, rinse it all out completely and let it air dry.
The Art of the Scuff
With the bed surgically clean, it’s time for the most critical step for mechanical adhesion: scuffing the paint. Your truck’s factory clear coat is designed to be slick and smooth, which is the exact opposite of what you need for a liner to grab onto. The goal here is to create a massive network of microscopic scratches for the liner to lock into.
You can use either sandpaper or abrasive scuff pads for this. Most kits will point you towards a grit somewhere between 80 and 120. That’s the sweet spot—aggressive enough to create the texture you need without digging deep gouges into the metal.
Work your way methodically from one end of the bed to the other, ensuring you dull every last bit of that original shiny finish. Every spot needs to have a uniform, hazy look. When you think you’re finished, wipe the dust off and inspect your work with a bright light from different angles. Any glossy spots you missed will stick out like a sore thumb.
A classic rookie mistake is only scuffing the floor of the bed. You absolutely have to scuff the inside walls, the wheel wells, and the entire inner face of the tailgate. Anywhere the liner is going, it needs a roughed-up surface to grip.
Masking for Razor-Sharp Lines
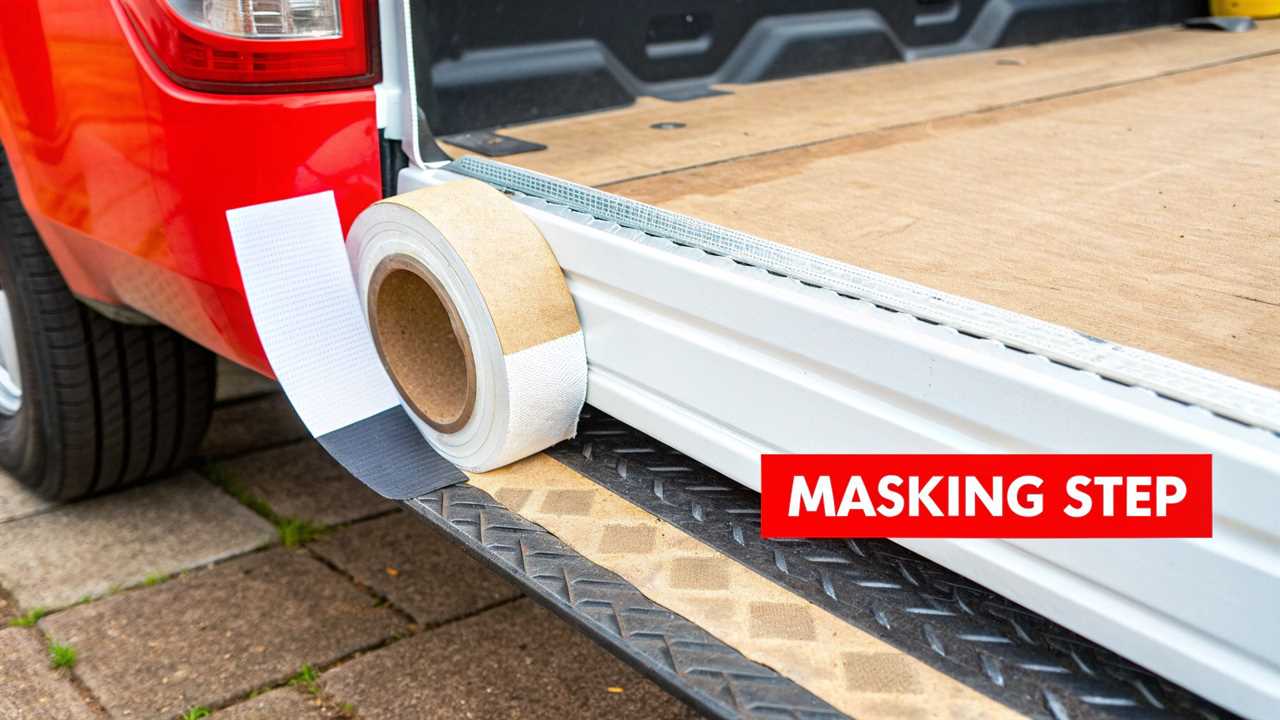
Now that the hard work of scuffing is over, it’s time to protect the rest of your truck. Put on your auto painter hat for this part. Using a high-quality automotive painter’s tape—the green or blue stuff from 3M is perfect—is the key to getting crisp, clean lines where the liner stops.
Here’s a quick masking checklist:
- The Top Rails: Lay down a perfectly straight line of tape along the top edges of the bed sides and tailgate.
- Tailgate Hardware: Carefully cover any bolts, latches, and drain holes. If you can, removing them beforehand is an even better move.
- The Cab and Rear Window: Use masking paper or plastic sheeting to shield the back of your cab and rear window from any overspray. Trust me, you don’t want to be scraping liner specks off your glass later.
This level of detail is what separates a job that looks factory-installed from one that screams “messy amateur.” A well-masked bed also simplifies your whole process and plays a big role in your long-term plans for effective truck bed cargo management.
The Final Wipe-Down
This is your last step before the main event. After all that sanding and scuffing, your truck bed is now covered in a fine layer of dust. Start by using a shop vac or compressed air to blow out every bit of debris from the corners and seams.
Next, you need to do a final solvent wipe. Grab a clean, lint-free rag and a solvent like acetone, denatured alcohol, or whatever specific surface prep solution came with your liner kit. Wipe down every scuffed surface to remove any lingering dust and any oils your hands may have left behind.
A truly bulletproof bond relies on a surface free of any impurities, including oxidation. If your bed has any rust or heavy oxidation, you’ll need to deal with that first. You can find a comprehensive DIY guide to removing car oxidation that walks you through the steps for creating a pristine base.
Once this final wipe has flashed off and evaporated, your truck bed is finally ready for its new armor.
Applying Your Liner for a Factory-Fresh Finish
All that painful prep work is about to pay off. This is where you get to see that perfectly scuffed and masked surface transform into a tough-as-nails, protected truck bed. Let’s walk through the application techniques that separate a sloppy job from a finish that looks like it rolled right off the factory floor.
The method you use will hinge entirely on the DIY truck bed liner kit you picked up. Each has its own rhythm and feel, but the goal is always the same: thin, even, and consistent coats. Trust me, rushing this part is a recipe for drips, runs, and a blotchy texture you’ll be stuck staring at for years.
Rolling On Your Bed Liner
If you went with a roll-on kit, your best friends will be patience and a light touch. Don’t just dunk the roller into the can and slop it on. A paint tray is your ally here. Pour some liner in and get a nice, even amount on your roller—you want it saturated, not dripping all over the place.
Start at the front of the bed, near the cab, and work your way back to the tailgate. The first coat should be thin, focusing on smooth, overlapping strokes all going in the same direction. This initial layer is what we call a “tack coat.” It doesn’t need to look perfect or provide full coverage. Its main job is to create a sticky base for the next coat to grab onto, which is a lifesaver for preventing sags on the vertical walls of the bed.
Let that first coat get tacky—check your kit’s instructions, but it’s usually around 30-60 minutes. Then you’re ready for your second, more substantial coat. This is where you’ll really build up the thickness and lock in that final, rugged texture.
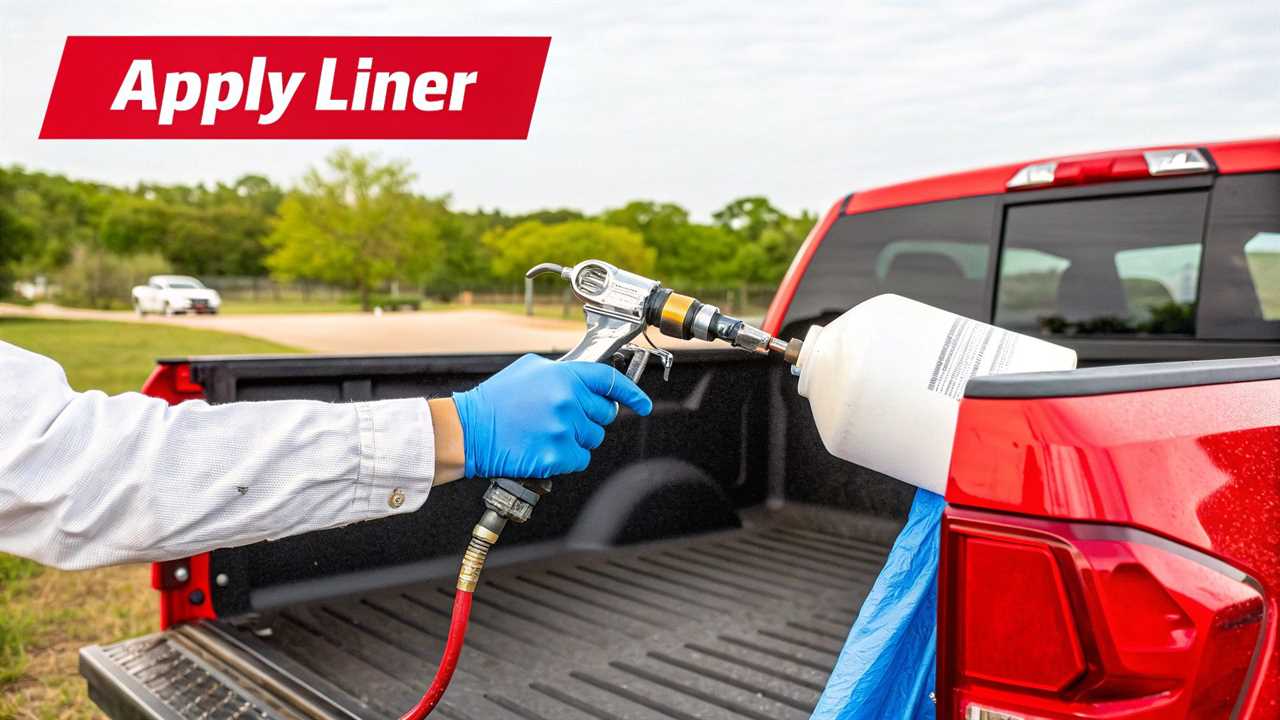
Using a Spray-On Can or Gun
For those of you with an aerosol can or a full-on spray gun setup, the principles are similar, but the technique is key. Your main focus is maintaining a consistent distance from the surface. Aim for about 10-12 inches away and use a steady, sweeping motion.
Here’s a pro tip: avoid the rookie mistake of flicking your wrist at the end of each pass. Instead, keep the sprayer parallel to the surface and continue the motion past the edge of where you’re coating. This little trick prevents heavy buildup at the start and end of each stroke and is the secret to a much more uniform finish.
And just like with rolling, laying down a light tack coat first is a game-changer. It gives the heavier coats something to adhere to, which dramatically cuts down the risk of runs and drips.
Respecting the Pot Life
If you’re using a two-part kit, you’re officially on the clock. The second you mix the resin and hardener, a chemical reaction kicks off, and you have a limited window to work. This is called “pot life.” It can be anywhere from 30 minutes to over an hour, depending on the product and, crucially, the temperature.
- Mix Only What You Need: If you have a smaller bed, don’t mix the whole kit at once. Do half first to make sure you don’t waste material or run out of time.
- Work Efficiently: Have your game plan ready before you mix. Know exactly where you’ll start and the path you’ll take to cover the bed.
- Temperature Matters: Hot weather will seriously shorten your pot life. Doing this job in the cool of the morning is always a smart move.
The popularity of these more advanced two-part systems is skyrocketing. The global market, valued at around USD 558.9 million in 2023, is on track to hit USD 878.9 million by 2033. Even big players like Mitsubishi are now offering branded liners straight from the factory. It’s a clear sign that the industry sees huge value in bed protection. You can read more about these market projections and OEM trends.
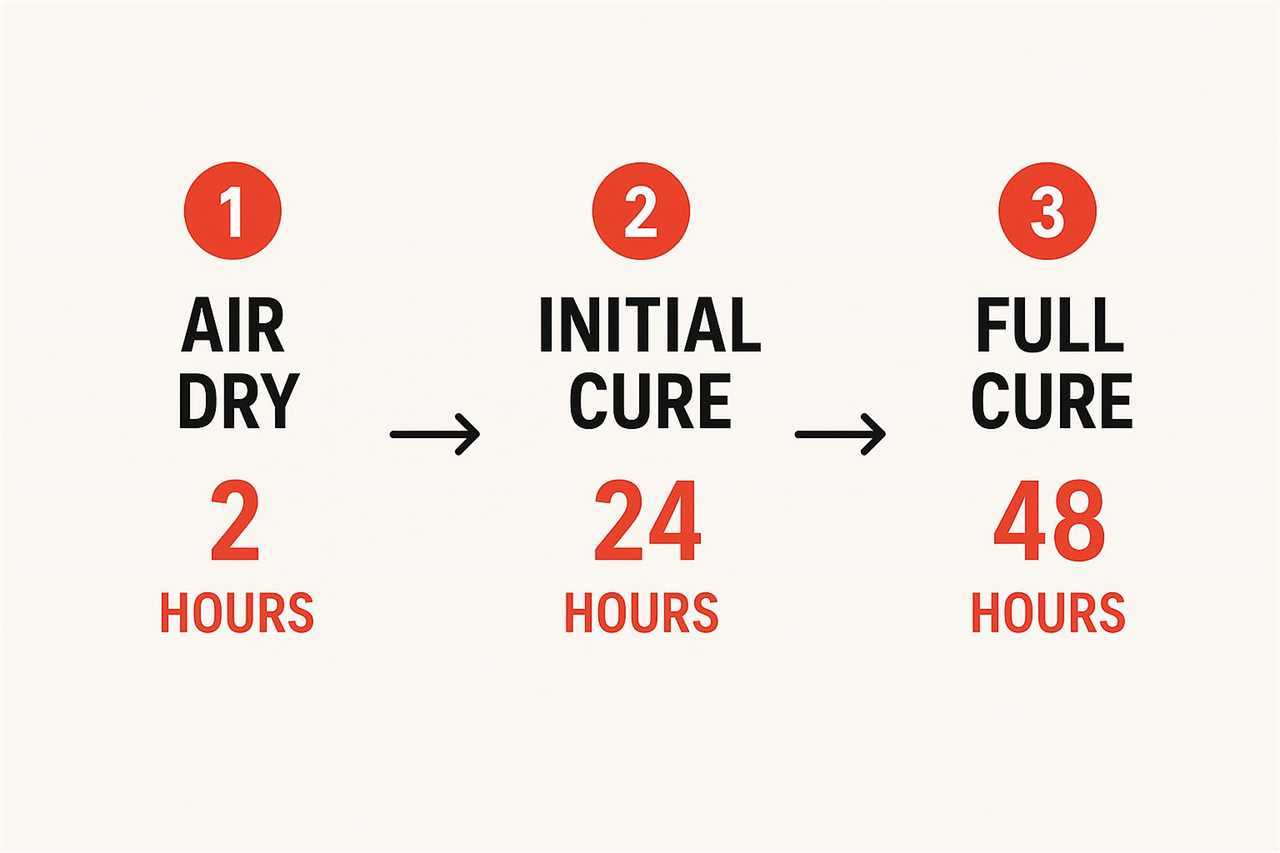
This graphic breaks down the three distinct curing stages your new liner will go through. Getting familiar with these is critical. You’ll need to give the liner a full 48 hours to cure before it’s ready for any light use, and even longer before you start throwing heavy gear back there.
The Curing Process and Long-Term Care
Just because you’ve rolled on that last coat doesn’t mean the job is finished. Not even close. Now comes the most critical—and often most trying—part of any DIY truck bed liner project: letting it cure properly. This is where patience pays off, because the chemical hardening process is what gives the liner its legendary toughness.
You’re going to be tracking three distinct stages of curing, and the timeline for each is heavily dependent on the temperature and humidity in your garage or workspace.
Understanding the Cure Timeline
First, you’ll hit the “touch-dry” stage. This happens pretty fast, usually within 60 to 90 minutes. This is your make-or-break window for pulling off the masking tape. If you wait too long, the liner will start to bond with the tape, and you’ll rip off chunks of your hard work, leaving a jagged, unprofessional edge. For the cleanest line possible, pull the tape slowly and at a 45-degree angle.
Next up is the “light-use” cure. This takes a solid 24 to 48 hours. At this point, the surface is hard enough to handle a light rain shower or maybe a few soft items, but it’s still susceptible to scratches. Don’t even think about tossing in a heavy toolbox or sliding in lumber just yet.
The final “full chemical cure” is the big one, and it’s where a lot of people get impatient and mess things up. This can take anywhere from three days to a full week. Only after this period is the liner truly ready for the heavy abuse you bought it for—hauling gravel, sliding in heavy equipment, or standing up to chemical spills. Rushing this final step is the single fastest way to undermine the liner’s long-term durability.
Long-Term Liner Maintenance
The good news? Keeping your new liner looking sharp is incredibly easy. That tough, non-porous surface is way less fussy than your truck’s factory paint.
- Routine Cleaning: For everyday dirt and grime, a simple washdown is all it takes. Use some mild soap, water, and a soft-bristled brush to get into the texture, then rinse it clean. Make sure to get all the soap off so it doesn’t leave a dull film.
- Avoid Harsh Chemicals: Stay away from abrasive cleaners or aggressive solvents like acetone for general cleaning. Over time, they can degrade the liner’s surface and damage the UV protectants that keep it from fading.
- Quick Touch-Ups: If you do manage to gouge the liner from some serious, heavy-duty use, fixing it is no sweat. Just clean out the damaged spot, rough it up a bit with some sandpaper, wipe it down with a prep solvent, and dab on a little bit of your leftover liner material. It’ll blend right in.
Proper care is just one piece of the puzzle. To get a full picture of how to keep your entire rig in prime condition, take a look at our comprehensive truck maintenance checklist. Follow these straightforward tips, and your DIY bed liner will protect your investment and look awesome for years to come.
Common DIY Bed Liner Questions Answered
Even with the best game plan, a few questions are bound to pop up when you’re tackling a DIY truck bed liner job. Getting ahead of these common concerns can save you from some serious headaches and give you the confidence to nail that flawless, professional-looking finish. Let’s dig into the stuff other truck owners are always asking.
One of the first things on everyone’s mind is longevity. How long does this stuff actually last? When you do the prep work right, a DIY bed liner is incredibly tough. It can easily last for years—often for the rest of the truck’s life.
The secret sauce isn’t the liner itself, but how well you prep the surface. If you slap a liner over a poorly scuffed or dirty bed, it’s just not going to stick. For trucks that get hammered with heavy, daily use, you might see some minor scuffs after five to seven years, but touching up those spots is a breeze.
Dealing With an Existing Liner
A situation that comes up all the time is trying to put a new coat over an old, faded, or beat-up liner. The short answer is yes, you can absolutely do it. But—and this is a big but—you can’t just spray or roll a new layer on top and expect it to work. Adhesion is the name of the game, and that old liner needs some serious prep.
Think of the old liner just like you would factory paint. First, you’ve got to give it a deep clean with a good degreaser to strip off any years of grime, wax, or oil buildup. After that, it’s time to get aggressive with the scuffing.
Grab some coarse sandpaper, something around 80-grit, and get to work roughing up the entire surface. You want to kill any shine and create a rugged texture for the new liner to grab onto. If the old liner is peeling or flaking off, you have to scrape and sand all that loose stuff away until you’re down to a solid, stable surface.
Never apply a new liner over a peeling one. It’s like building a house on a shaky foundation—the new coat will only fail as the old one continues to lift away from the metal underneath.
Application Conditions and Safety
Where and when you apply your liner makes a huge difference in how it turns out. Most DIY kits work best in dry weather with moderate temperatures, somewhere in that sweet spot between 60°F and 90°F (15°C to 32°C).
If it’s too cold, the chemical curing process slows to a crawl, which can lead to a weak bond that won’t last. On the flip side, trying to work in direct sun or extreme heat is a bad idea. The liner can cure way too fast, trapping solvent bubbles in the finish, messing up your texture, and cutting your working time way down, especially with two-part kits.
Finally, let’s talk safety. This isn’t the place to cut corners. These products are packed with potent chemicals.
- Ventilation is critical. Always work outside or in a garage with the doors wide open for maximum airflow.
- Protect yourself. Wear nitrile gloves to keep this stuff off your skin and safety goggles to protect your eyes.
- Use a respirator. This is non-negotiable. A simple dust mask won’t cut it. You need a respirator rated for organic vapors to protect your lungs from the fumes, especially if you’re spraying.
Ready to tackle any off-road challenge? Offroading.com is your go-to source for expert guides, gear reviews, and tutorials that prepare you for the trail. Explore our resources and gear up for your next adventure.
https://offroading.com/diy-truck-bed-liner/?utm_source=rss&utm_medium=rss&utm_campaign=diy-truck-bed-liner
Did you miss our previous article...
https://manstuffnews.com/4x4-off-road-cars/recovery-strap-vs-tow-strap-choosing-the-right-gear
