Sometimes the most satisfying meals are the ones that keep things simple. If you are looking for a go to cheeseburger recipe for your Big Green Egg then you have come to the right place. This method delivers the perfect burger every time by placing the focus on quality ingredients.
While I am using American Wagyu ground beef from Snake River Farms and brioche buns from St. Pierre for this cook, you can use any high quality ground chuck and your favorite local bakery buns to get incredible results. You do not need to overcomplicate things when making a great burger. Just a few simple steps and a hot grill will produce mouth watering burgers for your family and friends. Now sit back, grab an ice cold Kona Big Wave, and enjoy this post for Big Green Egg Cheeseburgers.
Step 1: Meat Selection
For this recipe I am using Snake River Farms American Wagyu Gourmet Burger Blend. This specific blend is curated from high quality Wagyu cuts, which provides a buttery texture and a rich flavor that is hard to beat. However, if you do not have this meat on hand, you can still achieve a fantastic result with the right selection at your local grocery store.
Choosing Your Beef
When shopping at the store, look for a 80/20 ground chuck blend. The 80% lean to 20% fat ratio is the gold standard for grilling. You want that extra fat because it renders down over the hot coals, creating a juicy interior and helping to develop a flavorful crust on the outside. Avoid ultra lean blends like 90/10 as they tend to dry out quickly on the Big Green Egg.
The DIY “Buddha Burger Blend”
If you want to take your grocery store beef to the next level, you can create your own custom blend at home. If you have a meat grinder (or a butcher who will help you out), try this ratio for a steakhouse quality burger:
- 50% Beef Chuck: For that classic “beefy” foundation.
- 25% Beef Brisket: For a rich, savory fat content.
- 25% Boneless Short Rib: For a deep, marbled flavor and tender texture.
Whether you go with the SRF Wagyu or your own custom blend, the goal is the same: high quality fat and a loose pack to ensure every bite is tender.
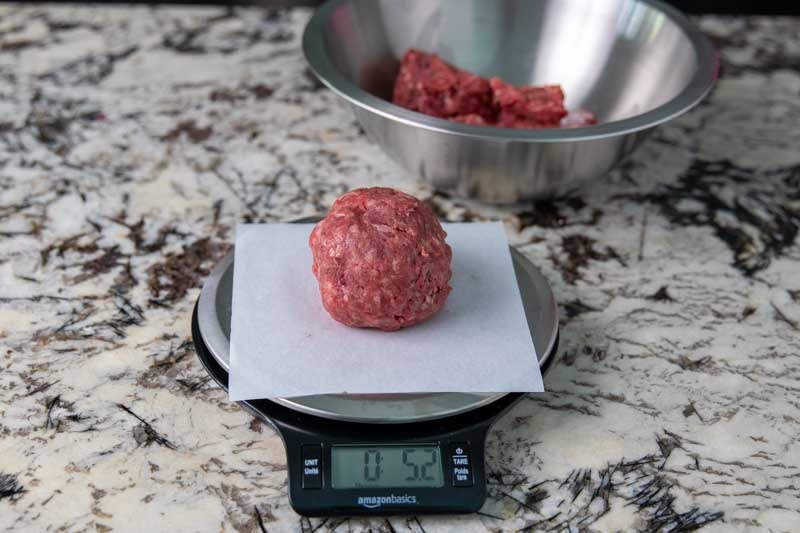
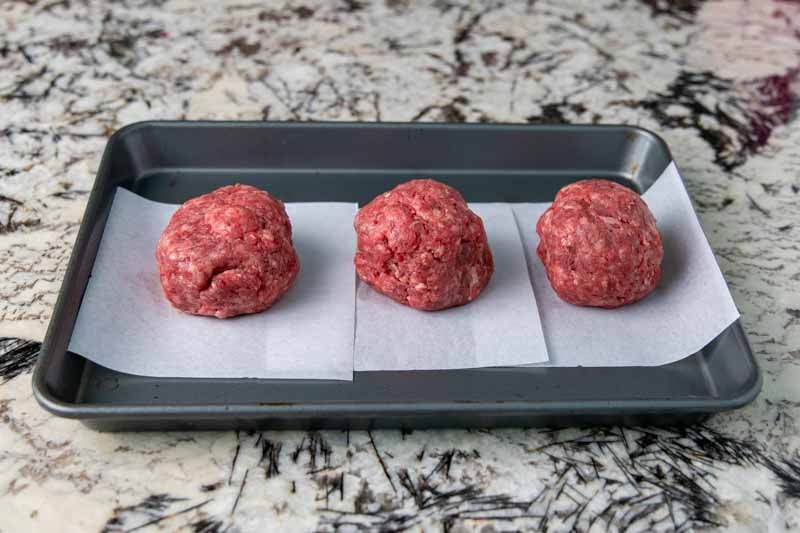
The Perfect Portion
Consistency is the secret to even cooking. The optimal size for a burger patty is between 5 and 6 ounces. I recommend dividing a one pound package of meat into three separate balls of 5.3 ounces each. This size ensures the burger stays juicy while fitting perfectly on a standard bun.
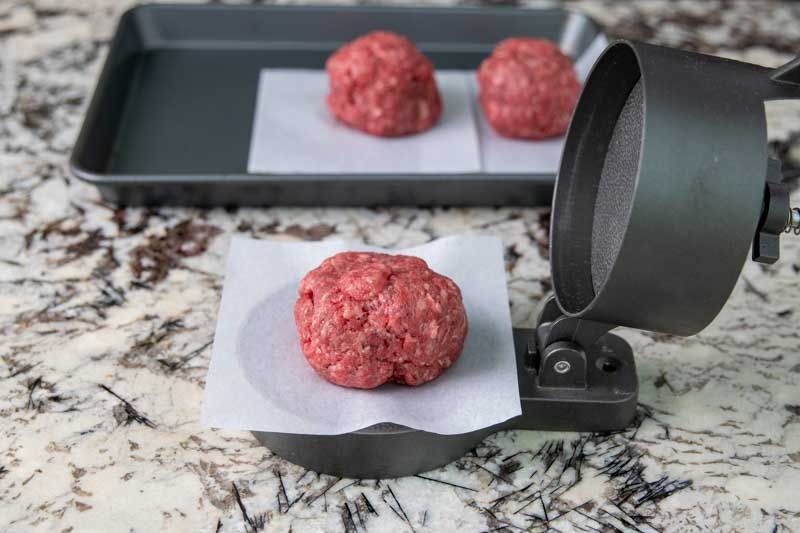
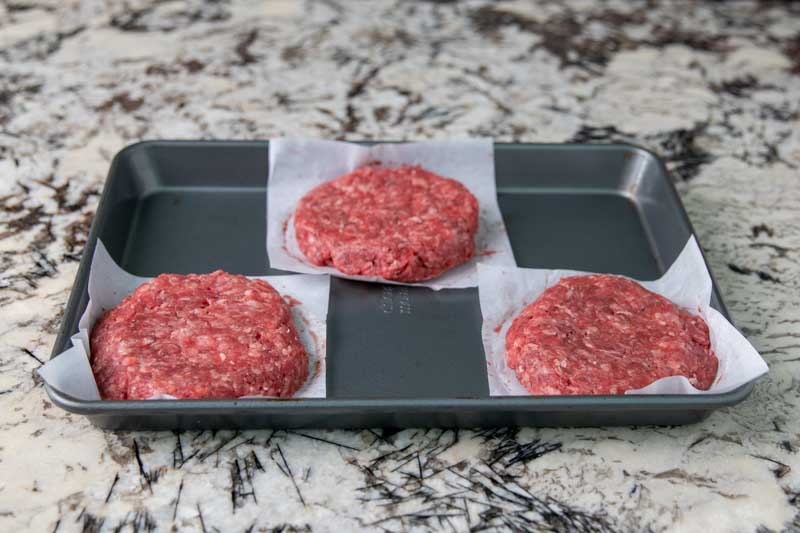
To ensure your burgers cook evenly and look professional, the shape and density of the patty are key. For this cook, I am using a Weston Hamburger Press to make perfect burger patties. This tool is a favorite in my kitchen because it allows you to set a specific thickness, ensuring every 5.3 ounce ball of meat is compressed into a uniform disc. Uniformity is important because it means every burger on the Big Green Egg will reach the perfect internal temperature at the exact same time.
Tips for Using a Press
- Don’t Overwork the Meat: When placing the beef into the press, handle it as little as possible. Overworking the meat can lead to a tough, dense burger.
- Use Patty Paper: Placing a small square of wax paper or patty paper on the top and bottom prevents the meat from sticking to the press and makes it easy to stack the patties before they hit the grill.
The DIY Manual Method
If you do not have a press on hand, you can still create great patties using your hands or common kitchen items.
- The Hand Press: Gently flatten your meat balls into discs about 1 inch thick. Make sure the diameter is slightly wider than your bun, as the meat will shrink slightly during the cooking process.
- The Lid Trick: You can use a large peanut butter jar lid or a similar plastic cap lined with plastic wrap as a makeshift mold. Press the meat into the lid to get a consistent shape, then pop it out using the plastic wrap.
- The “Thumb Print” Secret: No matter which manual method you use, always take your thumb and make a shallow indentation in the center of the raw patty. This prevents the burger from “doming” or puffing up in the middle while grilling, keeping your patty flat and easy to stack with toppings.
Whether you use a dedicated press or shape them by hand, the goal is a consistent thickness from edge to edge so the heat of the Egg can do its job effectively.

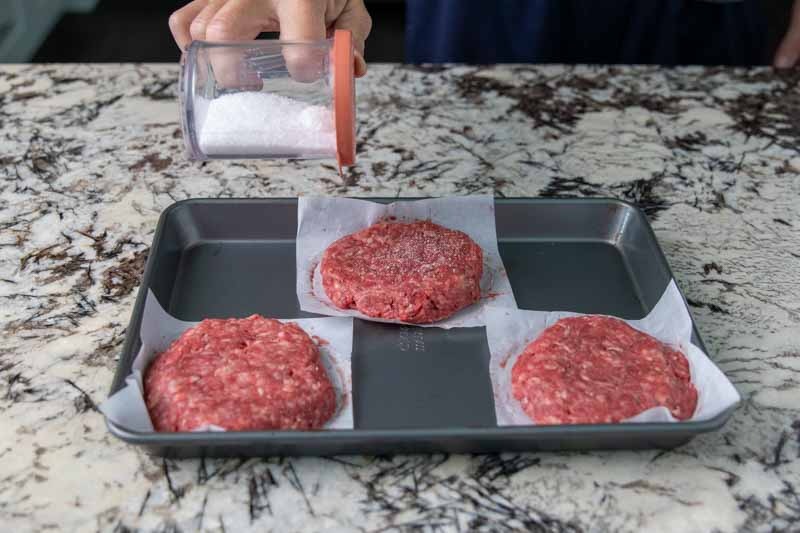
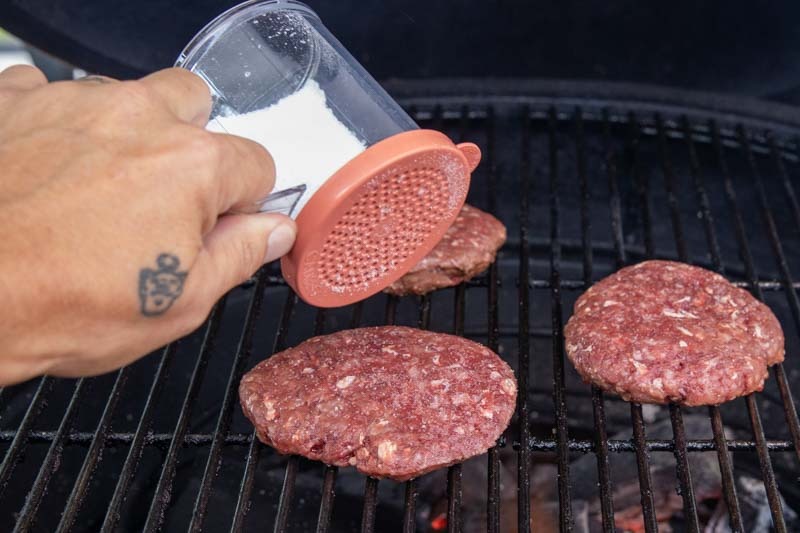
Step 3: Salting the Patties
After the patties are shaped, it is time to build the flavor profile. The first and most important step is the salt. After pressing the burger patties, add kosher salt to the tops of each patty.
The Science of the Salt
Salt does more than just season the meat; it is a functional ingredient in a great burger. When salt hits the surface of the beef, it begins to dissolve and draw out a small amount of moisture. This creates a savory brine that, when combined with the high heat of the Big Green Egg, helps produce a beautiful, crusty sear known as the Maillard reaction.
Timing and Technique
- The “Just Before” Rule: Only salt your patties right before they go on the grill. If you mix salt into the ground beef while forming the patties, it can change the texture of the meat, making it more like a dense sausage or meatloaf rather than a loose and tender burger.
- The High Fall: Hold your hand about 8 to 10 inches above the meat as you sprinkle. This ensures an even distribution across the entire surface so you do not end up with a “salty spot” in one bite and unseasoned meat in the next.
- Go Coarse: I always recommend Kosher salt over table salt. The larger flakes provide a better crunch and are much easier to see, which helps you judge exactly how much you have applied.
The “Buddha’s Choice” Seasoning
While salt is the essential foundation, you can certainly add more layers if you want to experiment. If you are looking for a more complex flavor, you can follow the salt with a light dusting of coarse black pepper or even a pinch of garlic powder. However, when you are using a premium meat like Snake River Farms, a generous coating of high quality salt is often all you need to let the natural Wagyu flavor take center center stage.
Step 4: Prep your Garnishes
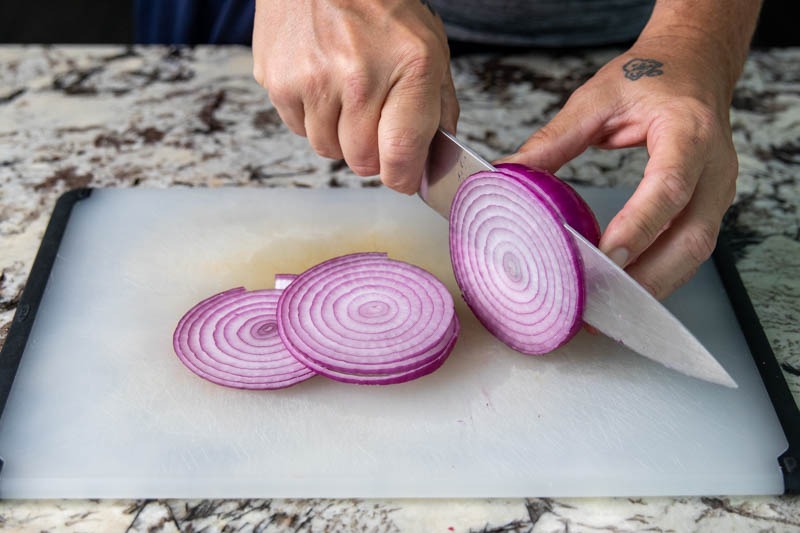
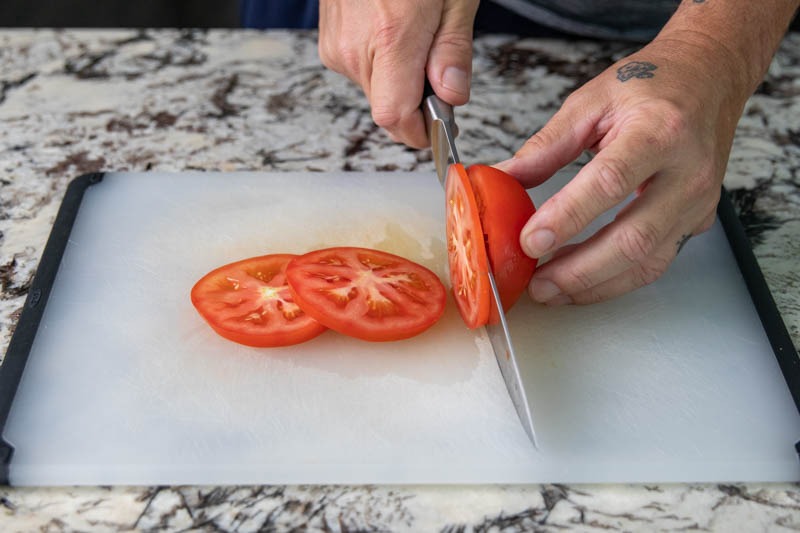
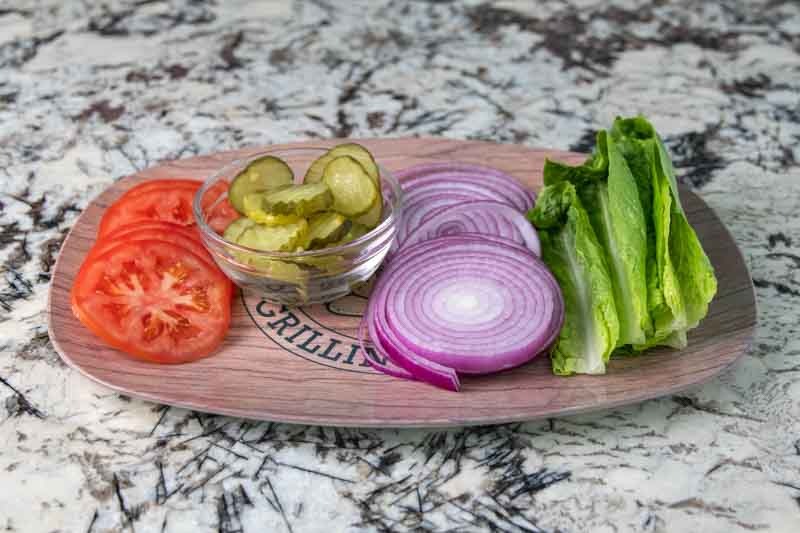
While the grill is heating up, it is the perfect time to prep your fresh toppings. A great burger is all about the balance of textures and flavors, so having your garnishes ready to go is essential for a smooth transition from the Egg to the table. Next, slice a red onion and a ripe tomato, then add them to a garnish tray along with pickle chips and crisp pieces of lettuce.
The Art of the Garnish Tray
Organizing your toppings on a single tray not only makes for a great presentation but also keeps everything within reach so you can build your burgers while the meat is hot.
- Red Onion: I prefer red onion for the sharp, peppery bite it provides. Slice these into thin rings so they offer flavor without overwhelming the beef. If you find raw onions too pungent, you can soak the slices in ice water for ten minutes to mellow them out.
- Tomato: Look for large, firm tomatoes like beefsteak or heirloom varieties. Use a serrated knife to cut thick, sturdy slices that can stand up to the heat of the patty.
- Lettuce: For a classic crunch, use Iceberg or Romaine. If you want a more “gourmet” look that stays flat on the bun, Bibb or Boston Living Lettuce is a fantastic choice because the leaves are soft and perfectly sized for a burger.
- Pickles: Whether you like sweet bread and butter chips or classic dill, make sure they are well-drained before putting them on the tray so the juice doesn’t run into your other vegetables.
Pro Tip: Pre-Salting Your Tomatoes
If you want to take your garnish game to the next level, give your tomato slices a very light sprinkle of salt while they sit on the tray. This draws out the excess water and intensifies the tomato flavor, making it a much more meaningful part of the burger rather than just a wet topping.
Having this tray prepped and ready means you won’t be scrambling in the kitchen while your Snake River Farms patties are resting. Everything should be cool, crisp, and ready for assembly.
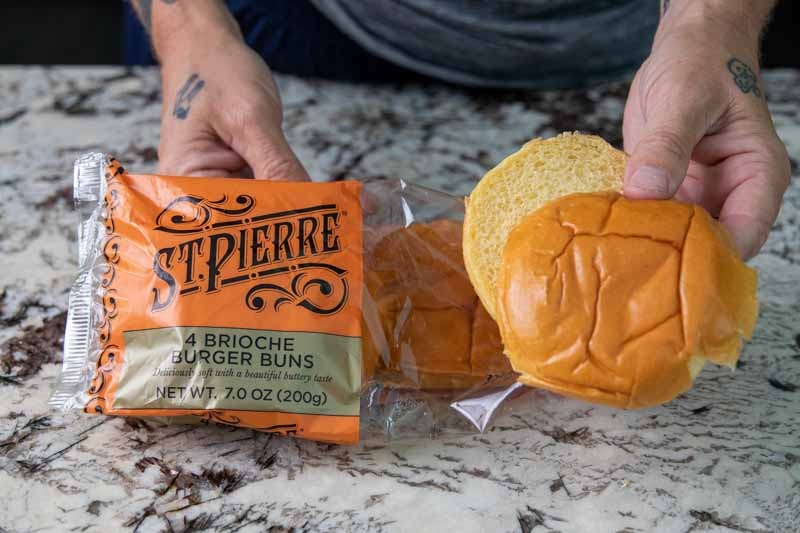
Step 5: Bun Selection and Prep
The bun is the frame for your burger masterpiece, so you want something that can support the weight and juices of a Wagyu patty without falling apart. For this cook, I am using St. Pierre Brioche Burger Buns. These are excellent because they have a high egg and butter content, giving them a rich flavor and a sturdy yet soft texture.
The Importance of the Toast
A toasted bun does more than just add a pleasant crunch. It creates a structural barrier between the meat and the bread. When you toast the bun, you are essentially “sealing” the surface so the juices from the burger and the condiments don’t soak into the bread and make it soggy.
- The Schmear: Take three St. Pierre Brioche Burger Buns out of the package and schmear softened butter on the cut side of the top and bottom of each bun. Using softened butter ensures even coverage without tearing the delicate brioche.
- Alternative Options: If you do not have Brioche on hand, a high quality Potato Roll is a fantastic utilitarian alternative. They are famously soft and have a great “squish” factor. For a heartier burger, a Pretzel Bun offers a salty, chewy contrast that works well with bold toppings.
- The Mayo Hack: If you are out of butter, a very thin layer of mayonnaise is a professional secret for toasting buns. It has a high smoke point and contains egg whites, which produce a perfectly even, golden-brown crust on the grill.
Once your buns are buttered, set these to the side on a plate or tray. You want them ready to go because once the cheese starts melting on those patties, the toasting process happens very quickly.


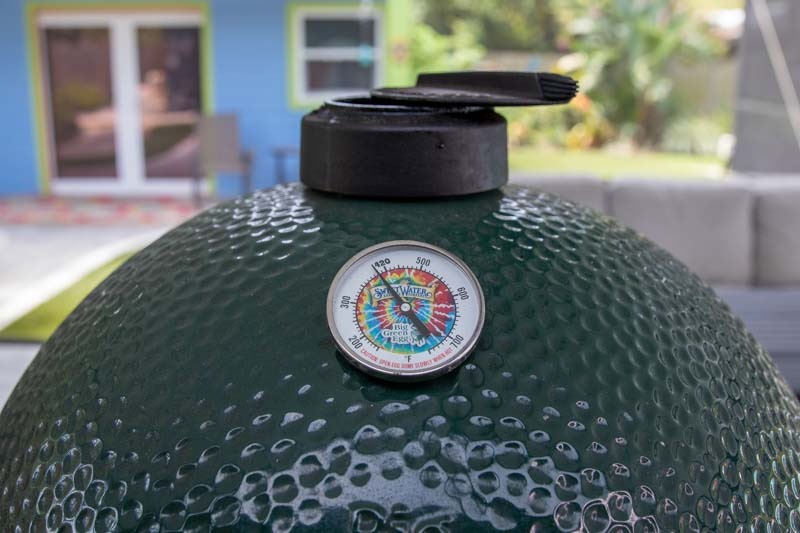
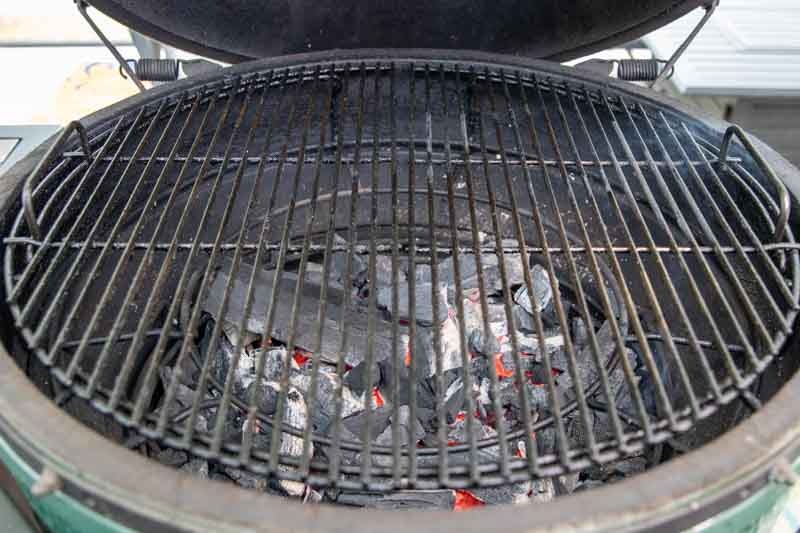
Step 6: Setup and Preheat your Big Green Egg
Now that the prep is finished, it is time to fire up the grill. Preheat your Big Green Egg to 375°F and set it up for raised direct grilling using your EGGspander base.
The Benefit of Raised Direct Grilling
Cooking “direct” means the meat is sitting right over the glowing hot coals, which is exactly what you want for burgers to get that signature backyard char. By using the EGGspander base to raise the cooking grate higher up into the dome, you create a bit of distance between the fire and the beef.
- Better Control: This extra few inches of clearance allows the exterior of the burger to develop a deep, caramelized crust without burning before the center reaches your desired doneness.
- Convection Effect: In a Big Green Egg, the heat reflects off the ceramic dome. Raising the meat puts it in the “sweet spot” where the radiant heat from the charcoal and the reflected heat from the lid work together to cook the patty evenly from both sides.
Getting the Temperature Right
When the Egg hits 375°F, you have reached the perfect balance. It is hot enough to sear the Snake River Farms Wagyu and create those delicious crispy edges, but not so hot that the fat causes uncontrollable flare-ups.
- Clean Grates: Once the grill is at temp, give your grates a quick brush to ensure they are clean.
- The “Burp” Reminder: As always, when cooking at these temperatures, remember to “burp” your Egg by opening the lid just an inch or two for a few seconds before opening it all the way. This prevents a sudden rush of oxygen from causing a flashback.
If you do not have an EGGspander, you can achieve a similar effect by using a standard grill extender or simply being diligent with your airflow to keep the fire steady. Once the temp is locked in and the blue smoke is rolling, you are ready to drop the meat.
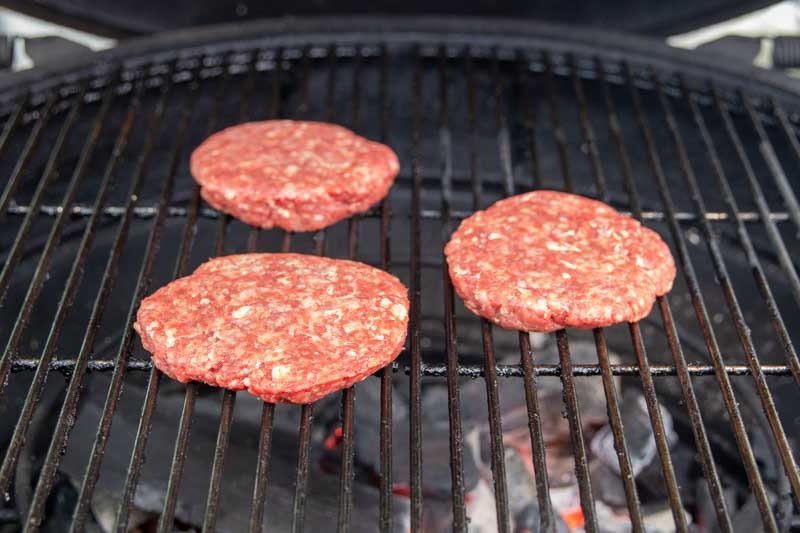
Step 7: Grill your Burger Patties
When the grill is preheated and your charcoal has transitioned to a nice ashy gray, it is time for the meat to hit the heat. Place the burgers on the grill grate salt side down. You should hear an immediate sizzle as the cold Wagyu fat meets the hot cast iron or stainless steel.
The Second Layer of Seasoning
Now that the first side is down, shake more kosher salt on the top side of the burger patties. By seasoning in two stages, you ensure that both sides of the burger develop that savory, salty crust. If you are feeling adventurous, this is also a great time to add a light dusting of coarse black pepper or your favorite beef rub to the upward-facing side.
The Five Minute Rule
Close the dome and let the burgers cook for 5 minutes undisturbed. This is perhaps the most important part of the grilling process.
- The Searing Process: During these five minutes, the heat is working to build a crust that will eventually allow the meat to release naturally from the grate. If you try to move or flip the burgers too early, the meat will stick and tear, causing you to lose those flavorful browned bits.
- Temperature Stability: Keeping the dome closed allows the Big Green Egg to act like a convection oven. The heat circulates around the thick patties, ensuring that the interior warms up at a steady pace while the bottom sears.
- No Squishing: Resist the urge to press down on the burgers with your spatula. Many people do this to hear the “sizzle,” but all you are doing is squeezing out the premium Wagyu juices and fat that make these burgers special. Let the heat do the work for you.
Once those five minutes are up, the bottom of the patties should be beautifully caramelized and ready for the flip.
Step 8: When to Flip the Burger Patties
After five minutes have passed, it is time to flip the burger patties. You will know they are ready for the transition when the meat releases easily from the cooking grate. If the burger feels like it is sticking, give it another thirty seconds; once that crust is fully formed, it will lift away without effort.
The Flip and the Finish
Use a sturdy, long-handled spatula to flip each patty in one confident motion. You should see a deep, mahogany-colored sear on the side that was facing the coals. Now, close the dome and cook for another 5 minutes.
- The Total Time: This 5 and 5 method is designed for a standard 5.3 ounce patty at 375°F. It typically results in a perfect medium to medium-well finish.
- The Wagyu Factor: Because we are using Snake River Farms American Wagyu, the high fat content provides a bit of a safety net. Even if you prefer your burgers cooked a little longer, the marbling ensures the meat stays juicy and tender.
- Alternative Doneness: If you prefer a true medium-rare burger with a warm red center, start checking the internal temperature around the 3 or 4 minute mark after the flip. You are looking for an internal temperature of 135°F for medium-rare or 145°F for medium.
Maintaining the Environment
By keeping the dome closed during this second half of the cook, you are maintaining that consistent 375°F environment. This ensures the top of the patty stays hot, which is critical for the next step when we add our cheese.
While the second side is searing, keep your cheese slices and buttered buns nearby. The final stage of the cook happens very fast, and you want to be ready to move as soon as that timer goes off.

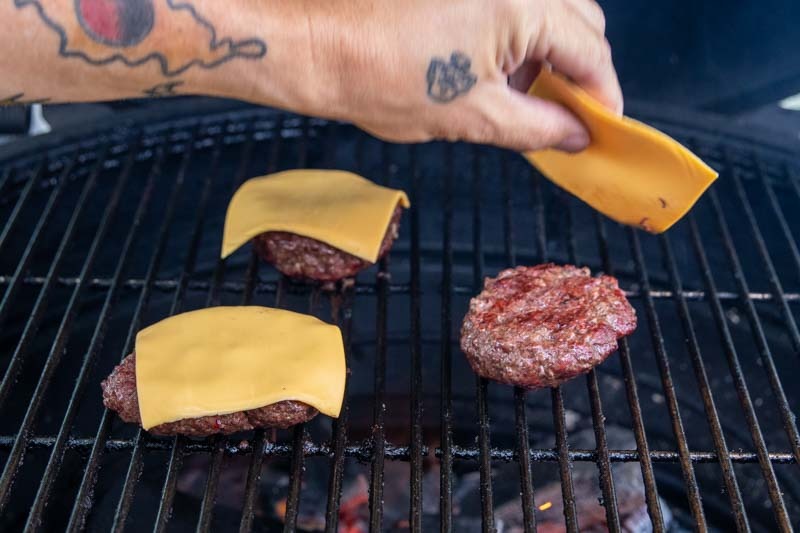
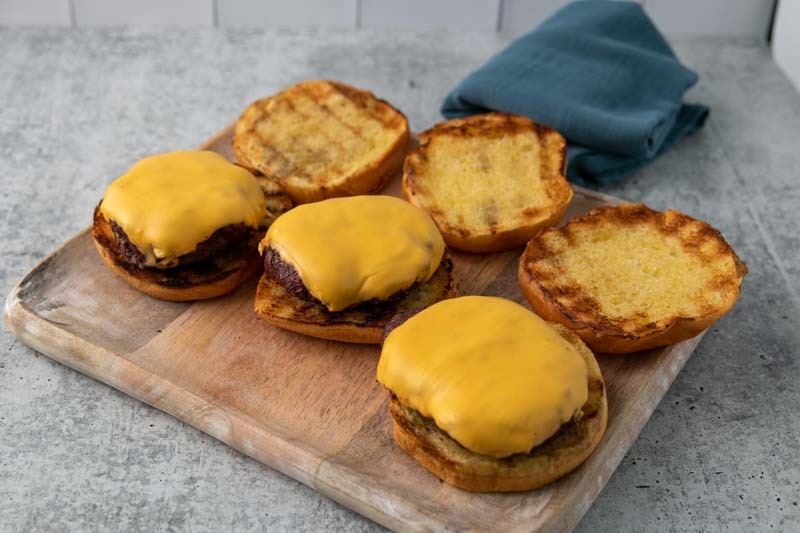
Step 9: Add the Cheese Slices
After ten minutes of total cook time, your patties should be perfectly seared and cooked through. Now it is time for the finishing touch that brings everything together. Place a slice of cheese on each patty, close the dome, and let them cook for another 1 to 2 minutes until the cheese has melted completely.
The Perfect Melt
By closing the dome, you are trapping the radiant heat and steam inside the Big Green Egg. This creates an oven-like effect that blankets the patty, causing the cheese to drape over the edges of the beef and lock in the moisture.
- Cheese Selection: I prefer a thick slice of sharp cheddar for that classic, bold flavor that can stand up to the rich Wagyu beef.
- The Utilitarian Option: If you want that iconic “diner style” melt, American cheese is the undisputed champion for burgers because of its low melting point and creamy texture.
- The Gourmet Twist: If you want to experiment, a slice of Pepper Jack adds a nice kick, while Swiss or Havarti offers a more subtle, buttery finish that complements the St. Pierre brioche buns perfectly.
The Visual Cue
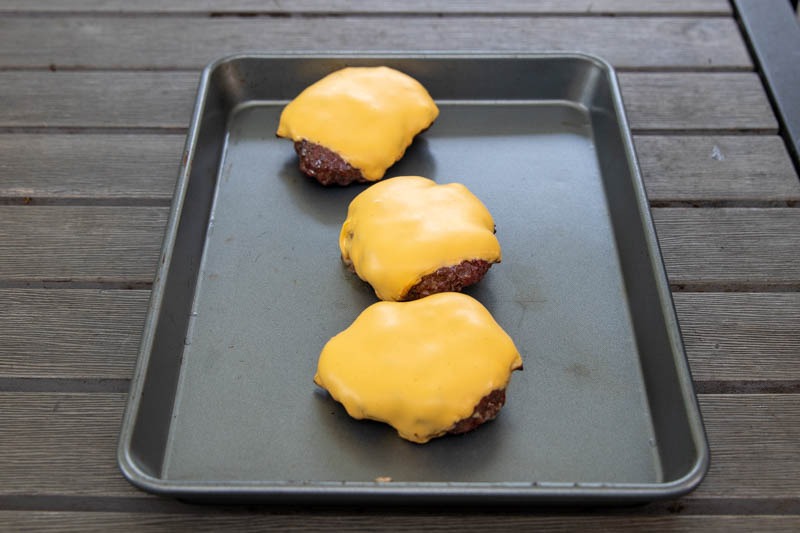
You are looking for the cheese to be fully slumped over the sides of the meat with a glossy, liquid appearance. Avoid leaving the burgers on too long after the cheese has melted, as you don’t want the fat to continue rendering out of the beef at this stage.
Once that cheese is shimmering and gooey, your patties are officially ready to be moved to the buns.

Step 10: Rest the Cheeseburgers & Toast the Buns
Once the cheese is perfectly melted, pull the burgers off the grate and let them rest on a clean plate or cutting board. This rest is just as important for a burger as it is for a steak. It allows the juices to redistribute within the patty so they stay inside the meat instead of running all over your plate on the first bite.
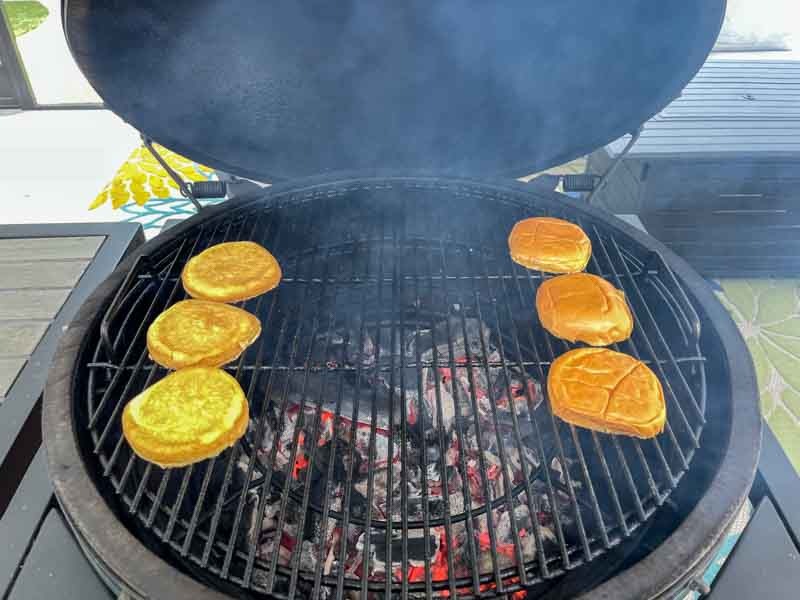
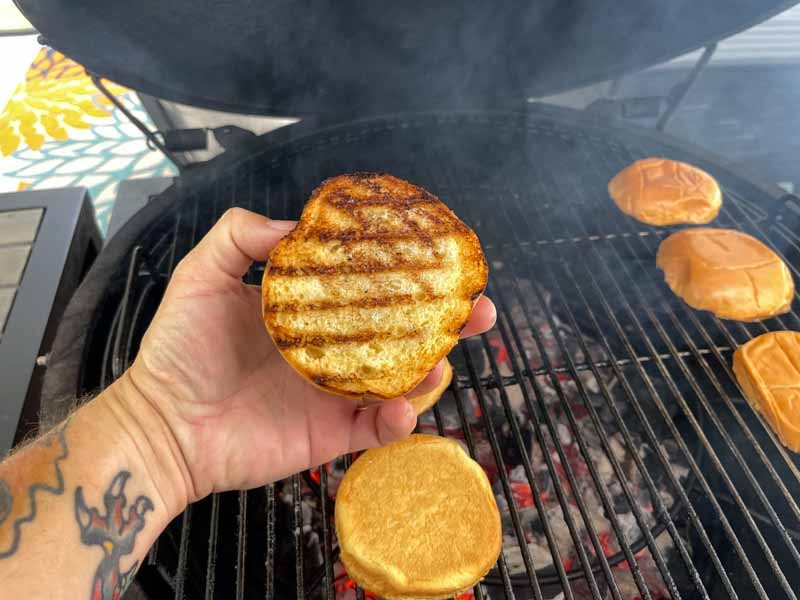
The Final Toast
While the meat is resting, it is time to finish those buttered St. Pierre Brioche Buns. Place the buns cut side down directly over the hot coals.
- The Watchful Eye: Do not walk away! Because of the high butter content in brioche and the schmear you applied earlier, these buns will toast very quickly. It usually only takes 30 to 60 seconds to achieve a perfect golden brown crust.
- The Texture: You are looking for edges that are slightly charred and a center that is crisp to the touch. This toasted “crust” acts as a floor and ceiling for your burger, providing a structural crunch that holds up against the juicy Wagyu beef and your choice of condiments.
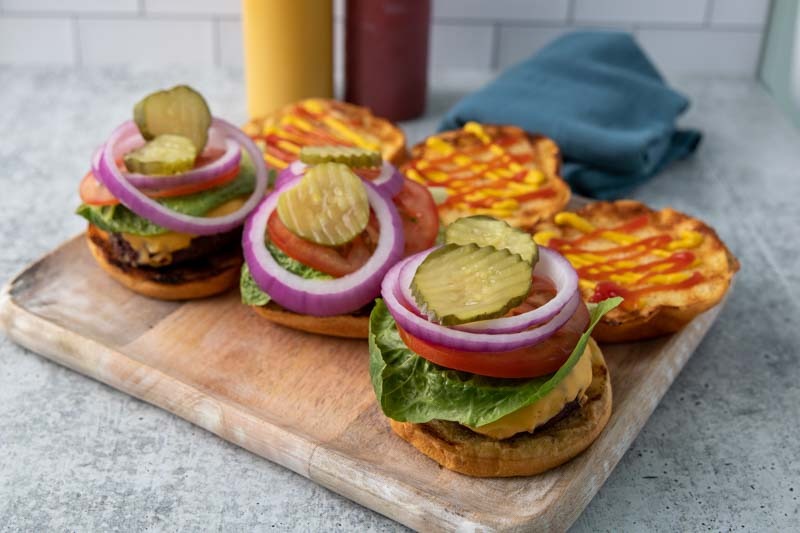
The Assembly
Once the buns are toasted, head over to your garnish tray. I like to start with a layer of sauce or mayo on the bottom bun to act as a “glue” for the lettuce, followed by that cheesy Wagyu patty, the tomato, red onion, and pickles.
The combination of the toasted brioche, the cold crisp vegetables, and the hot, salty American Wagyu from Snake River Farms creates a cheeseburger experience that is truly second to none. Serve these up while the buns are still warm and the cheese is gooey.
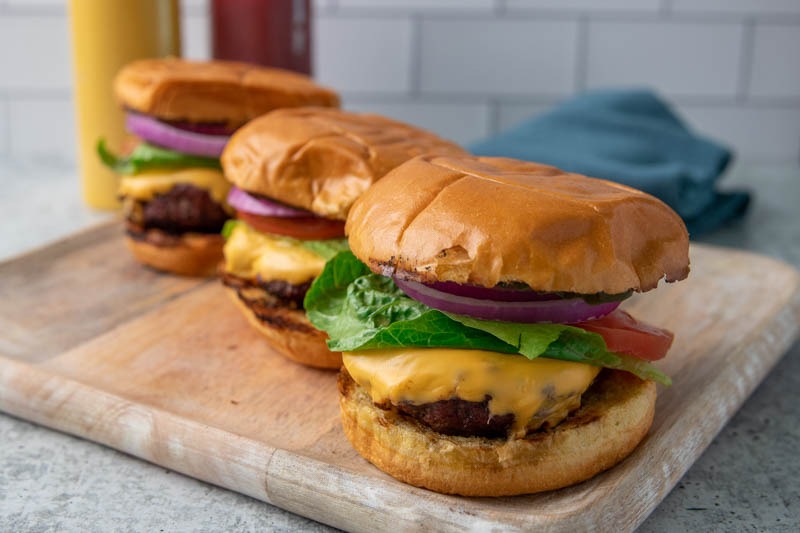
Step 11: Assemble Your Cheeseburger
The moment of truth has arrived. Take the rested burgers and place them between each toasted brioche bun. Garnish with the lettuce, tomato, red onion, and pickles you prepped earlier, then finish them off with a swirl of mustard and ketchup.
The Final Build
Assembly is more than just stacking; it is about creating the perfect bite. I recommend placing the lettuce on the bottom bun to act as a barrier that keeps the bread from getting hit directly by the burger juices. Follow that with the cheesy Wagyu patty, then layer your onions and tomatoes on top. This order ensures every ingredient stays in place as you take that first massive bite.
The “So What”
You might ask why we go through the trouble of sourcing Snake River Farms beef or buttering specific buns. The answer is in the contrast. When you take a bite, you get the crunch of the toasted St. Pierre brioche, the snap of the cold pickles, and the buttery, melt in your mouth richness of the American Wagyu.
By using the Big Green Egg, you have infused the meat with a subtle wood fired flavor that a kitchen stove simply cannot replicate. You have taken a humble backyard staple and elevated it into a gourmet experience using simple techniques and high quality ingredients.
Make It Your Own
While this “classic” build is my go to, the beauty of this method is its versatility.
- The Spicy Route: Swap the ketchup for a chipotle aioli and add some pickled jalapeños.
- The Steakhouse Style: Sauté some mushrooms and onions on the Egg while the burgers cook and swap the cheddar for swiss cheese.
- The Purist: If you really want to taste the Wagyu, skip the heavy sauces and stick to just salt, pepper, and a thin slice of onion.
No matter how you dress them, these burgers are a testament to the fact that you do not need to overcomplicate things to achieve greatness on the grill.
Print
Big Green Egg Cheeseburgers
This recipe for Big Green Egg Cheeseburgers delivers the perfect burger every time. This is your new go to recipe!
Course Burger
Cuisine American
Keyword Big Green Egg, Burger, Cheeseburger, St Pierre Brioche, Wagyu
Prep Time 30 minutes minutes
Cook Time 15 minutes minutes
Total Time 45 minutes minutes
Servings 3 people
- 1 pound ground beef 80/20 or Wagyu is best
- 3 tsp kosher salt
- 3 pieces brioche burger buns St Pierre is a good choice
- 3 slices American cheese
- 2 Tbsp butter softened
- 3 slices tomato
- 3 slices red onion
- 3 slices lettuce romaine or iceberg
- 6 pieces pickle chips
- 3 tsp ketchup
- 3 tsp yellow mustard
Setup your Big Green Egg for raised direct grilling. Preheat to 375°F.
Divide your ground beef into 3 equal portions of 5.3 oz each.
Use a burger press to form three burger patties.
Add kosher salt to the top of each burger patty.
When the Big Green Egg is preheated place the burger patties on the grill grate salt side down. Salt the top of each patty, close the lid, and cook for 5 minutes.
Flip the burger patties, close the lid, and cook another 5 minutes.
Flip the burger patties one more time, add a slice of cheese to each patty, close the lid, and cook 1-2 minutes until the cheese has melted.
Remove the patties from the Big Green Egg and let rest while you toast your buns. Close the top and bottom vents of your BIg Green Egg to let the grill cool down.
Schmear the softened butter on the cut side of each bun (top and bottom). Place the buttered side down on the grill grate and cook 1-2 minute until the buns are toasted.
Assemble the burgers by placing a patty on each toasted bun. Garnish with a piece of lettuce, a slice of tomato, a slice or red onion, two pickles, mustard, and ketchup. Enjoy!
The post Big Green Egg Cheeseburgers appeared first on The BBQ Buddha.
