The biggest complaint that people have when it comes to pellet grills is that they don’t use “real” wood or put off enough smoke.
The Woodwind Pro from Camp Chef promises to fix that complaint. It burns pellets, but it also has a built-in Smoke Box that allows you to add wood chunks or lump charcoal.
I was a big fan of the original Camp Chef Woodwind, so when I heard about the new Pro series, I had to get my hands on it. In this review, I’ll cover everything new, discuss performance and quality, and give you my thoughts on whether this pit lives up to the hype.
Camp Chef sent me this smoker for free in return for my honest review. All thoughts and opinions are my own.
Overview and first impressions
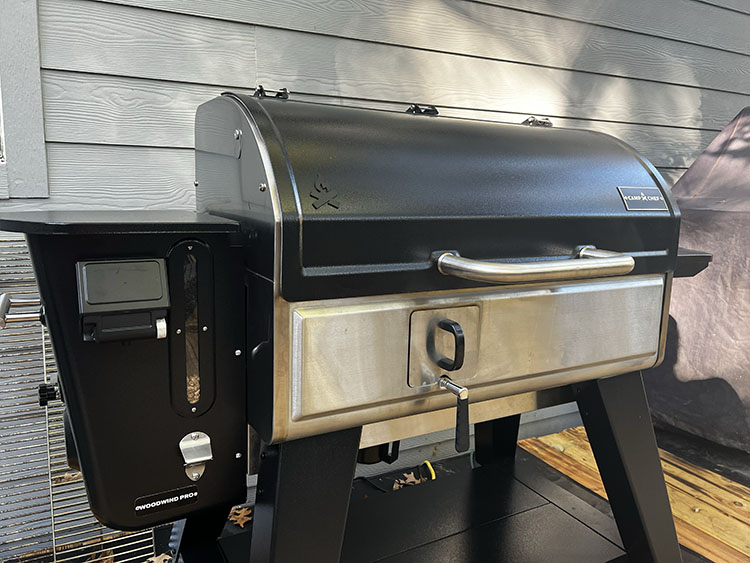
Like the original Woodwind, the Pro is available in 24 and 36-inch sizes. I chose the larger 36-inch grill for this review, but the features are identical.
I was glad that I opted for the 36” model as I like to load it up and cook a lot of food simultaneously without any space issues.
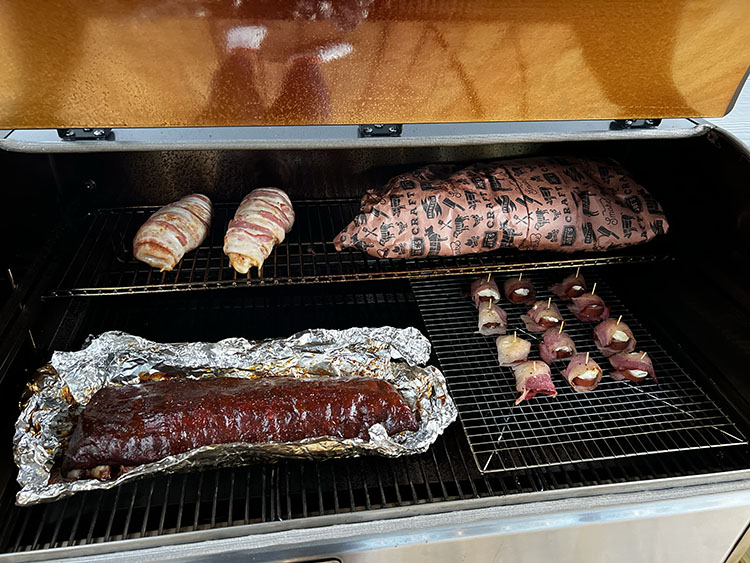
The 36″ Woodwind Pro has enough space to cook for a lot of people
Woodwind Pro Specifications
| Dimensions | 44.5 x 26 x 62″ (HWL) |
| Weight | 183lbs |
| Total Cooking Surface Area | 1236 sq. in. |
| Lower Rack Area | 663 sq. in. |
| Upper Rack Area | 573 sq. in. |
| Hopper Capacity | 22 lbs |
| Material: | Stainless Steel |
| Temperature Range | 60°F to 400°F |
| Warranty | 3 Years Limited |
| Price | Check latest price |
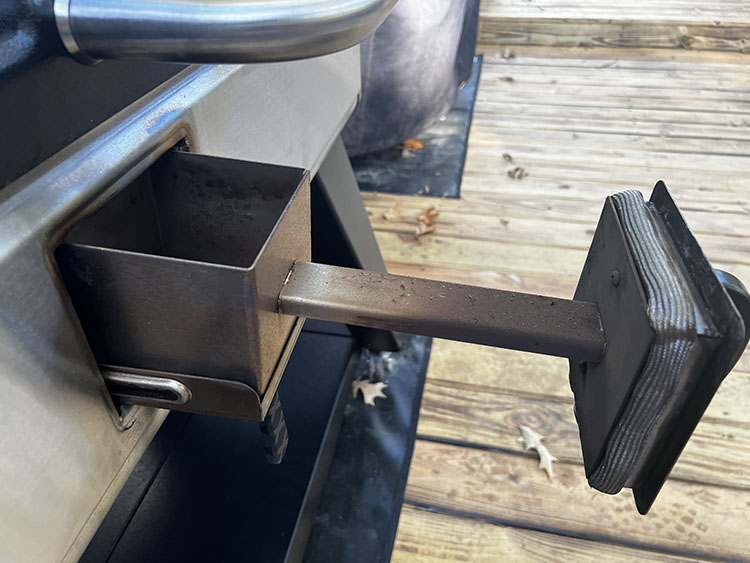
Obviously, the most interesting feature of the Woodwind Pro is the newly designed Smoke Box integrated into the bottom of the cooking chamber.
The box can be pulled out of the grill and filled with wood chunks, wood chips, or even charcoal. It also has a damper that allows you to adjust the amount of heat that the firebox transfers to the Smoke Box.
It takes 5 to 10 minutes for the Smoke Box to get up and running after you add your wood/charcoal, and it puts off a great deal more smoke than a typical pellet grill.
I’ll discuss what I think about the Smoke Box in more detail when I discuss my experience cooking on the pit.
If you’re wondering where the smokestack is, you won’t find one.
The smoker’s exhaust vents are on the back side, and an adjustable air intake is on top.
Camp Chef calls this the “Down & Out ventilation system.” It’s supposed to allow for even heat throughout the entire cooking chamber. This makes sense to me, as placing the chimney at one end of the smoker will pull heat across.
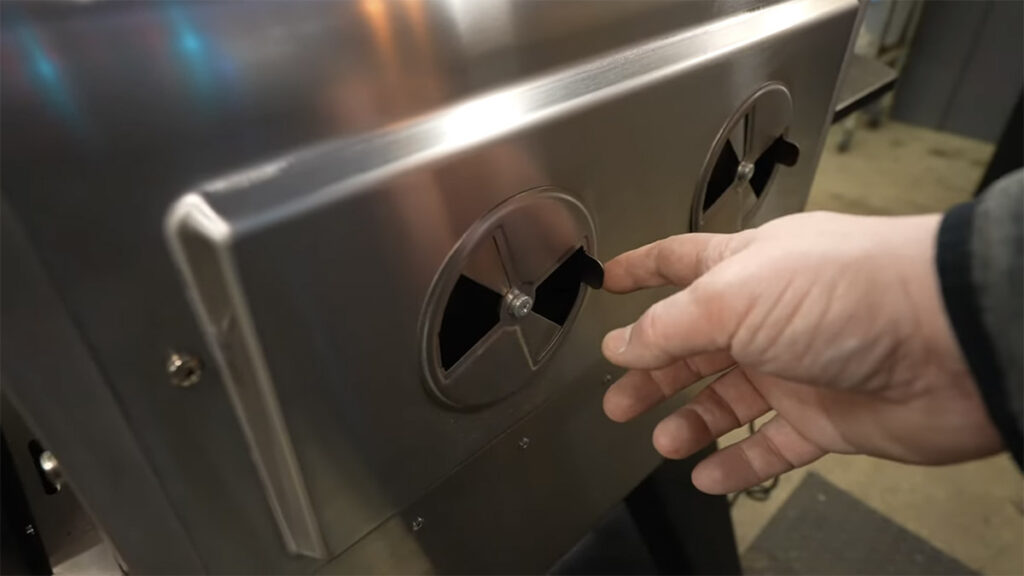
Adjustable exhaust vents on the back of the Woodwind Pro
I found the heat was directed throughout the cooking chamber very evenly.
I used an ambient probe on both sides of the grill and found that there was only a 2-to-3-degree difference in temperature from one end of the grill to the other.
Similar to other Camp Chef Models, the Woodwind Pro comes with a WiFi Controller that allows you to utilize the Camp Chef Connect app to monitor your cook directly from your phone via Bluetooth or WiFi. You can monitor and adjust the temperature and smoke level.
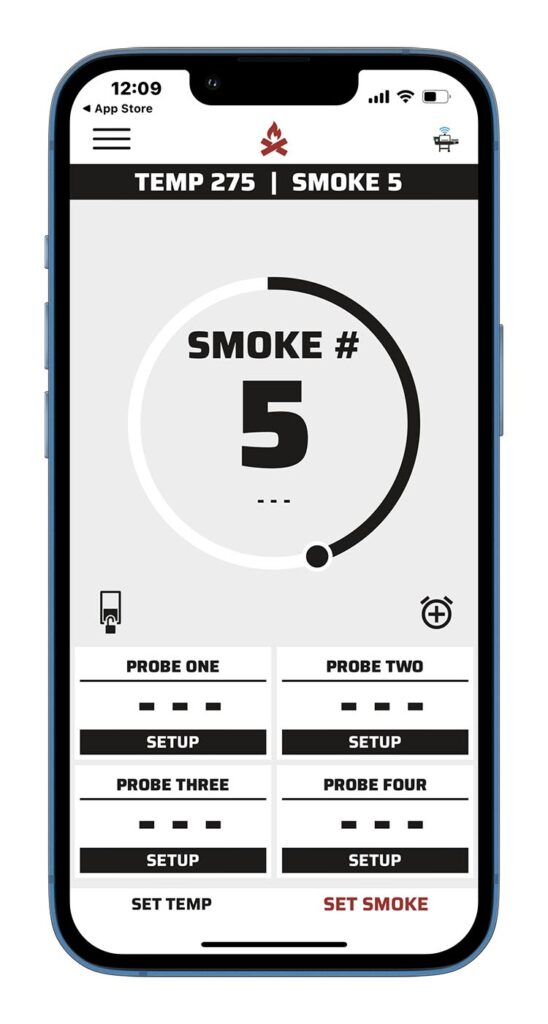
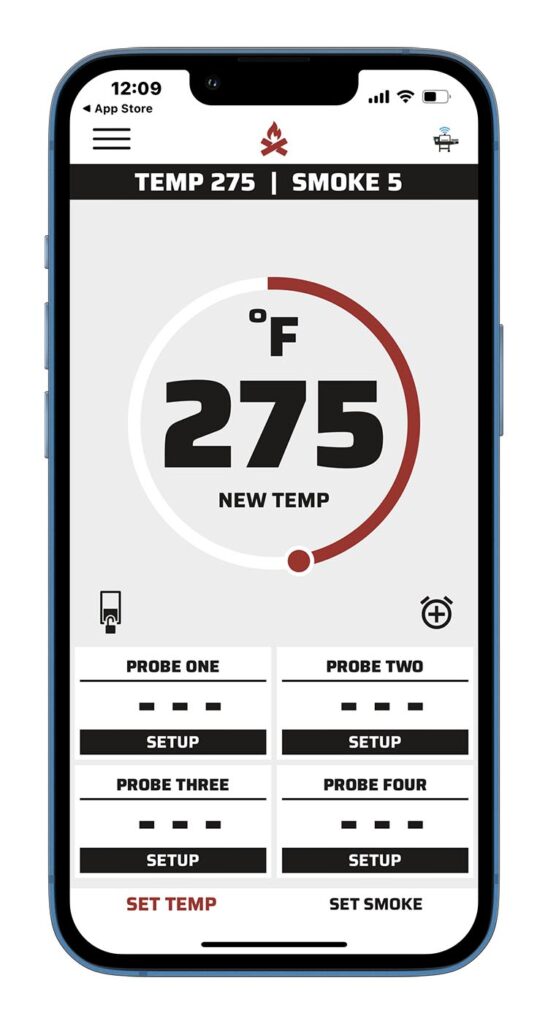
You also get the signature Camp Chef Smoke Number system that allows you to adjust the level of smoke on a scale from 1 to 10, depending on the amount of smoke you want to cook with.
When you combine this with the Smoke Box, you’ve got more options to ramp up or down smoke production than any other pellet grill I’ve tested.
The Woodwind Pro is also Sidekick compatible, so you can add any of the Camp Chef cooking accessories like the pizza oven, flat top, or sear grill to your pellet grill.
What I Like:
- The Addition of the Smoke Box – Adding an extra layer of smoke with lump charcoal or wood chunks is a game changer pellet grills.
- Black Exterior – I like that Camp Chef switched from the all-stainless design and opted to paint the chamber black. It helps keep the grill looking cleaner longer.
- Easy-to-Use Control Screen – I have always loved the ease of use when it comes to Camp Chef pellet grills, and the Woodwind Pro is no exception. The screen is in color and very easy to navigate.
- Smoke Level Adjustability – This is not a new Pro feature, but it’s still great to be able to choose a smoke level on scale from 1 to 10.
What I Don’t Like:
- No Cabinet Door – I wish that there was an option to purchase the grill with a cabinet door below the chamber in lieu of the open-air rack. It would be nice to store grilling accessories in an enclosed space.
- Size of the Smoke Box – I wish the Smoke Box was just slightly larger. I can only fit 2 to 3 regular-sized chunks of wood/lump charcoal and have found that I have to add more every hour or so.
- No Ash Pan for Smoke Box – I wish there were a removable ash pan below the smoke box. I’ve found that when I use it, I end up with a lot of ash in the chamber of the grill, therefore needing to clean it a bit more often.
Firing up the Woodwind Pro for the first time
I really wanted to put this grill to the test, and I figured there was no better way to test out a new smoker than with a brisket, a pork butt, and a rack of baby back ribs.
The first thing that impressed me was the capacity of the hopper. It holds up to 22 lbs of pellets, so you can cook all day without worrying about running out. I also like that there is a long window down the edge of the hopper, which allows you to see your pellet level at all times without opening the hopper.
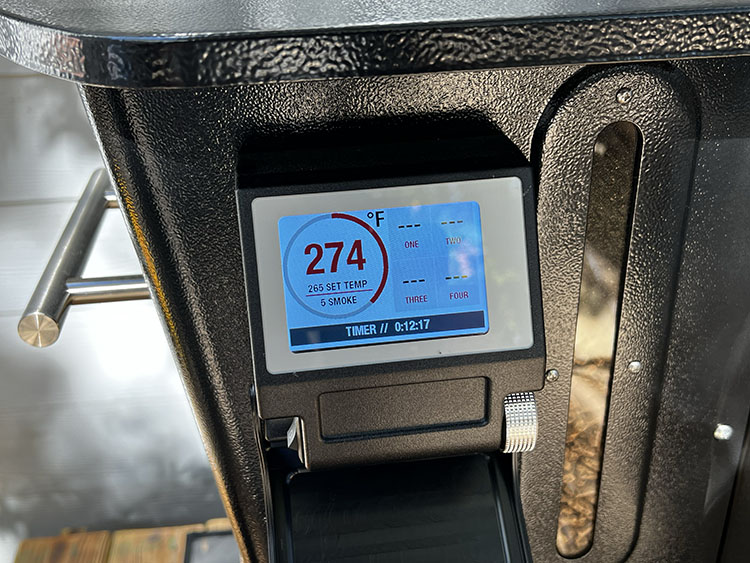
Like the other Camp Chef models, the Woodwind Pro has a full-color screen controller and four built-in meat probe ports. A small dial on the side makes the screen very easy to navigate and doubles as a button to make your desired selections.
Another thing I noticed about the Woodwind Pro that I did not have on my older Woodwind model was that the entire cooking chamber has a gasket around the edge where the door sits.
I really like this feature because it allows some insulation and reduces the amount of smoke lost during the cooking process.
After I completed the initial seasoning and burn-in, I fired it up to 250°F and set the Smoke Number to a 5 (out of 10).
The grill has an integrated start-up process that takes about 6 minutes to ignite the pellets, and it took a total of 12 minutes to get up to the 250°F temperature I had it set at.
The new smoke box
The biggest talking point about this grill is the addition of the Smoke Box, so I wanted to give a little overview of what it is, how it works, and whether it’s legit or a gimmick.
The Smoke Box is located just to the left of the center of the cooking chamber on the bottom side.
You can use it to add lump charcoal, wood chunks, or wood chips that will burn simultaneously with the pellets.
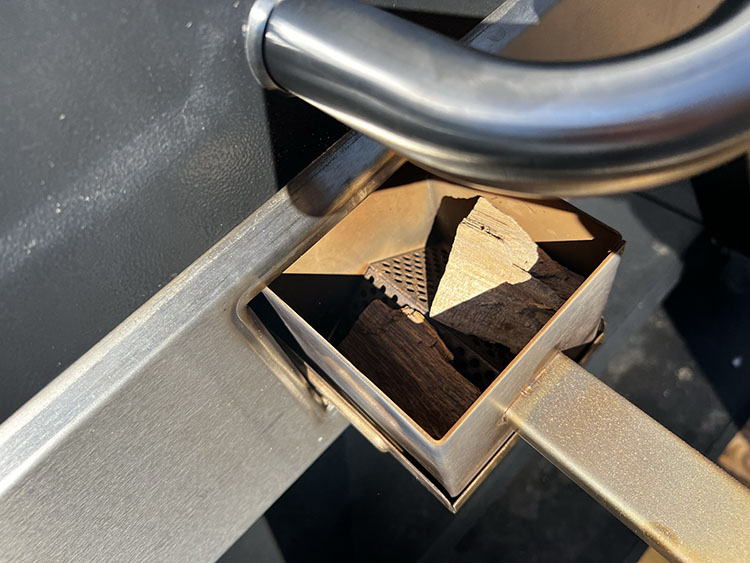
The burning pellets from the firebox ignite the contents of the Smoke Box, and it only takes a few minutes to start putting off more smoke during the cooking process.
The box is attached to a long handle that you can pull out from the grill to add wood/charcoal. There is also a damper located just below the box that you can use to adjust how much heat/smoke you want to use.
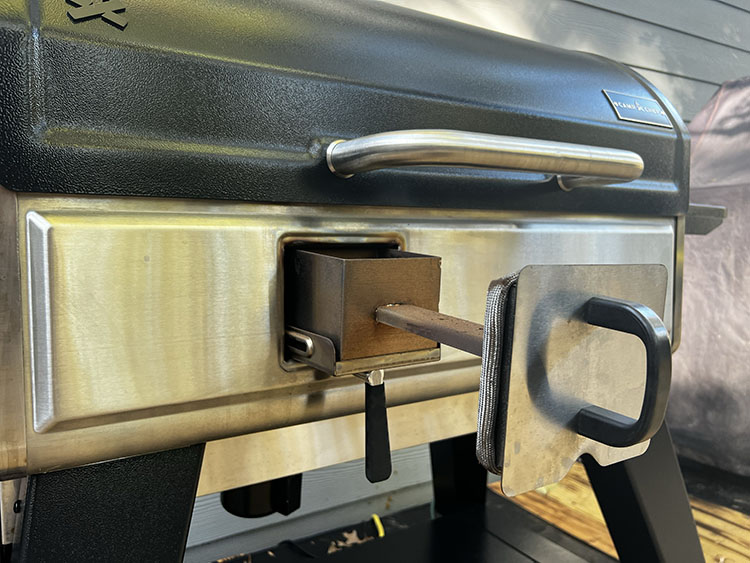
Using the Smoke Box is optional. The grill functions just fine as a regular pellet grill without it, but if you want to add an extra layer of smoke and flavor to your cooks, it’s great to have.
The capacity is a bit smaller than I would have liked. I can only fit two to three pieces of lump charcoal or small wood chunks in the area provided, but it definitely does what it is supposed to do and puts off a good amount of additional smoke.
In my experience, the Smoke Box burns for about an hour, though closing the damper would probably give you a bit more time.
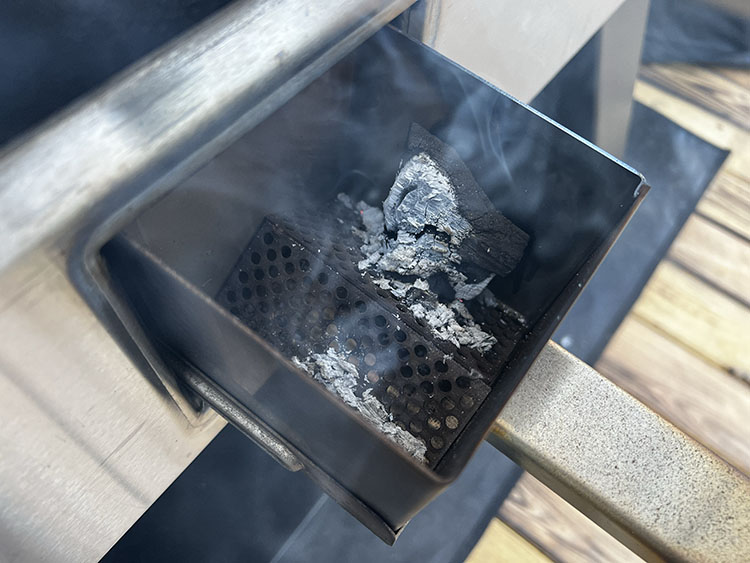
After the wood or charcoal burns out, you simply pull out the Smoke Box and add more.
I like to dump the ashes as much as I can before adding more so they don’t build up too much, but beware—the Smoke Box gets very hot.
I don’t think the Smoke Box is a gimmick at all. I think it is the perfect answer to people that want the ease of a pellet grill but still want the smoke flavor that you get from a traditional wood-burning smoker. It allows you to have the best of both worlds, and I think Camp Chef really nailed the design.
Overall build quality
The Woodwind Pro is definitely an upgrade from the original Woodwind models. It is thicker, heavier, and a lot more rugged. The new legs are more stable, and the storage shelf at the bottom feels sturdier and can hold more weight.
One key component of the new build quality is the addition of an insulation gasket around the cooking chamber’s doorframe. When we were assembling the grill, it was one of the first things I noticed, and I was pleasantly surprised! It allows your grill to stay extra insulated while cooking.
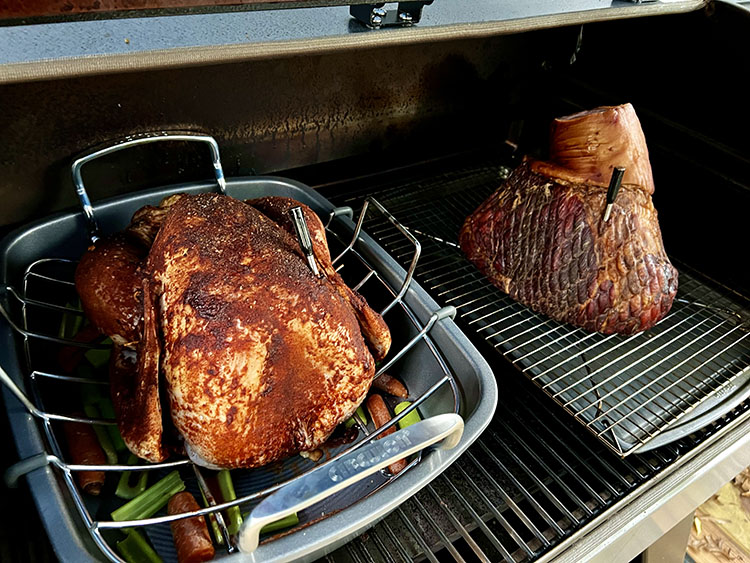
The gasket runs along the bottom of the door to keep smoke from leaking
The entire grill is built from high grade stainless steel. This allows the grill to hold heat better and protects against rust and corrosion over time. The stainless steel on the inside of the grill is 430 Stainless, and the valve, gasket, and burn cup are all 304 stainless steel.
Cleaning and maintenance
Between cooks, there isn’t much you need to do. The Ash Cleanout system is really handy and allows you to pull a knob and dump your ash with ease.
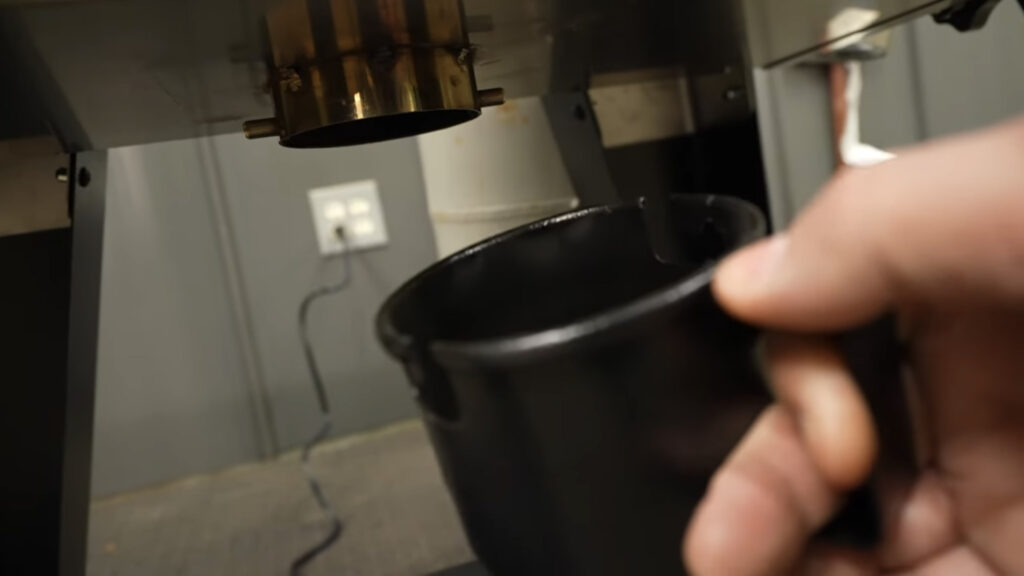
Removable ash pot makes cleanup easy.
As pellets burn, they create ash. Instead of having that ash build up inside the chamber of your grill (which would require you to use a Shop Vac to clean out), the ash from the pellets drops down into the Ash Cleanout at the bottom of the grill.
To empty it, you simply have to unscrew the knob and dump out the ash – then replace the knob and you’re ready to keep on smoking!
I make dumping the ash part of my start-up process with the grill. It is A LOT easier to clean up ash than on any other pellet grill I’ve used.
Camp Chef also recommends doing a deep cleaning about every 50 hours of cooking. If you don’t cook on your grill very often, this could be as infrequently as every several months. You want to clean the internal temperature probe with a mixture of vinegar and water a little more often as well because if it has too much build-up, then the grill won’t operate properly.
Overall, cleaning and maintenance are pretty easy on this grill. You only need to really disassemble it every 50 hours or so and give it a good scrub, but between normal cooks, it is as simple as just emptying the Ash Cleanup.
Performance and flavor
Now, let’s talk about the most important thing – how does it cook?
As I mentioned before, I started with a 14lb brisket, an 8lb pork butt, and a rack of pork baby back ribs.
Brisket:
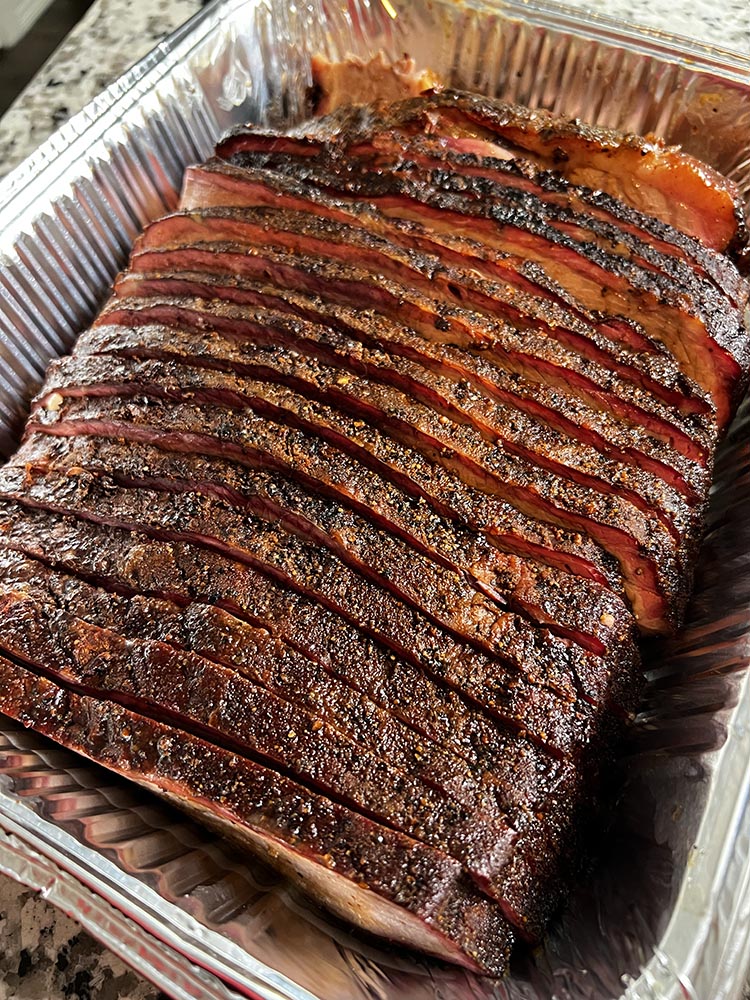
The brisket took about 16 hours to reach 203°F internally, and I wrapped it around 180°F when the bark was nice and set. The smoker held a consistent temperature throughout the entire cook, and I had to add more pellets around the 10-hour mark.
I used the Smoke Box to add chunks of pecan wood throughout the cook and left the damper on the widest open setting. Each time I added a couple of chunks of wood, they took around an hour or so to completely burn out, and I definitely saw an increase in the amount of smoke the grill was producing while they were burning.
The brisket had an amazing smoke flavor and was cooked very evenly. I would venture to say it was one of the best brisket I’ve ever smoked on a pellet grill.
Pork Butt:
I had an 8lb bone-in pork butt, and it took about 12 hours to reach 203°F internal. I used my tried-and-true Competition Style Pork Butt recipe for this cook. I wrapped it around the 165°F, and the bark was absolutely beautiful.
I filled the hopper with pellets at the start of the cook, and similar to the brisket, I had to add more pellets around the 10-hour mark. I filled the Smoke Box with a mixture of pecan chunks and lump charcoal for this cook.
It had a gorgeous smoke ring and deep smoke flavor. It was honestly some of the best pork I have ever smoked in my life.
Baby Back Ribs:
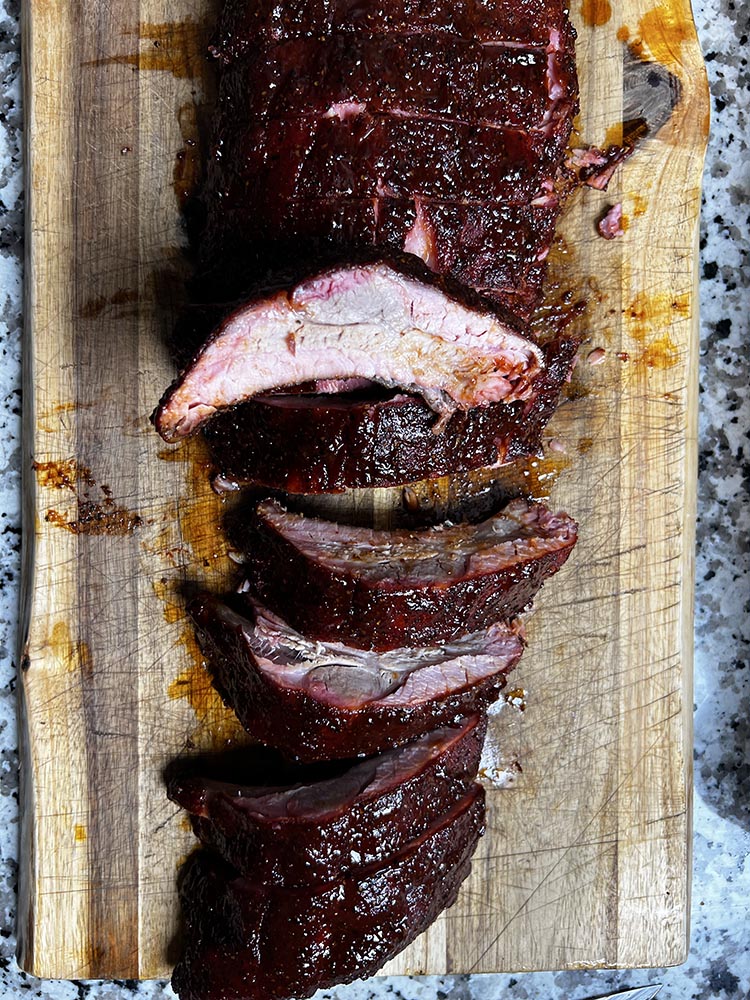
I always like to smoke a rack of ribs on a new smoker because I feel like they really tell a lot about a grill’s performance. The Woodwind Pro held a steady temperature at 250°F during the entire cook, so my ribs cooked evenly.
I wrapped them in foil after about 2 hours, then let them smoke for another hour and a half. Then I opened them up and glazed them with a bit of barbecue sauce before smoking them for one more hour. The entire cook took 4-1/2 hours, and the ribs were cooked to perfection. They had a nice smoke ring and a distinct smoky flavor that really impressed me.
Cold smoke
Another cool feature of this smoker is the Fan Mode, which allows you to cold-smoke food as well, depending on the ambient weather conditions.
You simply need to add two chunks of charcoal to the Smoke Box and add a few small chunks of wood on top.
Then fire up the grill as you normally would. Once the start-up has finished, go into the temperature settings and choose “FAN ONLY” mode and add a pan of ice to your grill.
This will allow you to ignite the Smoke Box while not increasing the grill temperature by igniting pellets.
I haven’t tested this feature out yet, so I’ll update the review once I’ve done some cooling smoking.
No-hassle warranty
One thing I really love about Camp Chef products is that the company stands behind the products they sell.
They include a 3-year Limited Warranty from the date of purchase, and they guarantee their products are free from defects in all materials and workmanship. If you run into issues during the warranty period, the customer support team will troubleshoot the issue and send replacement parts at no charge to the consumer.
Similar to just about every other grill on the market, the warranty does not cover normal wear-and-tear, nor does it extend to issues resulting from misuse, abuse, or alteration.
The Woodwind versus the Woodwind Pro
Camp Chef still sells the non-Pro Woodwind, which has also had a facelift recently.
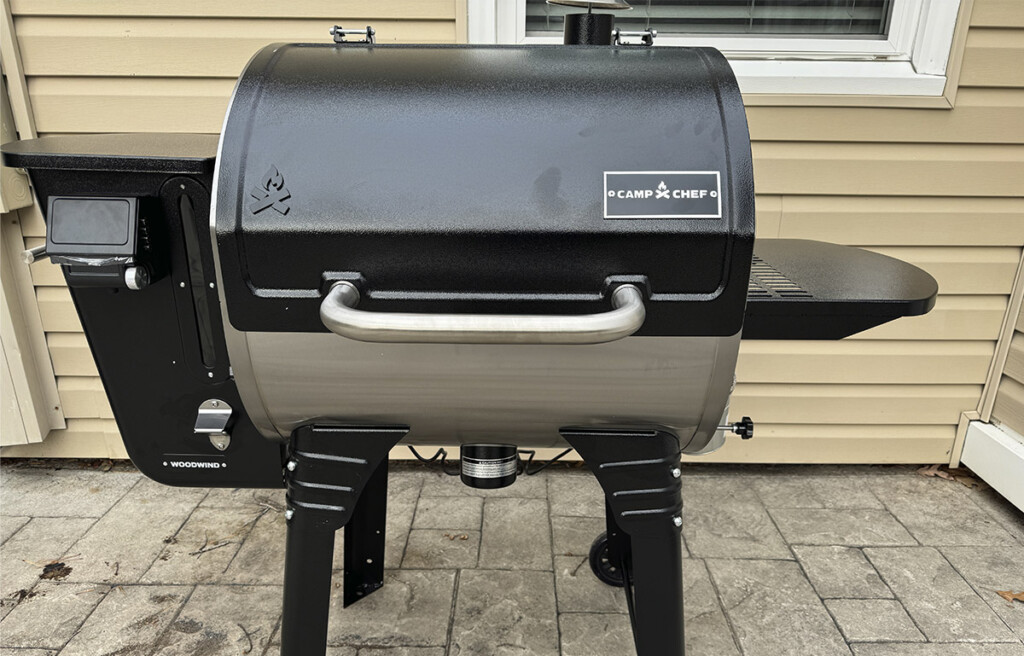
Woodwind 24
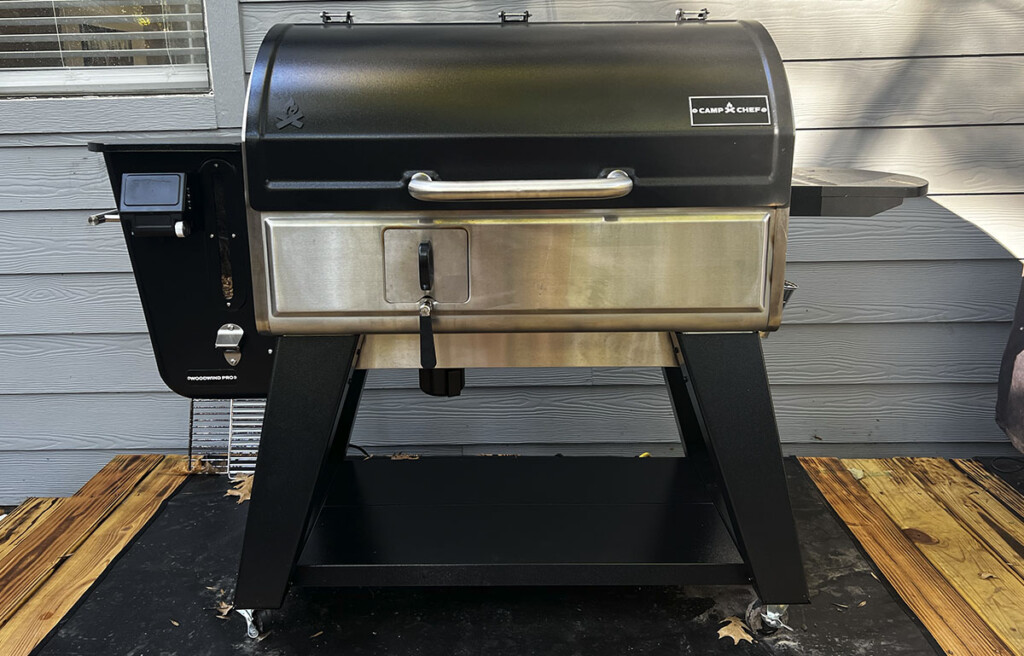
Woodwind Pro
My answer to which one you should get is that “it depends.”
You need to ask yourself what you want in a pellet grill. I own the former Woodwind model, and I absolutely love that grill. It has many of the functions that the Woodwind Pro has (e.g., Smoke Number, Camp Chef Connect, etc.) and it is a solid grill that I would recommend to anyone.
There are two things that, in my mind, really differentiate the Woodwind from the Woodwind Pro:
- The Smoke Box
- The Build Quality
The Smoke Box is unique to the Camp Chef Woodwind Pro. If you want to have the ability to add charcoal or wood chunks during the cooking process, then I recommend the Pro. It is also much heavier, sturdier, and more well-constructed than the former model (which I believe accounts for most of the increased price).
It really comes down to what you’re looking for and what you’re willing to spend. I personally think it is 100% worth the extra expense.
Two-year update
I first reviewed the Woodwind Pro after owning it for a few weeks back in December of 2022.
I’ve been cooking on it regularly ever since, using it as one of my main smokers for recipe development and cooking food for my family.
I’m happy to report zero issues with maintenance or parts over that time. I didn’t mention it during my initial review, but I’ve come to appreciate how the four-locking castor wheels make this smoker easy to move around.
I still recommend this pit for anyone who wants to focus on barbecue, although you can expand the versatility even further with the Sidekick.
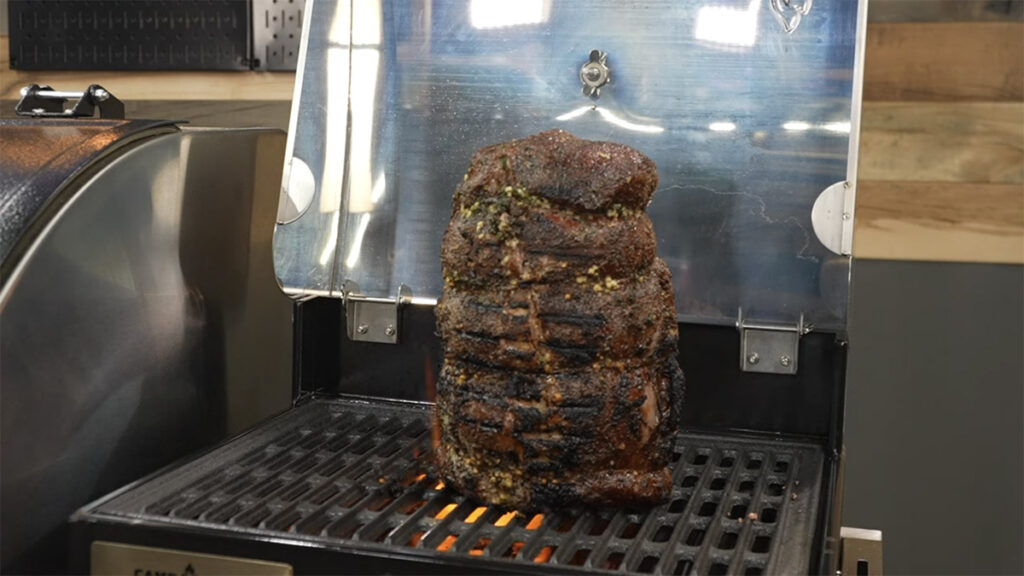
The Sidekick is fantastic for reverse searing large cuts of meat.
I will say that the new Weber Searwood gives the Woodwind Pro a run for its money, especially for the price.
Should you buy the Camp Chef Woodwind Pro?
I can confidently recommend this smoker for both beginners and seasoned pitmasters alike. The ability to add real wood chunks, chips, and even charcoal to your pellet smoker gives you the best of both worlds.
You get the ease and functionality of a traditional pellet grill, but you can add additional layers of smoke and flavor to your cooks as well when you want to.
I had zero issues with any of the cooks that I have done so far, and each one came out fantastic. I believe this is the best pellet grill on the market currently at this price range.
 Backyard GrillingWeekend WarriorsAdvice from DadBeard GroomingTV Shows for Guys4x4 Off-Road CarsMens FashionSports NewsAncient Archeology World NewsPrivacy PolicyTerms And Conditions
